Scripting the setup of a developer PC, Part 2 of 4 – Installing Frameworks and Components with WebPI

This is part two of a four part series on attempting to automate installation and setup of a development PC with a few scripts and some funky tools. If you haven’t already, why not read the introductory post about ninite? Disclaimer: this series was inspired by a blog from Maarten Balliauw.

Installing Frameworks and Components: WebPI

Microsoft’s Web Platform Installer makes finding and installing MS applications and components quite easy by bringing the way to find and install them into one central portal (when it works properly, that is.. grumblegrumble..):

image

It also comes in a command line flavour so you can script your component installation, and that’s what I’ll be using.

The list of available packages can be found with the “/list:available” parameter and it’s pretty long.

You can specify custom XML feeds to define your own products and applications to be installed; something that might be interesting to spin up a new instance of your company website on a new server, if you set your web server to run webpi from commandline using a custom feed pointing to the latest stable build of your web application (that’ll be an interesting follow up post at some point I think)!

A summary of the parameters available to you can be found here.

Fire up a command line and run “WebpiCmdLine.exe /List:available” to get a list of available products and applications. It didn’t look exhaustive to me, so I checked the xml locations listed at the beginning of this command:

For the current version of the WebPI (at time of writing this is v3.0) these are:

https://www.microsoft.com/web/webpi/3.0/webproductlist.xml

https://www.microsoft.com/web/webpi/3.0/webapplicationlist.xml

https://www.microsoft.com/web/webpi/3.0/mediaproductlist.xml

https://www.microsoft.com/web/webpi/3.0/toolsproductlist.xml

https://www.microsoft.com/web/webpi/3.0/enterpriseproductlist.xml


Trawling through these xml files you can see that apparently you can install VS2010SP1…
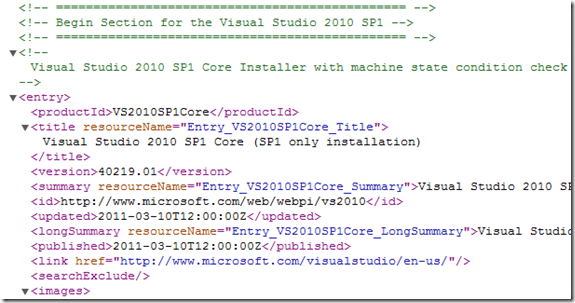
292111_autoinstall_webpi_VS2010SP1Core

…but not SQL Tools (other than Express). I’ll get onto this lot shortly.


So for the meantime I’m now adding some more to my script to set up the .Net frameworks, Powershell, and Windows Installers:


REM Ninite stuff
cmd /C "Z:\Installation\SetupDevPC\Ninite_DevPC_Utils.exe"

REM WebPI stuff 
cmd /C "Z:\Installation\SetupDevPC\webpicmdline.exe /AcceptEula /SuppressReboot /Products:PowerShell,PowerShell2,NETFramework20SP2,NETFramework35,NETFramework4"

cmd /C "Z:\Installation\SetupDevPC\webpicmdline.exe /AcceptEula /SuppressReboot /Products:WindowsInstaller31,WindowsInstaller45"

Notice the multiple products are comma delimited but without spaces; it bombs if you put a space after the comma.

You can split each product install out into its own webpicmdline.exe call, but this ends up reloading the five xml feeds for each product, which can take an age.

However, I’ve had to split it onto a couple of lines as the install of Windows Installer 4 fails if it’s on the same line as .Net 4. It also requires you to reboot, so since you’ve suppressed this you’ll see some log messages looking like “install: SUCCESS” then “verification: FAILURE”:

[code]Started downloading: WindowsInstaller45
DownloadedWindowsInstaller45
Started installing Products…
Started installing: WindowsInstaller45
Install completed (SuccessRebootRequired): Windows Installer 4.5
Reboot is required for product WindowsInstaller45. Install SUCCESS[/code]

YEY!!

[code]Verifying successful installation…
Windows Installer 4.5 False
Install of Products: FAILURE
Verifying successful log generation…
Windows Installer 4.5 Logs : False
Creation of Product Logs: FAILURE[/code]

uh.. BOOO! So you do actually need to reboot to get this to complete. As such, I’ve added in the final line for this file:

@echo off

REM Ninite stuff 
cmd /C "Z:\Installation\SetupDevPC\Ninite_DevPC_Utils.exe"

REM WebPI stuff 
cmd /C "Z:\Installation\SetupDevPC\webpicmdline.exe /AcceptEula /SuppressReboot /Products:PowerShell,PowerShell2,NETFramework20SP2,NETFramework35,NETFramework4" 

cmd /C "Z:\Installation\SetupDevPC\webpicmdline.exe /AcceptEula /SuppressReboot /Products:WindowsInstaller31,WindowsInstaller45"

shutdown /r /t 0 /d P:0:0

The install directory has grown a little bit too:
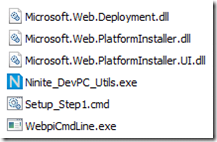
281211_autoinstall_webpi_dir_contents


It’s getting a bit trickier now. There are issues with this, and I’ll sum it all up in part 4. However, next up is some sweet goodness:

Scripting the setup of a developer PC, Part 3 of 4 – Installing.. uh.. everything.. with Chocolatey.

Update: there is now a v4 of WebPI command line that requires “/install” as the first parameter and is called WebPICmd instead of webpicmdline. Since I’d downloaded v3, that’s the version I’m scripting for. Check out v4 though, as it has added support for “offline mode”; you can download the installers and dependencies for any number of products (to a network share perhaps) and install from there instead of the interwebs – I will do a follow up article doing exactly that 😉
Scripting the setup of a developer PC, Part 1 of 4 – Installing Applications & Utilities with Ninite

Setting up a development PC can be a bit of a pain, unless you’re smart and create an image following the setup of a brand new vanilla install. But who’s organised enough to do that?! I’ll get onto that option in another post, but this one is more an excuse to play with interesting stuff.

I thought I’d have a play with coding up a set of scripts to do as much of this setup as possible instead; there are a few tools out there to do this sort of thing, and I’ve gone with ninite, webpi, and chocolatey.


I’ll start with the intended ideal option for each tool, and then go into how this doesn’t work perfectly and why, and what the other options are. Part 1 of this series of 4 is for the easiest tool of all:


Installing Applications & Utilities: ninite

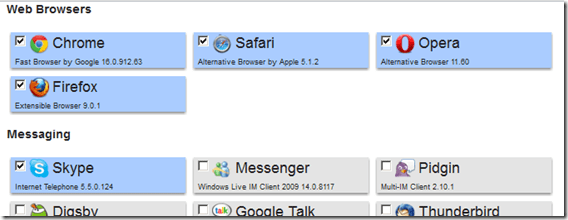
This site allows you to create a single exe installer which contains your own selection of a large number of applications/frameworks/utilities:

232111_autoinstall_ninite_web

For an ASP.Net developer PC I’ve gone with Chrome, Safari, Opera, Firefox, Skype, VLC, Flash, Air, Java, Silverlight, Launchy, 7-Zip, WinSCP, PuTTY, Notepad++, WinMerge, Paint.NET, PDFCreator, Reader, DropBox, and Everything Search for my installer. This installer can be called from the command line but the basic version still opens a graphical interface; however no interaction is required. The Pro version comes with a command line installer, but I’ll not be using that.

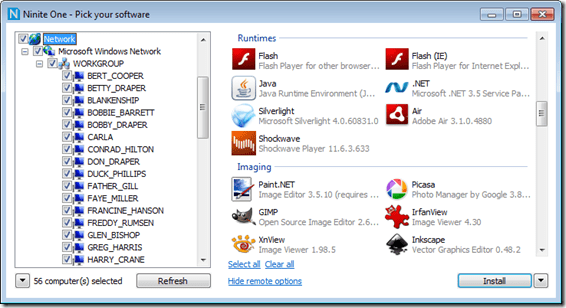
Ninite Pro is absolutely awesome: you can remotely manage installed software and software patches within your network with a silent install process.

232111_autoinstall_ninite_pro


So far my install script set looks like this; pretty bare:

[batch]@echo off
REM Ninite stuff
cmd /C Z:\Installation\SetupDevPC\Ninite_DevPC_Utils.exe[/batch]

And the installation directory is merely one script and one exe:

281211_autoinstall_ninite_dir_contents

That was dead simple! Lovely! Coming up next – something a bit messier:

Scripting the setup of a developer PC, Part 2 of 4 – Installing Frameworks and Components with WebPI.

My first productionised powershell script

I’ve been tooling around with powershell recently, trying to teach myself some basics, and a recent support request which would have previously been done manually looked like a perfect opportunity for a little ps1 script.

The request was to disable a feature on the website which is configured from a setting in the web.config file on each server. Since web.configs are xml files, I thought I could treat it as such, traversing and editing values as needed.

So here it is; pretty lengthy for what it’s doing since I don’t know the nicer ways of doing some things (e.g., var foo = (bar == baz ? 0 : 1), and var sna = !sna), and as such any comments to help out would be appreciated:

[powershell]
function ValueToText([string] $val){
if ($val -eq "1"){return "enabled"}
else {return "disabled"}
}

[System.Xml.XmlDocument] $xd = new-object System.Xml.XmlDocument
# pipe-delimited servers to work against
$servers = "192.168.0.1|192.168.0.2|192.168.0.3"

foreach ($server in $servers.Split("|")) {
write-host "Now configuring " $server

$file = "\\" + $server + "\d$\Web\web.config"
$xd.load($file)

# save a backup, just in case I snafu the site
$xd.save($file + ".bak")

# keys to edit
$nodelist = $xd.selectnodes("/configuration/appSettings/add[contains(@key,’Chat’)]")

foreach ($node in $nodelist) {
$key = $node.getAttribute("key")
$val = $node.getAttribute("value")
$setting = ValueToText($val)

$prompt = $key + " is currently " + $setting + ": toggle this? Y/N"
$toggle = read-host $prompt

if ($toggle -eq "Y" -or $toggle -eq "y"){
if ($val -eq "1") {$newbool = "0"}
else {$newbool = "1"}

$node.setAttribute("value", $newbool)

$newsetting = ValueToText($newbool)
$prompt = $key + " is now " + $newsetting
write-host $prompt
}
}
$xd.save($file)
}
write-host * done *
[/powershell]

It’s probably not much more than a “hello world”, but it certainly helped me out recently 🙂

TeamCity + Git + NuGet + AppCmd= automated versioned deployments V1

Attempting to implement a Continuous Deployment workflow whilst still having fun can be tricky. Even more so if you want to use reasonably new tech, and even more if you want to use free tech!

If you’re not planning on using one of the cloud CI solutions then you’re probably (hopefully) looking at something like TeamCity, Jenkins, or CruiseControl.Net. I went with TeamCity after having played with CruiseControl.Net and not liked it too much and having never heard of Jenkins until a few weeks ago.. ahem..

So; my intended ideal workflow would be along the lines of:

  • change some code
  • commit to local git
  • push to remote repo
  • TeamCity picks it up, builds, runs tests, etc (combining and minifing static files – but that’s for another blog post)
  • creates a nuget package
  • deploys to a private nuget repo
  • subscribed endpoint servers pick up/are informed of the updated package
  • endpoint servers install the updated package

Here’s where I’ve got with that so far:


1) On the development machine

a. Within your VisualStudio project ensure the bin directory is included

I need the compiled dlls to be included in my nuget package, so I’m doing this since I’m using the csproj file as the package definition file for nuget instead of a nuspec file.

Depending on your VCS IDE integration, this might have nasty implications which are currently out of scope of my proof of concept (e.g. including the bin dir in the IDE causes the DLLs to be checked into your VCS – ouch!). I’m sure there are better ways of doing this, I just don’t know them yet. If you do, please leave a comment!

In case you don’t already know how to include stuff into your Visual Studio project (hey, I’m not one to judge! There’s plenty of basic stuff I still don’t know about my IDE!):

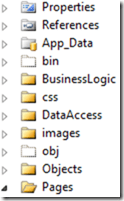
i. The bin dir not included:

vs2010_bin_excluded

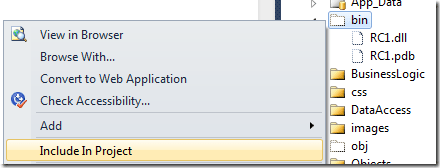
ii. Click the “don’t lie to me“ button*:

vs2010_dltm

iii. Select “include in project”:

vs2010_bin_include_dialog

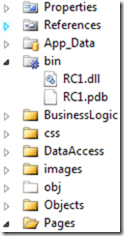
iv. The bin dir is now included:

vs2010_bin_included


b. Configure source control

Set up your code directory to use something that TeamCity can hook into (I’ve used SVN and Git successfully so far)

That’s about it.


2) On the build server

a. Install TeamCity

i. Try to follow the instructions on the TeamCity wiki

b. Install the NuGet package manager TeamCity add in

i. Head to the JetBrains TeamCity public repo

ii. Log in as Guest

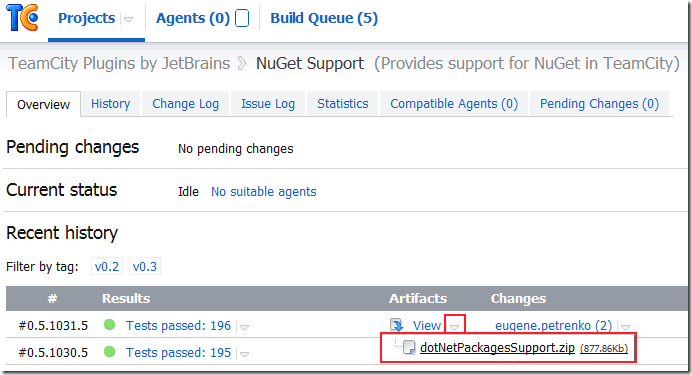
iii. Select the zip artifact from either the latest tag (or if you’re feeling cheeky the latest build):

teamcity_nuget_plugin_1

iv. Save it into your own TeamCity’s plugins folder

v. Restart your TeamCity instance

(The next couple of steps are taken from Hadi Hariri’s blog post over at JetBrains which I followed to get this working for me)

vi. Click on Administration | Server Configuration. If the plug-in installed correctly, you should now have a new Tab called NuGet

adminpanelnuget

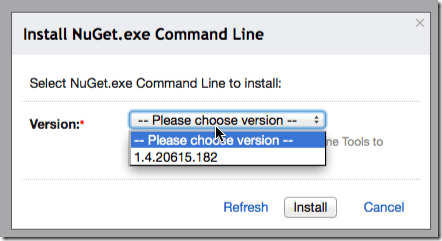
vii. Click on the “Install additional versions of the NuGet.exe Command Line”. TeamCity will read from the feed and display available versions to you in the dialog box. Select the version you want and click Install

nugetversion


c. Configure TeamCity

i. Set it up to monitor the correct branch

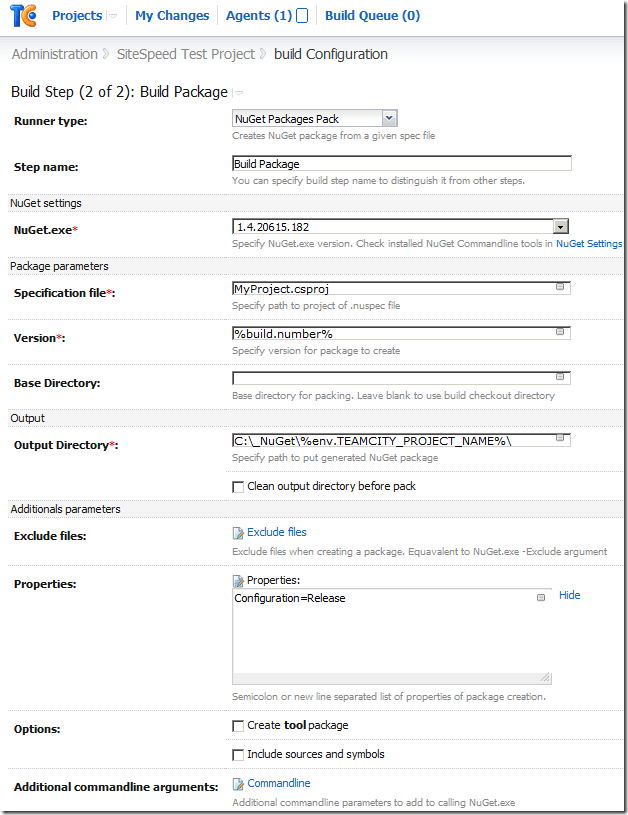
ii. Create a nuget package as a build step, setting the output directory to a location that can be accessed from your web server; I went for a local folder that had been configured for sharing:

teamcity_nuget_1

In addition to this, there is a great blog post about setting your nuget package as a downloadable artifact from your build, which I’m currently adapting this solution to use; I’m getting stuck with the Publish step though, since I only want to publish to a private feed. Hmm. Next blog post, perhaps.


3) On the web server (or “management” server)

a. Install NuGet for the command line

i. Head over to http://nuget.codeplex.com/releases

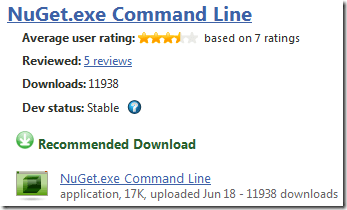
ii. Select the command line download:

nuget_cmdline_dl

iii. Save it somewhere on the server and add it to your %PATH% if you like


b. Configure installation of the nuget package

i. Get the package onto the server it needs to be installed on

Using Nuget, install the package from the TeamCity package output directory:
[code]nuget install "<MyNuGetProject>" –Source <path to private nuget repo>[/code]
e.g.
[code]nuget install "RposboWeb" –Source \\build\_packages\[/code]
This will generate a new folder for the updated package in the current directory. What’s awesome about this is it means you’ve got a history of your updates, so breaking changes notwithstanding you could rollback/update just by pointing IIS at a different folder.

Which brings me on to…

ii. Update IIS to reference the newly created folder

Using appcmd, change the folder your website references to the “content” folder within the installed nuget package:
[code]appcmd.exe set vdir "<MyWebRoot>/" /physicalpath:"<location of installed package>\content"[/code]
e.g.
[code]appcmd.exe set vdir "RposboWeb/" /physicalpath:"D:\Sites\RposboWeb 1.12\content"[/code]

So, the obvious tricky bit here is getting the name of the package that’s just been installed in order to update IIS. At first I thought I could create a powershell build step in TeamCity which takes the version as a parameter and creates an update batch file using something like the below:
[code]param([string]$version = "version")
$stream = [System.IO.StreamWriter] "c:\_NuGet\install_latest.bat"
$stream.WriteLine("nuget install \"<MyNugetProject>\" –Source <path to private nuget repo>")
$stream.WriteLine("\"%systemroot%\system32\inetsrv\appcmd.exe\" set vdir \"<MyWebRoot>/\" /physicalpath:\"<root location of installed package>" + $version + "\content\"")
$stream.Close()[/code]
However, my powershell knowledge is miniscule so this automated installation file generation isn’t working yet…

I’ll continue working on both this installation file generation version and also a powershell version that uses IIS7 administration provider instead of appcmd.
 

In conclusion

  • change some code – done (1)
  • commit to local git – done (1)
  • push to remote repo – done (1)
  • TeamCity picks it up, builds, runs tests, etc – done (2)
  • creates a nuget package – done (2)
  • deploys to a private nuget repo – done (2)
  • subscribed endpoint servers pick up/are informed of the updated package – done/in progress (3)
  • endpoint servers install the updated package – done/in progress (3)

 
Any help on expanding my knowledge gaps is appreciated – please leave a comment or tweet me! I’ll add another post in this series as I progress.
 

References

NuGet private feeds
http://haacked.com/archive/2010/10/21/hosting-your-own-local-and-remote-nupack-feeds.aspx
http://blog.davidebbo.com/2011/04/easy-way-to-publish-nuget-packages-with.html
 
TeamCity nuget support
http://blogs.jetbrains.com/dotnet/2011/08/native-nuget-support-in-teamcity/
 
Nuget command line reference
http://docs.nuget.org/ | http://docs.nuget.org/docs/reference/command-line-reference
 
IIS7 & Powershell
http://blogs.iis.net/thomad/archive/2008/04/14/iis-7-0-powershell-provider-tech-preview-1.aspx
http://learn.iis.net/page.aspx/447/managing-iis-with-the-iis-70-powershell-snap-in/
http://technet.microsoft.com/en-us/library/ee909471(WS.10).aspx
 

* to steal a nice quote from Scott Hanselman