nuget: cannot prompt for input in non-interactive mode

If you’ve ever seen this annoying error in your various build server logs, or even when running msbuild locally from the command line, you’re probably getting annoyed.

There are a few solutions (such as including the user credentials in plain text in a config file – eep!) but this is one which I’ve used when I really get stuck.

Ensure you’re logged in as the user which will be running the builds (if not yourself), and update the nuget source reference (which will be in a user-specific appdata config file) with the password:

nuget sources update -Name <whatever you called it> -source http://your.nuget.repo/authed/feed/ -User <your username> -pass <your pwd>

This will save an encrypted password in a user-specific config file on that computer, and should mean you don’t get prompted for that source anymore.

Several more options are detailed over here: http://www.xavierdecoster.com/nuget-package-restore-from-a-secured-feed

My NuGet

Want your own NuGet repo? Don’t want to pay for MyGet or similar?

Here’s how I’ve done it recently at Mailcloud (over an espresso that didn’t even have time to get cold – it’s that easy)

Setting up a NuGet Server

Creating your own nuget server could barely be any easier than it is now.

Open Visual Studio -> New Project -> WebSite

visual studio new website

Empty Website

visual studio empty azure website

Open Package Manager/Console -> Install-Package Nuget.Server

install nuget server

It’ll look something like this afterwards:

nuget server installed

Add API key to appsettings

nuget server add api key

For the API key: I just grabbed mine from newguid.com:
newguid.com

Publish site

If you’re using Azure and you selected the “Create remote resources” back at the start when creating the project, you can just push this straight out to the newly created website with a right click on the project -> publish :

publish azure website

Or use powershell, or msbuild to webdeploy, or ftp it somewhere, or keep it local – your call, buddy!

And that’s the hard part done 🙂

Using it

First visit

nuget server first visit

If you haven’t configured an API key then the first visit page will alert you to this.

Push a package

This is done in the usual manner – don’t forget your API key:

push a package

Check the repo

pushed package

Let’s reference our shiny new nuget repo:

Add a new source

Edit your Package Manager settings and add in a new source, using your new repo:

package manager sources

Find your packages!

Now you can open Package Manager window or console and find your pushed nuget package:

new source packages

Happy packaging!

Using NuGet at Mailcloud

So what is NuGet, anyway?

Intro

When working with shared functionality across multiple .Net projects and team members, historically your options are limited to something like;

  1. Copy a dll containing the common functionality into your solution
  2. Register the dll into the GAC on whichever machine it needs to run
  3. Reference the project itself within your solution

There are several problems with these such as;

  • ensuring all environments have the correct version of the dll as well as any dependencies already installed
  • tight dependencies between projects, potentially breaking several when the shared project is updated
  • trust – is this something you’re willing to install into a GAC if it’s from a 3rd party?
  • so many more, much more painful, bad bad things

So how can you get around this pain?

I’m glad you asked.

Treasure! Rubies, Gems, oh my.

ruby

The ruby language has had this problem solved for many, many years – since around 2004, in fact.

Using the gem command you could install a ruby package from a central location into your project, along with all dependencies, e.g.:

gem install rails --include-dependencies

This one would pull down rails as well as packages that rails itself depended on.

You could search for gems, update your project’s gems, remove old versions, and remove the gem from your project entirely; all with minimal friction. No more scouring the internets for information on what to download, where to get it from, how to install it, and then find out you need to repeat this for a dozen other dependent packages!

You use a .gemspec file to define the contents and meta data for your gem before pushing the gem to shared repository.

Pe(a)rls of Wisdom

cpan

Even ruby gems were borne from a frustration that the ruby ecosystem wasn’t supported as well as Perl; Perl had CPAN (Comprehensive Perl Archive Network) for over a DECADE before ruby gems appeared – it’s been up since 1995!

Nubular / Nu
Nubular

If Perl had CPAN since 1995, and ruby had gems since 2005, where is the .Net solution?

I’d spent many a project forgetting where I downloaded PostSharp from or RhinoMocks, and having to repeat the steps of discovery before I could even start development; leaving the IDE in order to browse online, download, unzip, copy, paste, before referencing within the IDE, finding there were missing dependencies, rinse, repeat.

Around mid-2010 Dru Sellers and gang (including Rob Reynolds aka @ferventcoder) built the fantastic “nu[bular]” project; this was itself a ruby gem, and could only be installed using ruby gems; i.e., to use nu you needed to install ruby and rubygems.


Side note: Rob was no stranger to the concept of .Net gems and has since created the incredible Chocolatey apt-get style package manager for installing applications instead of just referencing packages within your code projects, which I’ve previously waxed non-lyrical about

Once installed you were able to pull down and install .Net packages into your projects (again, these were actually just ruby gems). At the time of writing it still exists as a ruby gem and you can see the humble beginnings and subsequent death (or rather, fading away) of the project over on its homepage (this google group).

I used this when I first heard about it and found it to be extremely promising; the idea that you can centralise the package management for the .Net ecosystem was an extremely attractive proposition; unfortunately at the time I was working at a company where introducing new and exciting (especially open source) things was generally considered Scary™. However it still had some way to go.

NuPack

NuPack

In October 2006 Nu became Nu v2, at which point it became NuPack; The Epic Trinity of Microsoft awesomeness – namely Scott Guthrie, Scott Hanselman, and Phil Haack – together with Dave Ebbo and David Fowler and the Nubular team took a mere matter of months to create the first fully open sourced project that was central to an MS product – i.e., VisualStudio which was accepted into the ASP.Net open source gallery in Oct 2006

It’s referred to as NuPack in the ASP.MVC 3 Beta release notes from Oct 6 2010 but underwent a name change due to a conflict with an existing product, NUPACK from Caltech.

NuGet! (finally)

nuget

There was a vote, and if you look through the issues listed against the project in codeplex you can see some of the other suggestions.

(Notice how none of the names available in the original vote are “NuGet”..)

Finally we have NuGet! The associated codeplex work item actually originally proposed “Nugget”, but that was change to NuGet.

Okay already, so what IS NuGet?!

Essentially the same as a gem; an archive with associated metadata in a manifest file (.nuspec for nuget, .gemspec for gems). It’s blindingly simple in concept, but takes a crapload of effort and smarts to get everything working smoothly around that simplicity.

All of the details for creating a package are on the NuGet website.

Using NuGet at Mailcloud

We decided to use MyGet initially to kick off our own private nuget feed (but will migrate shortly to a self-hosted solution most likely; I mean, look at how easy it is! Install-Package NuGet.Server, deploy, profit!)

The only slight complexity was allowing the private feed’s authentication to be saved with the package restore information; I’ll get on to this shortly as there are a couple of options.

Creating a package

Once you’ve created a project that you’d like to share across other projects, it’s simply a matter of opening a prompt in the directory where your csproj file lives and running:

nuget spec

to create the nuspec file ready for you to configure, which looks like this:

<?xml version="1.0"?>
<package >
  <metadata>
    <id>$id$</id>
    <version>$version$</version>
    <title>$title$</title>
    <authors>$author$</authors>
    <owners>$author$</owners>
    <licenseUrl>http://LICENSE_URL_HERE_OR_DELETE_THIS_LINE</licenseUrl>
    <projectUrl>http://PROJECT_URL_HERE_OR_DELETE_THIS_LINE</projectUrl>
    <iconUrl>http://ICON_URL_HERE_OR_DELETE_THIS_LINE</iconUrl>
    <requireLicenseAcceptance>false</requireLicenseAcceptance>
    <description>$description$</description>
    <releaseNotes>Summary of changes made in this release of the package.</releaseNotes>
    <copyright>Copyright 2014</copyright>
    <tags>Tag1 Tag2</tags>
  </metadata>
</package>

Fill in the blanks and then run:

nuget pack YourProject.csproj

to end up with a .nupkg file in your working directory.

.nupkg

As previously mentioned, this is just an archive. As such you can open it yourself in 7Zip or similar and find something like this:
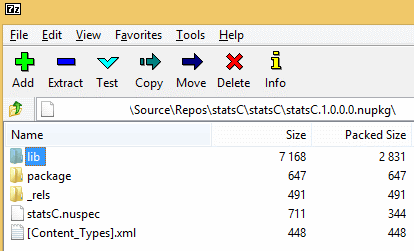
.nupkg guts

Your compiled dll can be found in the lib dir.

Pushing to your package feed

If you’re using MyGet then you can upload your nupkg via the MyGet website directly into your feed.

If you like the command line, and I do like my command line, then you can use the nupack command to do this for you:

nuget push MyPackage.1.0.0.nupkg <your api key> -Source https://www.myget.org/F/<your feed name>/api/v2/package

Once this has completed your package will be available at your feed, ready for referencing within your own projects.

Referencing your packages

If you’re using a feed that requires authentication then there are a couple of options.

Edit your NuGet sources (Options -> Package Manager -> Package Sources) and add in your main feed URL, e.g.

http://www.myget.org/F/<your feed name>/

If you do this against a private feed then an attempt to install a package pops up a windows auth prompt:
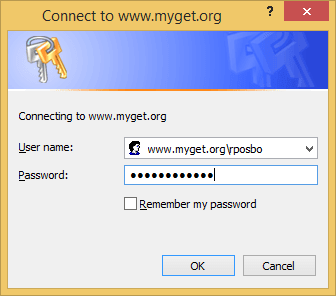
myget.auth

This will certainly work locally, but you may have problems when using a build server such as teamcity or VisualStudio Online due to the non-interactive authentication.

One solution to this is to actually include your password (in plain text – eep!) in your nuget.config file. To do this, right click your solution and select “Enable Package Restore”.
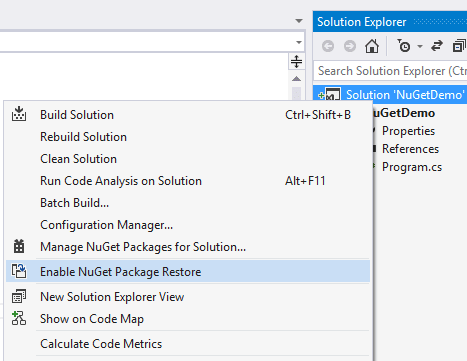
package restore

This will create a .nuget folder in your solution containing the nuget executable, a config file and a targets file. Initially the config file will be pretty bare. If you edit it and add in something similar to the following then your package restore will use the supplied credentials for the defined feeds:

<?xml version="1.0" encoding="utf-8"?>
<configuration>
  <solution>
    <add key="disableSourceControlIntegration" value="true" />
  </solution>
  <packageSources>
    <clear />
    <add key="nuget.org" value="https://www.nuget.org/api/v2/" />
    <add key="Microsoft and .NET" value="https://www.nuget.org/api/v2/curated-feeds/microsoftdotnet/" />
    <add key="MyFeed" value="https://www.myget.org/F/<feed name>/" />
  </packageSources>
  <disabledPackageSources />
  <packageSourceCredentials>
    <MyFeed>
      <add key="Username" value="myusername" />
      <add key="ClearTextPassword" value="mypassword" />
    </MyFeed>
  </packageSourceCredentials>
</configuration>

So we resupply the package sources (need to clear them first else you get duplicates), then add a packageSourceCredentials section with an element matching the name you gave your packageSource in the section above it.

Alternative Approach

Don’t like plain text passwords? Prefer auth tokens? Course ya do. Who doesn’t? In that case, another option is to use the secondary feed URL MyGet provides instead of the primary one, which contains your auth token (which can be rescinded at any time) and looks like:

https://www.myget.org/F/<your feed name>/auth/<auth token>/

Notice the extra “auth/blah-blah-blah” at the end of this version.

Summary

NuGet as a package manager solution is pretty slick. And the fact that it’s open sourced and can easily be self-hosted internally means it’s an obvious solution for managing those shared libraries within your project, personal or corporate.

Extra References

http://weblogs.asp.net/bsimser/archive/2010/10/06/unicorns-triple-rainbows-package-management-and-lasers.aspx

http://devlicio.us/blogs/rob_reynolds/archive/2010/09/21/the-evolution-of-package-management-for-net.aspx

Azure WebJobs and Azure Scheduler

Creating functionality in Azure to subscribe to messages on a queue is so 2013. You have to set up a service bus, learn about queues, topics, maybe subscribers and filters, blah, BLAH, BLAH.

Let’s not forget configuring builds and deployments and all that.

Fun though this may be, what if you want to have just the equivalent of a cronjob or scheduled task kicking off every few hours or days for some long-running or CPU-intensive task

Scheduled tasks – Old School: IaaS

Well, sure, you could create a VM, log in, and configure cron/scheduled tasks. However, all the cool kids are using webjobs instead these days. Get with the programme, grandpa! (Or something)

So what’s a webjob when it’s at home?

It depends. Each version is the equivalent of a small console app that lives in the ether (i.e., on some company’s server in a rainy field in Ireland), but how it kicks off the main functionality is different.

These webjobs can be deployed as part of a website, or ftp-ed into a specific directory; we’ll get onto this a bit later. Once there, you have an extra dashboard available which gives you a breakdown of the job execution history.

It uses the Microsoft.WindowsAzure.Jobs assemblies and can be best installed via nuget:

Install-Package Microsoft.WindowsAzure.Jobs.Host -Pre

(Notice the “-Pre”: this item is not fully cooked yet. It might need a few more months before you can safely eat it without fear of intestinal infrastructure blowout)

Let’s check out the guts of that assembly shall we?

Jobs - attributes

We’ll get onto these attributes momentarily; essentially, these allow you to decorate a public method for the job host to pick up and execute when the correct event occurs.

Here’s how the method will be called:
host - assemly methods

Notice that all of the other demos around at the moment not only use RunAndBlock, but they don’t even use the CancellationToken version (if you have a long running process, stopping it becomes a lot easier if you’re able to expose a cancellation token to another – perhaps UI – thread).

Setting it up

Right now you have limited options for deploying a webjob.

For each option you firstly need to create a new Website. Then click the WebJobs (Preview) tab at the top. Click Add at the bottom.

Now it gets Old Skool.

Zip

Zip the contents of your app’s bin/debug folder, call it WebJob.zip (I don’t actually know if the name matters though).

Enter the name for your job and browse to the zip file to upload.

You can choose; run continuously, run on a schedule (if you have Azure Scheduler Preview enabled), and run on demand.

There’s a great article on asp.net covering this method.

FTP

Webjobs are automagically picked up via convention from a particular directory structure. As such, you can choose to ftp (or other deployment method, perhaps via WebDeploy within the hosting website itself, a git commit hook, or a build server) the files that would have been in the zip into:

site\wwwroot\App_Data\jobs\{job type}\{job name}

What I’ve discovered doing this is that the scheduled jobs are in fact actually triggered jobs, which means that they are actually triggered via an HTTP POST from the Azure Scheduler.

There’s a nice intro to this over on Amit Apple’s blog

When to execute

Remember those attributes?

Jobs - attributes

Storage Queue

One version can be configured to monitor a Storage Queue (NOT a service bus queue, as I found out after writing an entire application to do this, deploy it, then click around the portal for an entire morning, certain I was missing a checkbox somewhere).

By using the attribute [QueueInput] (and optionally [QueueOutput]) your method can be configured to automatically monitor a Storage Queue, and execute when the appropriate queue has something on it.

Blob

A method with the attribute [BlobInput] (and optionally [BlobOutput]) will kick off when a blob storage container has something uploaded into it.

Woah there!
Yep, that’s right. Just by using a reference to an assembly and a couple of attributes you can shortcut the entire palava of configuring azure connections to a namespace, a container, creating a block blob reference, and/or a queue client, etc; it’s just there.

Crazy, huh?

On Demand

When you upload your webjob you are assigned a POST endpoint to that job; this allows you to either click a button in the Azure dashboard to execute the method, or alternatively execute it via an HTTP POST using Basic Auth (automatically configured at the point of upload and available within the WebJobs tab of your website).

You’ll need a [NoAutomaticTrigger] or [Description] attribute on this one.

Scheduled

If you successfully manage to sign up for the Azure Scheduler Preview then you will have an extra option in your Azure menu:

finding scheduler

Where you can even add a new schedule:

setting up scheduler

This isn’t going to add a new WebJob, just a new schedule; however adding a new scheduled webjob will create one of these implicitly.

In terms of attributes, it’s the same as On Demand.

How to execute

Remember those methods?

host - assemly methods

RunAndBlock

These require the Main method of your non-console app to instantiate a JobHost and “runandblock”. The job host will find a matching method with key attribute decorations and depending on the attributes used will fire the method when certain events occur.

[csharp]
static void Main()
{
JobHost h = new JobHost();
h.RunAndBlock();
}

public static void MyAwesomeWebJobMethod(
[BlobInput("in/{name}")] Stream input,
[BlobOutput("out/{name}")] Stream output)
{
// A new cat picture! Resize all the things!
}
[/csharp]

Scott Hanselman has a great example of this.

Call

Using some basic reflection you can look at the class itself (in my case it’s called “Program”) and get a reference to the method you want to call such that each execution just calls that method and stops.

[csharp]
static void Main()
{
var host = new JobHost();
host.Call(typeof(Program).GetMethod("MyAwesomeWebJobMethod"));
}

[NoAutomaticTrigger]
public static void MyAwesomeWebJobMethod()
{
// go find epic cat pictures and send for lulz.
}
[/csharp]

I needed to add in that [NoAutomaticTrigger] attribute, otherwise the webjob would fail completely due to no valid method existing.

In summary

WebJobs are fantastic for those offline, possibly long running tasks that you’d rather not have to worry about implementing in a website or a cloud service worker role.

I plan to use them for various small functions; at Mailcloud we already use a couple to send the sign-ups for the past few days to email and hipchat each morning.

Have a go with the non-scheduled jobs, but if you get the chance to use Azure Scheduler it’s pretty cool!

Good luck!

References

Scripting the setup of a developer PC, Part 3 of 4 – Installing.. uh.. everything.. with Chocolatey.

This is part three of a four part series on attempting to automate installation and setup of a development PC with a few scripts and some funky tools. If you haven’t already, why not read the introductory post about ninite or even the second part about the command line version of WebPI? Disclaimer: this series was inspired by a blog from Maarten Balliauw.

Installing.. uh.. everything..: Chocolatey

Chocolatey is sort of “apt-get for windows” using powershell; it doesn’t quite achieve that yet, but the idea is the same; imagine nuget + apt-get. It works exactly like nuget but is meant to install applications instead of development components. The next release will support webpi from within chocolatey, but more on that in a moment.

There’s not much to look at yet, but that’s the point; you just type what you want and it’ll find and install it and any dependencies. I want to install virtualclonedrive, some sysinternals goodies, msysgit, fiddler, and tortoisesvn.

Before you start, make sure you’ve relaxed Powershell’s execution policy to allow remote scripts:
[powershell]Set-ExecutionPolicy Unrestricted[/powershell]

Ok, now we can get on with it. I can now execute a new powershell script to install choc and those apps:

[powershell]# Chocolatey
iex ((new-object net.webclient).DownloadString(‘http://bit.ly/psChocInstall’))

# install applications
cinst virtualclonedrive
cinst sysinternals
cinst msysgit
cinst fiddler
cinst tortoisesvn[/powershell]

This script will download (DownloadString) and execute (iex) the chocolatey install script from the bit.ly URL, which is just a powershell script living in github:
https://raw.github.com/chocolatey/chocolatey/master/chocolateyInstall/InstallChocolatey.ps1

This powershell script currently resolves the location of the chocolatey nuget package:
http://chocolatey.org/packages/chocolatey/DownloadPackage

Then, since a nupkg is basically a zip file, the chocolatey script unzips it to your temp dir and fires off chocolateyInstall.ps1; this registers all of the powershell modules that make up chocolatey. The chocolatey client is essentially a collection of clever powershell scripts that wrap nuget!

Once chocolatey is installed, the above script will fire off “cinst” – an alias for “chocolatey install” – to install each listed application.

What’s even more awesome is that the latest – not yet on the “master” branch – version of Chocolatey can install using webpi. To get this beta version, use the extremely terse and useful command from Mr Chocolatey himself, Rob Reynolds (@ferventcoder):

Adding in the install of this beta version allows me to use choc for a few more webpi components:

[powershell]# Chocolatey
iex ((new-object net.webclient).DownloadString(‘http://bit.ly/psChocInstall’))

# install applications
cinst virtualclonedrive
cinst sysinternals
cinst msysgit
cinst fiddler
cinst tortoisesvn

# getting the latest build for webpi support: git clone git://github.com/chocolatey/chocolatey.git | cd chocolatey | build | cd _{tab}| cinst chocolatey -source %cd%
# I’ve already done this and the resulting nugetpkg is also saved in the same network directory:
cinst chocolatey –source “Z:\Installation\SetupDevPC\”

# Now I’ve got choc I may as well use it to install a bunch of other stuff from WebPI;
# things that didn’t always work when I put them in the looong list of comma delimited installs
# IIS
cinst IIS7 -source webpi
cinst ASPNET -source webpi
cinst BasicAuthentication -source webpi
cinst DefaultDocument -source webpi
cinst DigestAuthentication -source webpi
cinst DirectoryBrowse -source webpi
cinst HTTPErrors -source webpi
cinst HTTPLogging -source webpi
cinst HTTPRedirection -source webpi
cinst IIS7_ExtensionLessURLs -source webpi
cinst IISManagementConsole -source webpi
cinst IPSecurity -source webpi
cinst ISAPIExtensions -source webpi
cinst ISAPIFilters -source webpi
cinst LoggingTools -source webpi
cinst MetabaseAndIIS6Compatibility -source webpi
cinst NETExtensibility -source webpi
cinst RequestFiltering -source webpi
cinst RequestMonitor -source webpi
cinst StaticContent -source webpi
cinst StaticContentCompression -source webpi
cinst Tracing -source webpi
cinst WindowsAuthentication -source webpi[/powershell]

Best bit about this? When you run the first command you’ll download and install the latest version of the specified executable. When this succeeds you’ll get:

[code] has finished successfully! The chocolatey gods have answered your request![/code]

Nice.

You’ll hopefully see your Powershell window update like this a few times:
choc_install (click to embiggen)

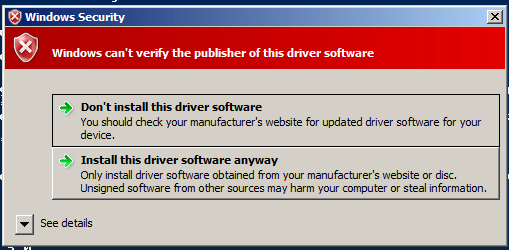
But depending on your OS version (I’m using Windows Server 2008 R2) you might see a few alerts about the unsigned drivers you’re installing:
choc_alert

That doesn’t seem to be avoidable, so just click to install and continue.

You might also find that your own attempts to install the beta version of chocolatey fail with errors like these:
choc_install_choc_fail1
or
choc_install_choc_fail2 (click to embiggen)

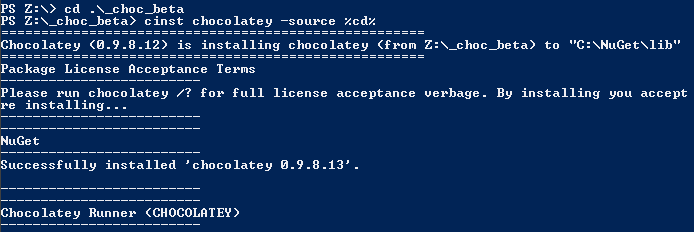
This is due to how you reference the directory in which your beta choc nuget package lives. If you reference it from a root dir (e.g. “Z:\”) then it’ll fail. Put it in a subdirectory and you’re golden:
choc_install_choc_success2
or using “%cd%” as the source dir (assuming you’re already in that dir):
choc_install_choc_success1

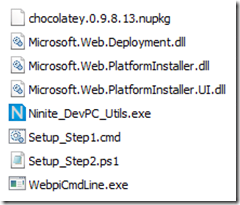
So, with my new powershell script and the beta chocolatey nupkg, along with the existing script for ninite, webpi and their components, my PC Setup directory now looks like this:

281211_autoinstall_choc_dir_contents

The last part of this series focuses on installing other things that either can’t be done or just didn’t work using one of the previous options, a list of “interesting things encountered”, and a conclusion to the whole project; see you back in:

Scripting the setup of a developer PC, Part 4 of 4 – Installing Custom Stuff, Interesting Things Encountered, and Conclusion.

Update: The chocolatey “beta” I mentioned is actually now in the mainline.

TeamCity + Git + NuGet + AppCmd= automated versioned deployments V1

Attempting to implement a Continuous Deployment workflow whilst still having fun can be tricky. Even more so if you want to use reasonably new tech, and even more if you want to use free tech!

If you’re not planning on using one of the cloud CI solutions then you’re probably (hopefully) looking at something like TeamCity, Jenkins, or CruiseControl.Net. I went with TeamCity after having played with CruiseControl.Net and not liked it too much and having never heard of Jenkins until a few weeks ago.. ahem..

So; my intended ideal workflow would be along the lines of:

  • change some code
  • commit to local git
  • push to remote repo
  • TeamCity picks it up, builds, runs tests, etc (combining and minifing static files – but that’s for another blog post)
  • creates a nuget package
  • deploys to a private nuget repo
  • subscribed endpoint servers pick up/are informed of the updated package
  • endpoint servers install the updated package

Here’s where I’ve got with that so far:


1) On the development machine

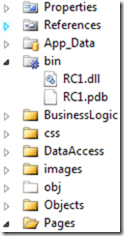
a. Within your VisualStudio project ensure the bin directory is included

I need the compiled dlls to be included in my nuget package, so I’m doing this since I’m using the csproj file as the package definition file for nuget instead of a nuspec file.

Depending on your VCS IDE integration, this might have nasty implications which are currently out of scope of my proof of concept (e.g. including the bin dir in the IDE causes the DLLs to be checked into your VCS – ouch!). I’m sure there are better ways of doing this, I just don’t know them yet. If you do, please leave a comment!

In case you don’t already know how to include stuff into your Visual Studio project (hey, I’m not one to judge! There’s plenty of basic stuff I still don’t know about my IDE!):

i. The bin dir not included:

vs2010_bin_excluded

ii. Click the “don’t lie to me“ button*:

vs2010_dltm

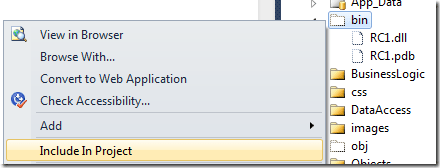
iii. Select “include in project”:

vs2010_bin_include_dialog

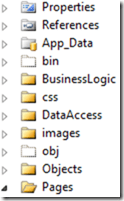
iv. The bin dir is now included:

vs2010_bin_included


b. Configure source control

Set up your code directory to use something that TeamCity can hook into (I’ve used SVN and Git successfully so far)

That’s about it.


2) On the build server

a. Install TeamCity

i. Try to follow the instructions on the TeamCity wiki

b. Install the NuGet package manager TeamCity add in

i. Head to the JetBrains TeamCity public repo

ii. Log in as Guest

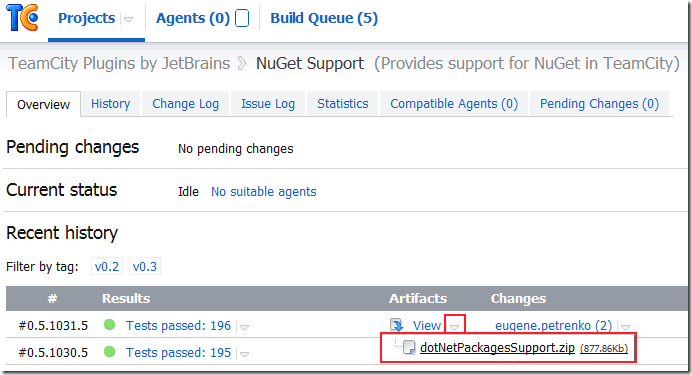
iii. Select the zip artifact from either the latest tag (or if you’re feeling cheeky the latest build):

teamcity_nuget_plugin_1

iv. Save it into your own TeamCity’s plugins folder

v. Restart your TeamCity instance

(The next couple of steps are taken from Hadi Hariri’s blog post over at JetBrains which I followed to get this working for me)

vi. Click on Administration | Server Configuration. If the plug-in installed correctly, you should now have a new Tab called NuGet

adminpanelnuget

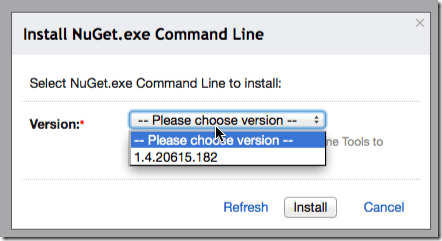
vii. Click on the “Install additional versions of the NuGet.exe Command Line”. TeamCity will read from the feed and display available versions to you in the dialog box. Select the version you want and click Install

nugetversion


c. Configure TeamCity

i. Set it up to monitor the correct branch

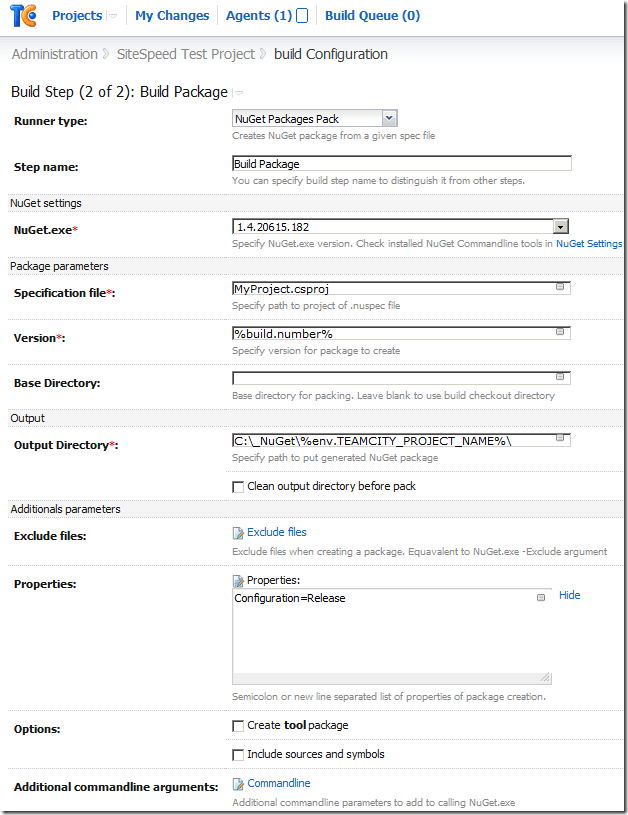
ii. Create a nuget package as a build step, setting the output directory to a location that can be accessed from your web server; I went for a local folder that had been configured for sharing:

teamcity_nuget_1

In addition to this, there is a great blog post about setting your nuget package as a downloadable artifact from your build, which I’m currently adapting this solution to use; I’m getting stuck with the Publish step though, since I only want to publish to a private feed. Hmm. Next blog post, perhaps.


3) On the web server (or “management” server)

a. Install NuGet for the command line

i. Head over to http://nuget.codeplex.com/releases

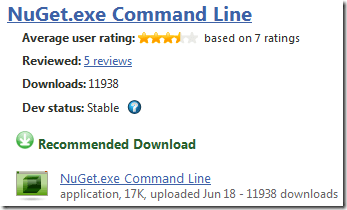
ii. Select the command line download:

nuget_cmdline_dl

iii. Save it somewhere on the server and add it to your %PATH% if you like


b. Configure installation of the nuget package

i. Get the package onto the server it needs to be installed on

Using Nuget, install the package from the TeamCity package output directory:
[code]nuget install "<MyNuGetProject>" –Source <path to private nuget repo>[/code]
e.g.
[code]nuget install "RposboWeb" –Source \\build\_packages\[/code]
This will generate a new folder for the updated package in the current directory. What’s awesome about this is it means you’ve got a history of your updates, so breaking changes notwithstanding you could rollback/update just by pointing IIS at a different folder.

Which brings me on to…

ii. Update IIS to reference the newly created folder

Using appcmd, change the folder your website references to the “content” folder within the installed nuget package:
[code]appcmd.exe set vdir "<MyWebRoot>/" /physicalpath:"<location of installed package>\content"[/code]
e.g.
[code]appcmd.exe set vdir "RposboWeb/" /physicalpath:"D:\Sites\RposboWeb 1.12\content"[/code]

So, the obvious tricky bit here is getting the name of the package that’s just been installed in order to update IIS. At first I thought I could create a powershell build step in TeamCity which takes the version as a parameter and creates an update batch file using something like the below:
[code]param([string]$version = "version")
$stream = [System.IO.StreamWriter] "c:\_NuGet\install_latest.bat"
$stream.WriteLine("nuget install \"<MyNugetProject>\" –Source <path to private nuget repo>")
$stream.WriteLine("\"%systemroot%\system32\inetsrv\appcmd.exe\" set vdir \"<MyWebRoot>/\" /physicalpath:\"<root location of installed package>" + $version + "\content\"")
$stream.Close()[/code]
However, my powershell knowledge is miniscule so this automated installation file generation isn’t working yet…

I’ll continue working on both this installation file generation version and also a powershell version that uses IIS7 administration provider instead of appcmd.
 

In conclusion

  • change some code – done (1)
  • commit to local git – done (1)
  • push to remote repo – done (1)
  • TeamCity picks it up, builds, runs tests, etc – done (2)
  • creates a nuget package – done (2)
  • deploys to a private nuget repo – done (2)
  • subscribed endpoint servers pick up/are informed of the updated package – done/in progress (3)
  • endpoint servers install the updated package – done/in progress (3)

 
Any help on expanding my knowledge gaps is appreciated – please leave a comment or tweet me! I’ll add another post in this series as I progress.
 

References

NuGet private feeds
http://haacked.com/archive/2010/10/21/hosting-your-own-local-and-remote-nupack-feeds.aspx
http://blog.davidebbo.com/2011/04/easy-way-to-publish-nuget-packages-with.html
 
TeamCity nuget support
http://blogs.jetbrains.com/dotnet/2011/08/native-nuget-support-in-teamcity/
 
Nuget command line reference
http://docs.nuget.org/ | http://docs.nuget.org/docs/reference/command-line-reference
 
IIS7 & Powershell
http://blogs.iis.net/thomad/archive/2008/04/14/iis-7-0-powershell-provider-tech-preview-1.aspx
http://learn.iis.net/page.aspx/447/managing-iis-with-the-iis-70-powershell-snap-in/
http://technet.microsoft.com/en-us/library/ee909471(WS.10).aspx
 

* to steal a nice quote from Scott Hanselman