Node.js 101 : Part #2 – Serving Web Content

Following on from my recent post about doing something this year, I’m committing to doing 12 months of “101”s; posts and projects themed at begining something new (or reasonably new) to me

Basic web server in node

(if you have no clue what node.js is, check out my quick overview from the last post)

Having installed node locally your easiest option for starting development is to open a text editor (notepad, sublimetext, notepad++, whatever) and to launch a command prompt.

  1. Create an initial node file, say app.js, put some content in there (such as console.log(“hiyaa”)) and save it.
  2. In the command prompt change to your working directory and fire off “node app.js”
  3. Now that you’ve seen that work, kill the node process with Ctrl+C

Making Changes 1 – the slow way

Now let’s move from command line development to web development.

  1. For this you’ll need a web server, so create this server.js file:

    [js]var http = require("http");

    http.createServer(function(request, response) {
    response.writeHead(200, {"Content-Type": "text/plain"});
    response.write("Hello World");
    response.end();
    }).listen(3000);[/js]

  2. Save it, run “node server.js”, open a browser and navigate to http://localhost:3000
  3. Now change the server.js file to:

    [js highlight=”5″]var http = require("http");

    http.createServer(function(request, response) {
    response.writeHead(200, {"Content-Type": "text/plain"});
    response.write("Hello moon");
    response.end();
    }).listen(3000);
    [/js]

  4. Save, refresh your browser… Huh? Nothing’s changed?

You need to restart the node process in order to pick up the changes to the code; your first port of call will be hitting Ctrl+C, up, enter.

Now refresh the page and bask in the glorious result:

Making Changes 2 – the easy way

That restart process is going to get annoying after the first hundred times; surely there’s a better way? Darn right there is! Some clever people out there have come up with numerous solutions to this, of which I have gone with nodemon, which monitors for file changes and automatically restarts the node process:

  1. Firstly run [code]npm install -g nodemon[/code]
  2. Then instead of using node server.js you use [code]nodemon server.js[/code]
  3. Give that a go, open your browser at your node site, change server.js to:

    [js highlight=”5″]var http = require("http");

    http.createServer(function(request, response) {
    response.writeHead(200, {"Content-Type": "text/plain"});
    response.write("CIAO MARS");
    response.end();
    }).listen(3000);
    [/js]

  4. Save it and notice that your command line has output an alert that the file change has been detected and the node process is restarting. Refresh your browser and you’ll see the changes already available. Hurrah!

Getting stuck in

The majority of this next section is lifted from the best node.js introduction tutorial, nodebeginner. I won’t rewrite too much of it, I’d suggest you read that post if there’s anything here I gloss over too much.

1) Exports & a basic web server

So far we’ve seen how to use a single file to run a basic web server. Using the concept of “exports” we can set this up as a self-contained module (modules are a key concept in node) and reference it from a different initialisation file.

Rewrite our current basic web server as a module and save it as “server.js”:

[js]var http = require("http");

function start(port) {
http.createServer(function(request, response) {
response.writeHead(200, {"Content-Type": "text/plain"});
response.write("Hello world");
response.end();
}).listen(port);
console.log("Server has started listening on port " + port);
}

exports.start = start;[/js]

You can see that the same functionality is in there, except that the module now returns a function instead of executing the code; no server is actually created yet.

Now let’s create a new initialisation file called “app.js” and reference the server module:

[js]var server = require("./server");

var port = process.env.PORT || 3000;
server.start(port);[/js]

Firstly, there’s the reference at the top to “./server” – this just links our server.js file so that we can call the “start” function that we exposed from that server.js file.

Secondly I’m now passing in the port to use; either the current process’s environment setting (useful for deployment later on, when you can’t control the port your process will actually run on) or default to 3000 (for development purposes).

Now kick off node and point it at “app.js” – the same familiar “Hello world” text should greet you in the browser.

2) Basic routing

That’s all well and good, but it’s not much use displaying “hello world” all the time. Firstly, let’s introduce the (exceptionally) basic concepts of routing.

Define the request handler for a particular route, and expose the function:

requestHandler.js – creating a single route, “hello”, defining what it does, and exporting it:

[js]function hello(response) {
console.log("Request handler ‘hello’ was called.");
response.writeHead(200, {"Content-Type": "text/plain"});
response.write("hello world");
response.end();
}

exports.hello = hello;[/js]

Create a basic router to match the request against the defined handlers:

router.js – a function to take an array of routes that have been wired up (“handle”), that current request’s path (“pathname”), and the response to manipulate, and attempt to match and call the correct function else return a 404:

[js]function route(handle, pathname, response) {
if (typeof handle[pathname] === ‘function’) {
handle[pathname](response);
} else {
console.log("No request handler found for " + pathname);
response.writeHead(404, {"Content-Type": "text/plain"});
response.write("404 Not found");
response.end();
}
}

exports.route = route;[/js]

Now let’s update the server.js and app.js to wire these together:

server.js – the web server, made more generic, and using the “url” module to expose the “pathname” of the current request for matching to a route, as well as slightly abstracting the request function itself:

[js]var http = require("http"),
url = require("url");

function start(route, handle, port) {
function onRequest(request, response) {
var pathname = url.parse(request.url).pathname;
route(handle, pathname, response);
}

http.createServer(onRequest).listen(port);
console.log("Server has started listening on port " + port);
}

exports.start = start;[/js]

app.js – wire up the router and request handler, define the “hello” route in a new “handles” array and map it to the “requestHandlers.hello” function, passing those into the server function:

[js]var server = require("./server"),
router = require("./route"),
requestHandlers = require("./requestHandlers");

var handle = {}
handle["/hello"] = requestHandlers.hello;

var port = process.env.PORT || 3000;
server.start(router.route, handle, port);[/js]

Fire up nodemon pointing at app.js and visit http://localhost:3000/hello to see the route “/hello” rendered magnificently on screen.

3) Returning content

Now we’ve just got the same functionality we had right at the start – good old “hello world”. Adding new request handlers and registering the routes will allow us to return more content. First up, let’s add “goodbye”:

requestHandlers.js – update this with the new content:

[js highlight=”8-13,16″]function hello(response) {
console.log("Request handler ‘hello’ was called.");
response.writeHead(200, {"Content-Type": "text/plain"});
response.write("hello world");
response.end();
}

function goodbye(response) {
console.log("Request handler ‘goodbye’ was called.");
response.writeHead(200, {"Content-Type": "text/plain"});
response.write("goodbye cruel world");
response.end();
}

exports.hello = hello;
exports.hello = goodbye;[/js]

app.js – register the new route by referencing the newly created function into the “handle” array:

[js highlight=”7″]var server = require("./server"),
router = require("./route"),
requestHandlers = require("./requestHandlers");

var handle = {}
handle["/hello"] = requestHandlers.hello;
handle["/goodbye"] = requestHandlers.goodbye;

var port = process.env.PORT || 3000;
server.start(router.route, handle, port);[/js]

That’s all you need to do. Now kick off your process and visit http://localhost:3000/hello and http://localhost:3000/goodbye to see:
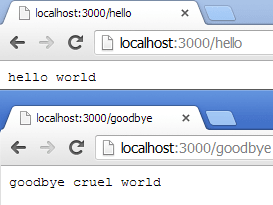
hello-bye-world-web-1

So adding new content is a case of defining a function to return content and registering a new route.

4) Returning different types of content

You may have noticed that when making any call to your node app you see two responses:
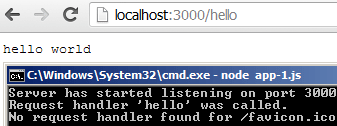
hello-world-web-2
That second one is the browser asking for the favicon. You can either register a route to return an HTTP 200 and nothing else (in order to avoid 404s) or you can create a route and send back an actual favicon.

requestHandlers.js – add a reference to the filesystem module “fs” and create a new handler to read an actual favicon image (I’m using my own website’s favicon) and write it out to the response stream:

[js highlight=”1,5,6,12,13,17-22,26″]var fs = require(‘fs’);

function hello(response) {
console.log("Request handler ‘hello’ was called.");
response.writeHead(200, {"Content-Type": "text/html"});
response.write("<em>hello world</em>");
response.end();
}

function goodbye(response) {
console.log("Request handler ‘goodbye’ was called.");
response.writeHead(200, {"Content-Type": "text/html"});
response.write("<em>goodbye cruel world</em>");
response.end();
}

function favicon(response) {
console.log("Request handler ‘favicon’ was called.");
var img = fs.readFileSync(‘./favicon.ico’);
response.writeHead(200, {"Content-Type": "image/x-icon"});
response.end(img,’binary’);
}

exports.hello = hello;
exports.goodbye = goodbye;
exports.favicon = favicon;[/js]

Notice the “favicon” function reads in the icon file from the filesystem and also sets the content type to “image/x-icon”.

app.js – wire up the new route:
[js highlight=”8″]var server = require("./server"),
router = require("./route"),
requestHandlers = require("./requestHandlers");

var handle = {}
handle["/hello"] = requestHandlers.hello;
handle["/goodbye"] = requestHandlers.goodbye;
handle["/favicon.ico"] = requestHandlers.favicon;

var port = process.env.PORT || 3000;
server.start(router.route, handle, port);[/js]

Refresh and you’ll get:
hello-world-web-favicon

Oooh – pretty. So adding new content is a new request handler and registering a new route, and outputting a different content type if necessary.

In summary

So that’s the basics of serving web content via node, including basic routing and content type manipulation.

The files for this post can all be found over on github

Next up: a basic RESTful API in node which I’ll be using for several of the other 101 projects throughout this year.

Year of 101

The Year of 101Following on from my recent post about doing something this year, I think I’ll start simple and commit to doing 12 months of “101”s; posts and projects themed at beginning something new (or reasonably new) to me. As such, I’m going to kick off the year, and the project, with…

January – Node.js 101

Part #1 – Intro

node-js-logo

I may have looked into node a bit during 2012 but haven’t had the chance to actually write anything myself with a point to it. As such, I’m going to start this year off by getting stuck into starting coding node, and bring together resources that help me learn during this month.

Node.js

So what’s Node when it’s at home, then?

JavaScript. A language essentially written in a couple of weeks to enable spam popups filling your screen every time you wanted to browse entertaining quotes from IMDB in the 90s.

Not really..

Ok, fine. Node itself is not JavaScript – Node.js is the engine which runs on a server and executes your JavaScript. The engine and the core modules of node are compiled binaries written in C++ (I think) – and given that it’s open source, you can check it out yourself here

Every modern browser has an ECMAScript engine in it, and it is this which executes the javascript code. A packaged compilation of Google’s V8 engine is at the heart of Node, and that makes it a solid and speedy engine to be running functionality on.

Why is it so popular?

Perhaps because it’s a bit new. Perhaps it’s nice to be able to use JavaScript on the server for once, allowing developers to use a single language for front and back end development. It’s fast, it’s async, it’s non-blocking. I just find it fun to code with.

I’m a big fan due to two particular elements:

  1. I like JavaScript as a language. I like the syntax, I like the dynamic nature. I learned it way back in the late 90s whilst at university by doing loads of “view-source”s on Angelfire and Geocities sites. Plus I was doing a degree in C++ at the time, so the syntax was already familiar but was much easier to see a visible result.

  2. Node strips development right down to basics. No fancy IDE (being practically dependant on Visual Studio for developing .Net on Windows has always really bothered me), no intellisense (you just have to KNOW THE ANSWER. Or Google it.. or check the nodejs.org website’s API documentation). I do have WebStorm (and even bought a licence during the JetBrains recent Apocolypse sale) but I currently prefer to develop Node projects in SublimeText2.

Want to say hello world?

  1. Install Node
  2. Save the below as “hiya.js”:

    [js]console.log("hello world");[/js]

  3. from a command line run:

    [code]node hiya.js[/code]

  4. You will see, amazingly:

    [code]hello world[/code]

Not very impressive, I know, but that’s not what Node is about IMO. I find the ability to easily add layers to your code and make it do a little bit more is very interesting.

Let’s change that script to also send the text to a web browser. Without a web server. No IIS, no Apache, no TomCat.

  1. Create a fully functional web server and limit it to send a single response (save the below as “hiya-web.js”):

    [js]var http = require("http");

    http.createServer(function(request, response) {
    response.writeHead(200, {"Content-Type": "text/plain"});
    response.write("Hello World");
    response.end();
    }).listen(3000);[/js]

  2. from a command line run:

    [code]node hiya-web.js[/code]

  3. open a browser and visit http://localhost:3000

    hello-world-web-0

How about changing that to send an html page instead of plain text?

  1. Change the following lines:

    [js highlight=”4,5″]var http = require("http");

    http.createServer(function(request, response) {
    response.writeHead(200, {"Content-Type": "text/html"});
    response.write("<h1>Hello World</h1>");
    response.end();
    }).listen(3000);[/js]

  2. rerun node – kill your node process (Ctrl+C), then:

    [code]node hiya.js[/code]

  3. Refresh your browser

    hello-world-web-1

You can just keep adding layers to it, which is what I’ve done in my first project (next post).

It’s pretty powerful stuff. But it’s just Javascript being executed on the server’s ECMAScript engine instead of your browser’s one. I mean, look at that code for a second – you’re referencing a global “http” node module, creating a web server, and telling it what it should do. (Don’t ask why it uses port 3000; 3000 and 8888 seem to be the standard Node.js ports for tutorials..); that’s extremely powerful stuff. And it’s pretty much just good old javascript from where you’re sitting.

Starting developing at this level is a nice form of YAGNI (you ain’t gonna need it) – don’t install an MVC framework or a CSS minification module until you actually need one. Although you can do both of those things, and I’ll get onto that in a later post.

Developing Node apps

I’ve said that you don’t need a fancy IDE for writing Node apps, and I fully understand that the same is true of most other languages, but once you get a complex project structure together in .Net writing your own msbuild commands instead of letting Visual Studio build them up for you can be somewhat counterproductive.

I’m a little bit enamoured by the development tools available for Node, and this may just be because they’re new and shiny, but they’re still nice tools. My top three are:

  • JetBrains WebStorm

    webstorm-node-js-asos-api-2

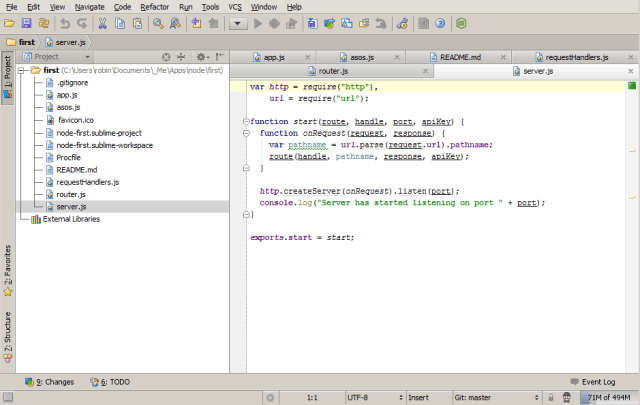
    This is a fully featured Node (and other language) development environment, with intellisense, inline syntax checking, live editing updates via a Chrome plugin, npm integration, VCS integration (including github, natch). Slick.

  • Cloud9IDE

    cloud-9-ide-node-js-asos-api-2

    Amazingly, this is a browser based development environment, also with inline syntax checking and intellisense, npm integration (via an in-browser command line), github/bitbucket integration, and – my favourite – integrated heroku/azure deployment. So you can collaboratively develop, debug, and deploy Node apps from a browser. Take THAT Microsoft volume licencing!

  • Sublime Text 2

    sublimetext-node-js-asos-api-2

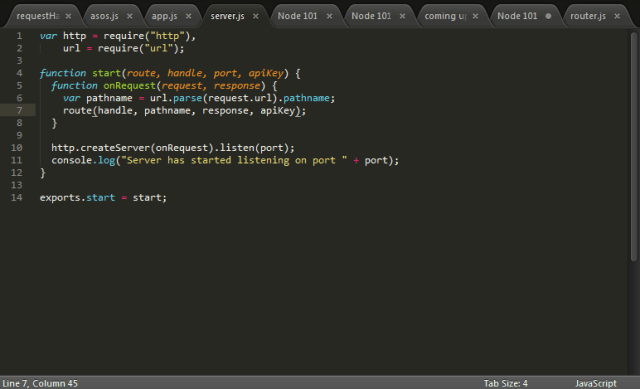
    My personal favourite tool for pretty much anything outside of .Net development – a feature rich text editor with extensions available via python plugins. Has nothing whatsoever to do with Node. It’s about as “Node” as Notepad would be.

Coming up

The next few posts this month will cover developing an application in node, installing node packages, version control, and deployment & hosting.

I’m looking forwards to playing with getting stuck in to something new, learning my way around, and seeing how it all works. Hopefully you’ll enjoy reading that experience too!

Backup Backup Backup

Whilst out at a bar in Camden recently a friend started hunting around our area with an increasingly panic stricken look on his face. Turns out that his personal laptop had been taken from under our seats. Six years of his personal dev work lost.

The response from every technical person he told? Should’ve backed up. Also, you’ve got Prey on there, right?.. no?.. Ah..

Not exactly the most compassionate response, but for those of us with a half decent backup solution all you need worry about is getting the insurance paid out on the hardware itself.

My backup solution is pretty minimal; the only things I care about are photos and videos, documents (work and home), and coding fun.

First up – Cloud

Photos

My photos are usually taken on my Samsung Galaxy S3 so exist in several places almost by default. The SG3 is an android device, so my photos are automatically synced up to my google drive using Google Plus Instant Upload.

I have a dropbox account and the android dropbox app so they’re also being synced to dropbox; I have dropbox on my laptops at home and on my work PC, so the photos are downloaded onto those devices too.

I have the Jungledisk agent on all of my PCs which also backup those photos to my jungledisk account. It’s going to be pretty tricky to lose them all.

Documents

Documents are handled by both dropbox and Windows Live Mesh; as soon as I close a document on my office PC it’s synced via Live Mesh to SkyDrive and then downloaded again to my home PC.

Again, this is also backed up to Jungledisk as separate PC backups.

Coding fun

This also uses Windows Live Mesh, and Dropbox, and Jungledisk, but the ones I really like are also pushed up to github.

Pricey, right?

The cost of this security? Not much at all.

  • Live Mesh comes with Windows 7.

  • Dropbox is free and if you by a SG3 you get 50GB free for a year, plus 500MB free for every 500MB of photos you backup to dropbox.

  • Jungledisk costs me around £10 a month, which given that I also use it to automatically back up everything in my and my wife’s laptops’ “My Documents” folders to a secure cloud based solution, including all iTunes, iPhoto, etc folders, I think that’s money well spent; obviously some of that is also on iCloud too!

Physical? Sure!

I’m not relying on internet access to get my files back either. I have both local network and USB attached backup solutions.

External HDD

Western Digital My Passport

This tiny 500GB Western Digital Passport attaches to whichever machine I’m working on at the time and constantly backs up my entire D drive (non-OS) securely and with rollback capabilities.

NAS

LaCie LaCinema

I also have everything in key folders on each laptop within my home network being copied over to a 1TB LaCie LaCinema HD HDMI Media Centre/NAS, which is an amazing bit of kit in its own right. You can now get a 2TB version for about £160.

It Works For Me ©

I’m not saying this is what everyone should do, as requirements will obviously differ. But this works for me, and the last time one of my laptops crashed and burned I was quite happy at the chance to get a shiny new one, not having lost any important data at all.

Applications

No need to back up any applications since it’s so easy to rebuild an entire Windows system using things like Chocolatey, WebPi, and Ninite.

London Buses and The Javascript Geolocation API

The wonderful people at Transport For London (TFL) recently released (but didn’t seem to publicise) a new page on their site that would give you a countdown listing of buses due to arrive at any given stop in London.

This is the physical one (which only appears on some bus stops):

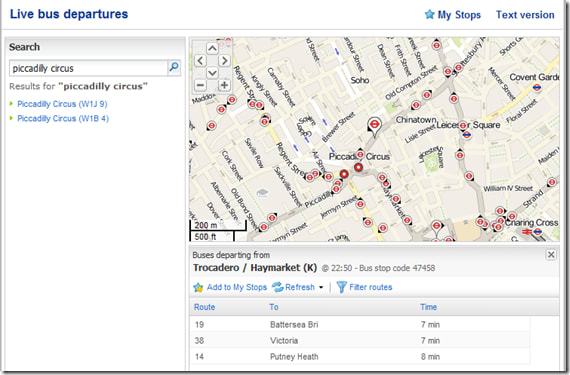
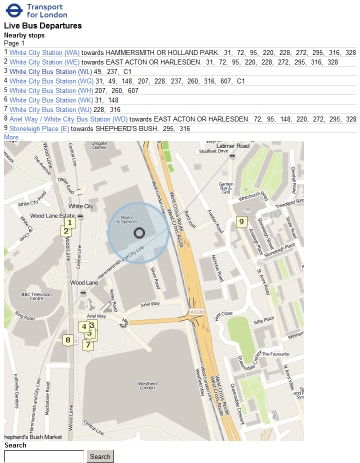
And this is the website one, as found at countdown.tfl.gov.uk

countdown

Before I continue with the technical blithering, I’d like quantify how useful this information is by way of a use case: you’re in a pub/bar/club, a little worse for wear, the tubes have stopped running, no cash for a cab, it’s raining, no jacket. You can see a bus stop from a window, but you’ve no idea how long you’d have to wait in the rain before your cheap ride home arrived. IF ONLY this information were freely available online so you can check if you have time for another drink/comfort break/say your goodbyes before a short stroll to hail the arriving transport.

With this in mind I decided to create a mobile friendly version of the page.

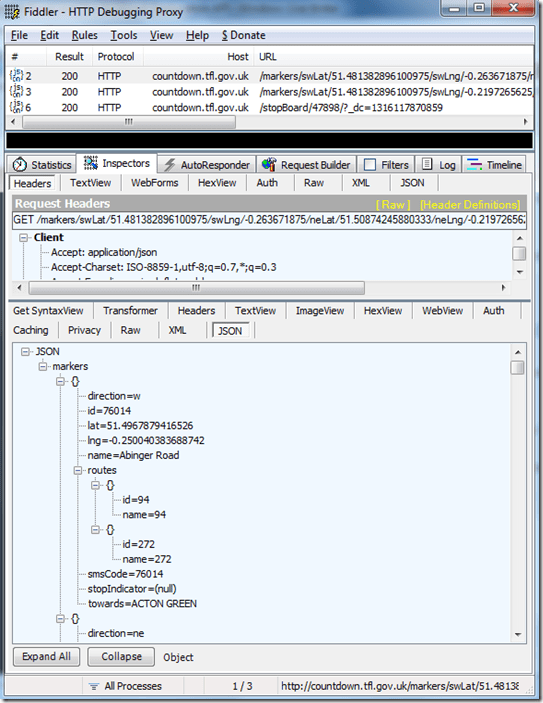
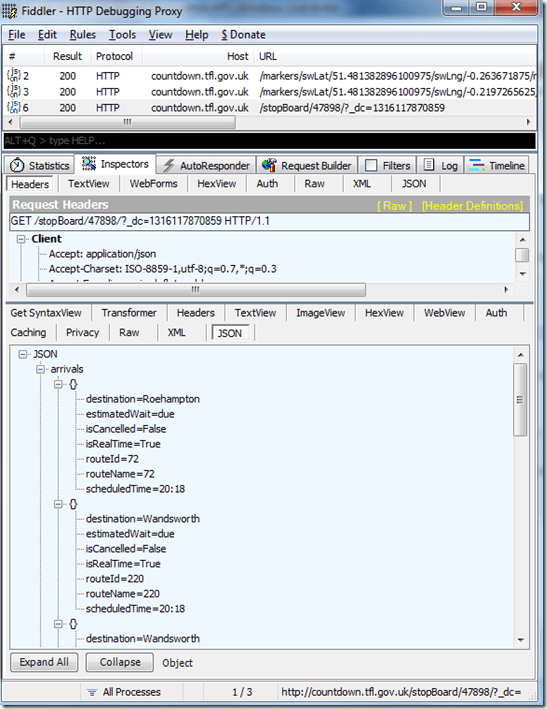
If you visit the tfl site (above) and fire up fiddler you can see that the request for stops near you hits one webservice which returns json data,

fiddler_tfl_countdown_1

and then when you select a stop there’s another call to another endpoint which returns json data for the buses due at that stop:

fiddler_tfl_countdown_2

Seems easy enough. However, the structure of the requests which follow on from a search for, say, the postcode starting with “W6” is a bit tricky:


http://countdown.tfl.gov.uk/markers/
swLat/51.481382896100975/
swLng/-0.263671875/
neLat/51.50874245880333/
neLng/-0.2197265625/
?_dc=1315778608026

That doesn’t say something easy like “the postcode W6”, does it? It says “these exact coordinates on the planet Earth”.

So how do I emulate that? Enter JAVASCRIPT’S NAVIGATOR.GEOLOCATION!

Have you ever visited a page or opened an app on your phone and saw a popup asking for your permission to share your location with the page/app? Something like:

Or in your browser:

image

This is quite possibly the app attempting to utilise the javascript geolocation API in order to try and work out your latitude and longitudinal position.

This information can be easily accessed by browsers which support the javascript navigator.geolocation API. Even though the API spec is only a year old, diveintohtml5 point out it’s actually currently supported on quite a few browsers, including the main mobile ones.

The lat and long can be gleaned from the method

[javascript]
navigator
.geolocation
.getCurrentPosition
[/javascript]

which just takes a callback function as a parameter passing a “position” object e.g.

[javascript]
navigator
.geolocation
.getCurrentPosition(showMap);

function show_map(position) {
var latitude = position.coords.latitude;
var longitude = position.coords.longitude;
// let’s show a map or do something interesting!
}
[/javascript]

Using something similar to this we can pad the single position to create a small area instead, which we pass to the first endpoint, retrieve a listing of bus stops within that area, allow the user to select one, pass that stop ID as a parameter to the second endpoint to retrieve a list of the buses due at that stop, and display them to the user.

My implementation is:

[javascript]
$(document).ready(function() {
// get lat long
if (navigator.geolocation){
navigator
.geolocation
.getCurrentPosition(function (position) {
getStopListingForLocation(
position.coords.latitude,
position.coords.longitude);
});
} else {
alert(‘could not get your location’);
}
});
[/javascript]

Where getStopListingForLocation is just

[javascript]
function getStopListingForLocation(lat, lng){
var swLat, swLng, neLat, neLng;
swLat = lat – 0.01;
swLng = lng – 0.01;
neLat = lat + 0.01;
neLng = lng + 0.01;

var endpoint =
‘http://countdown.tfl.gov.uk/markers’ +
‘/swLat/’ + swLat +
‘/swLng/’ + swLng +
‘/neLat/’ + neLat +
‘/neLng/’ + neLng + ‘/’;

$.ajax({
type: ‘POST’,
url: ‘Proxy.asmx/getMeTheDataFrom’,
data: "{‘here’:’"+endpoint+"’}",
contentType: "application/json; charset=utf-8",
dataType: "json",
success: function(data) {
displayStopListing(data.d);
}
});
}
[/javascript]

The only bit that had me confused for a while was forgetting that browsers don’t like cross browser ajax requests. The data will be returned and is visible in fiddler, but the javascript (or jQuery in my case) will give a very helpful “error” error.

As such, I created the World’s Simplest Proxy:

[csharp]
[System.Web.Script.Services.ScriptService]
public class Proxy: System.Web.Services.WebService
{

[WebMethod]
public string getMeTheDataFrom(string here)
{
using (var response = new System.Net.WebClient())
{
return response.DownloadString(here);
}
}
}
[/csharp]

All this does, quite obviously, is to forward a request and pass back the response, running on the server – where cross domain requests are just peachy.

Then I have a function to render the json response

[javascript]
function displayStopListing(stopListingData){
var data = $.parseJSON(stopListingData);
$.each(data.markers, function(i,item){
$("<li/>")
.text(item.name + ‘ (stop ‘ + item.stopIndicator + ‘) to ‘ + item.towards)
.attr("onclick", "getBusListingForStop(" + item.id + ")")
.attr("class", "stopListing")
.attr("id", item.id)
.appendTo("#stopListing");
});
}
[/javascript]

And then retrieve and display the bus listing

[javascript]
function getBusListingForStop(stopId){
var endpoint = ‘http://countdown.tfl.gov.uk/stopBoard/’ + stopId + ‘/’;

$("#" + stopId).attr("onclick","");

$.ajax({
type: ‘POST’,
url: ‘Proxy.asmx/getMeTheDataFrom’,
data: "{‘here’:’"+endpoint+"’}",
contentType: "application/json; charset=utf-8",
dataType: "json",
success: function(data) { displayBusListing(data.d, stopId); }
});
}

function displayBusListing(busListingData, stopId){
var data = $.parseJSON(busListingData);

$("<h2 />").text("Buses Due").appendTo("#" + stopId);

$.each(data.arrivals, function(i,item){

$("<span/>")
.text(item.estimatedWait)
.attr("class", "busListing time")
.appendTo("#" + stopId);

$("<span/>")
.text(item.routeName + ‘ to ‘ + item.destination)
.attr("class", "busListing info")
.appendTo("#" + stopId);

$("<br/>")
.appendTo("#" + stopId);
});
}
[/javascript]

(yes, my jQuery is pants. I’m working on it..)

These just need some very basic HTML to hold the output

[html]
<h1>Bus Stops Near You (tap one)</h1>
<ul id="stopListing"></ul>
[/html]

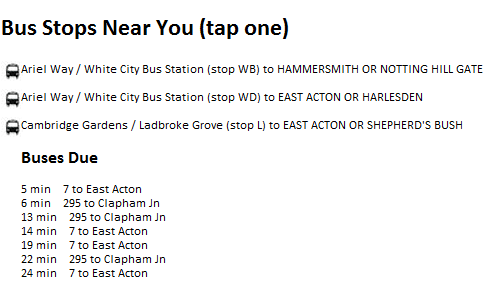
Which ends up looking like

The resultingfull HTML can be found here, the Most Basic Proxy Ever is basically listed above, but also in “full” here. If you want to see this in action head over to rposbo.apphb.com.

Next up – how this little page was pushed into the cloud in a few seconds with the wonder of AppHarbor and git.

UPDATE

Since creation of this “app” TFL have created a very nice mobile version of their own which is much nicer than my attempt! Bookmark it at m.countdown.tfl.gov.uk :


Project: Hands-free (or as close as possible) DVD Backup


I’ve recently bought a 2TB LaCie LaCinema Classic HD Media HDD as the solution to my overly complex home media solution. The previous solution involved a networked Mac Mini hooked to the TV, streaming videos from an NSLU2 Linksys NAS (unslung, obviously) or my desktop in another room, using my laptop to VNC in to the Mac and control VLC.

Not exactly a solution my wife could easily use.

The LaCinema is a wonderful piece of kit; very simple interface, small but mighty remote control, is recognised as a media device on your network, can handle HD video, and pretty reasonable for the capacity and functionality. Plus it’s so easy to use I can throw the remote to the missus and she’ll be happy to use it.

Now comes the hard part: transferring a couple of hundred DVDs to the LaCinema internal HD. Ripping CDs is easy, since you can configure even Windows Media Player to detect a CD being inserted, access the CDDB, create the correct folders, rip the CD, even eject it when done.

Nothing comparable seems to exist for DVDs, which is extremely frustrating. You always need to have manual interaction to either specify the name of the DVD you’re ripping, the streams you want to rip, the size and format of the output video file, etc.

I can’t be arsed with all that faffing around for my sprawling DVD collection, so I thought about creating a solution.

I’ve gone for a windows service with a workflow-esque model that has the following steps:

1. Detect a DVD being inserted
2. Look up the film/series name, year, genre, related images online
3. Determine which sections and streams to rip
4. Rip to local PC
5. Move to media centre

Over the next few posts I’ll go into a bit more detail on the challenges each stage posed and the solutions I came up with. I’ll post the code online and would love for some constructive feedback!

This isn’t about me making something that everyone should look at and go “oooh, he’s so clever”, it’s about having a solution for ripping a DVD library that everyone can use and tweak to suit their own requirements. As such, help is always appreciated.