Content Control Using ASCX–Only UserControls With BatchCompile Turned Off

This is a bit of a painful one; I’ve inherited a “content control” system which is essentially a vast number of ascx files generated outside of the development team, outside of version control, and dumped directly onto the webservers. These did not have to be in the project because the site is configured with batch=”false”.

I had been given the requirement to implement dynamic content functionality within the controls.

These ascx files are referenced directly by a naming convention within a container aspx page to LoadControl(“~/content/somecontent.ascx”) and render within the usual surrounding master page. Although I managed to get this close to pulling them all into a document db and creating a basic CMS instead, unfortunately I found an even more basic method of using existing ascx files and allowing newer ones to have dynamic content.

An example content control might look something like:

[html]
<%@ Control %>
<div>
<ul>
<li>
<span>
<img src="http://memegenerator.net/cache/instances/250×250/8/8904/9118489.jpg" style="height:250px;width:250px;" />
<a href="http://memegenerator.net/">Business Cat</a>
<span class="title">&#163;19.99</span>
</span>
</li>
<li>
<span>
<img src="http://memegenerator.net/cache/instances/250×250/8/8904/9118489.jpg" style="height:250px;width:250px;" />
<a href="http://memegenerator.net/">Business Cat</a>
<span class="title">&#163;19.99</span>
</span>
</li>
<li>
<span>
<img src="http://memegenerator.net/cache/instances/250×250/8/8904/9118489.jpg" style="height:250px;width:250px;" />
<a href="http://memegenerator.net/">Business Cat</a>
<span class="title">&#163;19.99</span>
</span>
</li>
</ul>
</div>
[/html]

One file, no ascx.cs (these are written outside of the development team, remember). There are a couple of thousand of them, so I couldn’t easily go through and edit them to all. How to now allow dynamic content to be injected with minimal change?

I started off with a basic little class to allow content injection to a user control:
[csharp]
public class Inject : System.Web.UI.UserControl
{
public DynamicContent Data { get; set; }
}
[/csharp]

and the class for the data itself:
[csharp]
public class DynamicContent
{
public string Greeting { get; set; }
public string Name { get; set; }
public DateTime Stamp { get; set; }
}
[/csharp]

Then how to allow data to be injected only into the new content files and leave the heaps of existing ones untouched (until I can complete the business case documentation for a CMS and get budget for it, that is)? This method should do it:
[csharp]
private System.Web.UI.Control RenderDataInjectionControl(string pathToControlToLoad, DynamicContent contentToInject)
{
var control = LoadControl(pathToControlToLoad);
var injectControl = control as Inject;

if (injectControl != null)
injectControl.Data = contentToInject;

return injectControl ?? control;
}
[/csharp]

Essentially, get the control, attempt to cast it to the Inject type, if the cast works inject the data and return the cast version of the control, else just return the uncast control.

Calling this with an old control would just render the old control without issues:
[csharp]const string contentToLoad = "~/LoadMeAtRunTime_static.ascx";
var contentToInject = new DynamicContent { Greeting = "Hello", Name = "Dave", Stamp = DateTime.Now };

containerDiv.Controls.Add(RenderDataInjectionControl(contentToLoad, contentToInject));
[/csharp]

232111_codecontrol_static

Now we can create a new control which can be created dynamically:
[html highlight=”1″]
<%@ Control CodeBehind="Inject.cs" Inherits="CodeControl_POC.Inject" %>
<div>
<%=Data.Greeting %>, <%=Data.Name %><br />
It’s now <%= Data.Stamp.ToString()%>
</div>

<div>
<ul>
<li>
<span>
<img src="http://memegenerator.net/cache/instances/250×250/8/8904/9118489.jpg" style="height:250px;width:250px;" />
<a href="http://memegenerator.net/">Business Cat</a>
<span class="title">&#163;19.99</span>
</span>
</li>
<li>
<span>
<img src="http://memegenerator.net/cache/instances/250×250/8/8904/9118489.jpg" style="height:250px;width:250px;" />
<a href="http://memegenerator.net/">Business Cat</a>
<span class="title">&#163;19.99</span>
</span>
</li>
<li>
<span>
<img src="http://memegenerator.net/cache/instances/250×250/8/8904/9118489.jpg" style="height:250px;width:250px;" />
<a href="http://memegenerator.net/">Business Cat</a>
<span class="title">&#163;19.99</span>
</span>
</li>
</ul>
</div>
[/html]

The key here is the top line:

[html highlight=”1″]
<%@ Control CodeBehind="Inject.cs" Inherits="CodeControl_POC.Inject" %>
[/html]

Since this now defines the type of this control to be the same as our Inject class it gives us the same thing, but with a little injected dynamic content

[csharp]
const string contentToLoad = "~/LoadMeAtRunTime_dynamic.ascx";
var contentToInject = new DynamicContent { Greeting = "Hello", Name = "Dave", Stamp = DateTime.Now };

containerDiv.Controls.Add(RenderDataInjectionControl(contentToLoad, contentToInject));
[/csharp]

232111_codecontrol_dynamic

Just a little something to help work with legacy code until you can complete your study of which CMS to implement Smile

Comments welcomed.

A Quirk of Controls in ASP.Net

As part of the legacy codebase I’m working with at the moment I have recently been required to edit a product listing page to do something simple; add an extra link underneath each product.


Interestingly enough the product listing page is constructed as a collection of System.Web.UI.Controls, generating an HTML structure directly in C# which is then styled after being rendered completely flat.


For example:, each item in the listing could look a bit like this
[csharp]
public class CodeControl : Control
{
protected override void CreateChildControls()
{
AddSomeStuff();
}

private void AddSomeStuff()
{
var image = new Image
{
ImageUrl = "http://memegenerator.net/cache/instances/250×250/8/8904/9118489.jpg",
Width = 250,
Height = 250
};
Controls.Add(image);

var hyperlink = new HyperLink { NavigateUrl = "http://memegenerator.net/", Text = "Business Cat" };
Controls.Add(hyperlink);

var title = new HtmlGenericControl();
title.Attributes.Add("class", "title");
title.InnerText = "£19.99";
Controls.Add(title);
}
}
[/csharp]
 

And then the code to render it would be something like:
[csharp]
private void PopulateContainerDiv()
{
var ul = new HtmlGenericControl("ul");

for (var i = 0; i < 10; i++)
{
// setup html nodes
var item = new CodeControl();
var li = new HtmlGenericControl("li");

// every 3rd li reset ul
if (i % 3 == 0) ul = new HtmlGenericControl("ul");

// add item to li
li.Controls.Add(item);

// add li to ul
ul.Controls.Add(li);

// add ul to div
containerDiv.Controls.Add(ul);
}
}
[/csharp]

The resulting HTML looks like:

[html]
<ul><li><img src="http://memegenerator.net/cache/instances/250×250/8/8904/9118489.jpg" style="height:250px;width:250px;" /><a href="http://memegenerator.net/">Business Cat</a><span class="title">&#163;19.99</span></li>
.. snip..
[/html]

And the page itself:

232111_codecontrol_blank_unstyled

I’ve never seen this approach before, but it does make sense; define the content, not the presentation. Then to make it look nicer we’ve got some css to arrange the list items and their content, something like:
[css]
ul { list-style:none; overflow: hidden; float: none; }
li { padding-bottom: 20px; float: left; }
a, .title { display: block; }
[/css]
Which results in the page looking a bit more like

232111_codecontrol_blank_styled


So that’s enough background on the existing page. I was (incorrectly, with hindsight, but that’s why we make mistakes right? How else would we learn? *ahem*..) attempting to implement a change that wrapped the contents of each li in a tag so that some jQuery could pick up the contents of that li and put them somewhere else on the page when a click was registered within the li.

So I did this:
[csharp highlight=”4,10,13″]
// setup html nodes
var item = new CodeControl();
var li = new HtmlGenericControl("li");
var form = new HtmlGenericControl("form");

// every 3rd li reset ul
if (i % 3 == 0) ul = new HtmlGenericControl("ul");

// add item to form
form.Controls.Add(item);

// add form to li
li.Controls.Add(form);

// add li to ul
ul.Controls.Add(li);

// add ul to div
containerDiv.Controls.Add(ul);
[/csharp]

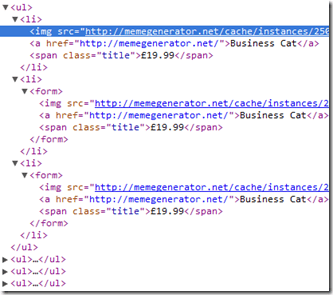
I added in a <form> tag and put the control in there, then put the form in the li and the li in the ul. However, this resulted in the following HTML being rendered:

232111_codecontrol_elem_form

Eh? Why does the first <li> not have a <form> in there but the rest of them do? After loads of digging around my code and debugging I just tried something a bit random and changed it from a <form> to a <span>:
[csharp highlight=”4,10,13″]
// setup html nodes
var item = new CodeControl();
var li = new HtmlGenericControl("li");
var wrapper = new HtmlGenericControl("span");

// every 3rd li reset ul
if (i % 3 == 0) ul = new HtmlGenericControl("ul");

// add item to form
wrapper.Controls.Add(item);

// add form to li
li.Controls.Add(wrapper);

// add li to ul
ul.Controls.Add(li);

// add ul to div
containerDiv.Controls.Add(ul);
[/csharp]

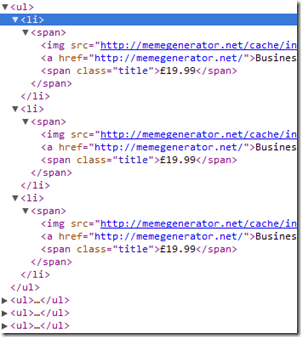
Resulting in this HTML:

232111_codecontrol_elem_span

Wha? So if I use a <span> all is good and a <form> kills the first one? I don’t get it. I still don’t get it, and I’ve not had time to dig into it. in the end I just altered the jQuery to look for closest(‘span’) instead of closest(‘form’) and everything was peachy.


If anyone knows why this might happen, please do comment. It’s bugging me.

Git on Windows: Debugging Problems With Msysgit

Getting git working on Linux is really simple: apt-get install git, ssh-keygen –t rsa –C “[email protected]”, cat ~/.ssh/id_rsa.pub, copy to clipboard, paste in your git repo host, ssh [email protected] (accept the new host key), git clone [email protected]:/yourproject.git, bam, done.


Getting it working with Windows can be a right sod. Or it can be equally simple if you’ve not already tried loads of different methods, leaving loads of other conflicting apps installed.

The Good:

If you follow the github Windows setup tutorial you’ll be pretty much there already.

The Bad:

If you’ve already installed things such as TortoiseGit and PuTTY you may see some confusing errors.

Those along the lines of

[bash]FATAL_ERROR Disconnected: No supported authentication methods available[/bash]

or

[bash]FATAL_ERROR The remote end hung up unexpectedly[/bash]

are usually related to your public key not being correctly used in the connection.

If you can ssh correctly to the repo I found that this can happen if you have the wonderful PuTTY installed and have pageant (key manager) running somewhere, forcing msysgit to use pageant as the key manager instead of OpenSSH (assuming you selected the OpenSSH option in the msysgit installation).

Some say to update the GIT_SSH environment variable (I didn’t have one to delete, so this didn’t help me much). I ended up deleting PuTTY (overkill) and Pageant and ensuring no related processes were running.


If you get errors along the lines of “access denied” when you try to view or delete a repo:

Following the answer to this SO post; the first step is to see what is locking the file. Pop over to sysinternals and make sure you have the wonderful Process Explorer to hand.

You’ll most likely find that the process in question is TGitCache – a process related to TortoiseGit. Kill the process and uninstall if you don’t use it.

HTH

My first productionised powershell script

I’ve been tooling around with powershell recently, trying to teach myself some basics, and a recent support request which would have previously been done manually looked like a perfect opportunity for a little ps1 script.

The request was to disable a feature on the website which is configured from a setting in the web.config file on each server. Since web.configs are xml files, I thought I could treat it as such, traversing and editing values as needed.

So here it is; pretty lengthy for what it’s doing since I don’t know the nicer ways of doing some things (e.g., var foo = (bar == baz ? 0 : 1), and var sna = !sna), and as such any comments to help out would be appreciated:

[powershell]
function ValueToText([string] $val){
if ($val -eq "1"){return "enabled"}
else {return "disabled"}
}

[System.Xml.XmlDocument] $xd = new-object System.Xml.XmlDocument
# pipe-delimited servers to work against
$servers = "192.168.0.1|192.168.0.2|192.168.0.3"

foreach ($server in $servers.Split("|")) {
write-host "Now configuring " $server

$file = "\\" + $server + "\d$\Web\web.config"
$xd.load($file)

# save a backup, just in case I snafu the site
$xd.save($file + ".bak")

# keys to edit
$nodelist = $xd.selectnodes("/configuration/appSettings/add[contains(@key,’Chat’)]")

foreach ($node in $nodelist) {
$key = $node.getAttribute("key")
$val = $node.getAttribute("value")
$setting = ValueToText($val)

$prompt = $key + " is currently " + $setting + ": toggle this? Y/N"
$toggle = read-host $prompt

if ($toggle -eq "Y" -or $toggle -eq "y"){
if ($val -eq "1") {$newbool = "0"}
else {$newbool = "1"}

$node.setAttribute("value", $newbool)

$newsetting = ValueToText($newbool)
$prompt = $key + " is now " + $newsetting
write-host $prompt
}
}
$xd.save($file)
}
write-host * done *
[/powershell]

It’s probably not much more than a “hello world”, but it certainly helped me out recently 🙂

Batch file to create an IIS7 website

Really simple stuff which is helping me out when hosting multiple sites for development on one machine; you either pass in as parameters or specify as responses

  1. the directory name of your site – e.g. “D:\Dev\MySite1” would be “MySite1”
  2. the port number you want it on
  3. the site ID

and it’ll set up the site, migrate your config settings to II7 if necessary, start the new site and let you know the URL to access it.

@echo off
setlocal EnableDelayedExpansion

REM Get parameters from user if they're not specified
if [%1]==[] set /P directory="Enter name of directory/site: "
if [%2]==[] set /P port="Enter port number: "
if [%3]==[] set /P sitenum="Enter site number: "

REM Create site in IIS
%systemroot%\system32\inetsrv\appcmd add site /name:"%directory%" /id:%sitenum% /physicalPath:"D:\Dev\%directory%" /bindings:http/*:%port%:%computername%

REM Attempt to migrate config to IIS7 stylee
%SystemRoot%\system32\inetsrv\appcmd migrate config "%directory%/"

REM Start new site
%SystemRoot%\system32\inetsrv\appcmd start site "%directory%"

echo site "%directory%" now running at http://%computername%:%port%

REM interactive mode
if [%1]==[] (if [%2]==[] (if [%3]==[] (
    pause
    exit
)))

I will change this to pull the next available site ID and port number unless someone else can tell me how to do that.

And yes, this would be very easy in Powershell but I’ve not done that version either..!

Also, if you’d like to know how I managed to get Syntaxhighlighter to work nicely with batch/cmd/dos, leave a comment. There are *no* nice, simple, tutorials out there with common mistakes, so I could paste my steps in here if necessary.

TeamCity + Git + NuGet + AppCmd= automated versioned deployments V1

Attempting to implement a Continuous Deployment workflow whilst still having fun can be tricky. Even more so if you want to use reasonably new tech, and even more if you want to use free tech!

If you’re not planning on using one of the cloud CI solutions then you’re probably (hopefully) looking at something like TeamCity, Jenkins, or CruiseControl.Net. I went with TeamCity after having played with CruiseControl.Net and not liked it too much and having never heard of Jenkins until a few weeks ago.. ahem..

So; my intended ideal workflow would be along the lines of:

  • change some code
  • commit to local git
  • push to remote repo
  • TeamCity picks it up, builds, runs tests, etc (combining and minifing static files – but that’s for another blog post)
  • creates a nuget package
  • deploys to a private nuget repo
  • subscribed endpoint servers pick up/are informed of the updated package
  • endpoint servers install the updated package

Here’s where I’ve got with that so far:


1) On the development machine

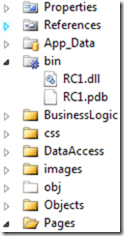
a. Within your VisualStudio project ensure the bin directory is included

I need the compiled dlls to be included in my nuget package, so I’m doing this since I’m using the csproj file as the package definition file for nuget instead of a nuspec file.

Depending on your VCS IDE integration, this might have nasty implications which are currently out of scope of my proof of concept (e.g. including the bin dir in the IDE causes the DLLs to be checked into your VCS – ouch!). I’m sure there are better ways of doing this, I just don’t know them yet. If you do, please leave a comment!

In case you don’t already know how to include stuff into your Visual Studio project (hey, I’m not one to judge! There’s plenty of basic stuff I still don’t know about my IDE!):

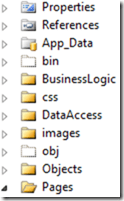
i. The bin dir not included:

vs2010_bin_excluded

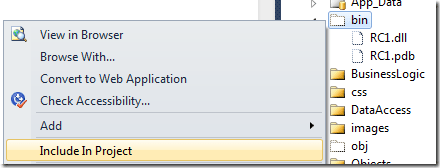
ii. Click the “don’t lie to me“ button*:

vs2010_dltm

iii. Select “include in project”:

vs2010_bin_include_dialog

iv. The bin dir is now included:

vs2010_bin_included


b. Configure source control

Set up your code directory to use something that TeamCity can hook into (I’ve used SVN and Git successfully so far)

That’s about it.


2) On the build server

a. Install TeamCity

i. Try to follow the instructions on the TeamCity wiki

b. Install the NuGet package manager TeamCity add in

i. Head to the JetBrains TeamCity public repo

ii. Log in as Guest

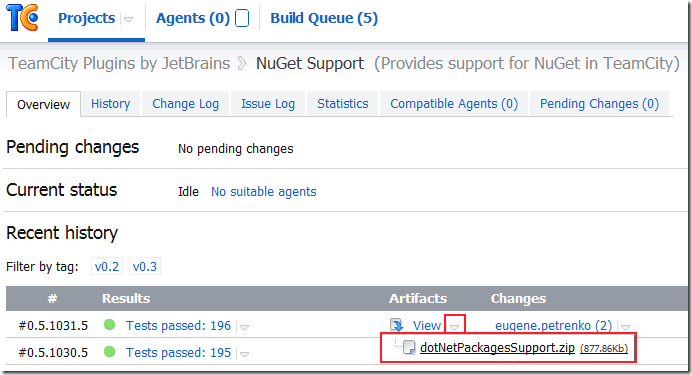
iii. Select the zip artifact from either the latest tag (or if you’re feeling cheeky the latest build):

teamcity_nuget_plugin_1

iv. Save it into your own TeamCity’s plugins folder

v. Restart your TeamCity instance

(The next couple of steps are taken from Hadi Hariri’s blog post over at JetBrains which I followed to get this working for me)

vi. Click on Administration | Server Configuration. If the plug-in installed correctly, you should now have a new Tab called NuGet

adminpanelnuget

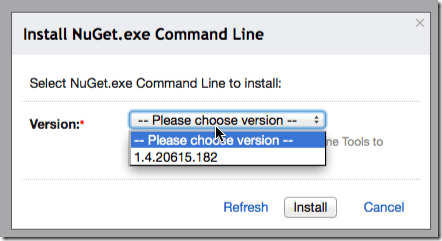
vii. Click on the “Install additional versions of the NuGet.exe Command Line”. TeamCity will read from the feed and display available versions to you in the dialog box. Select the version you want and click Install

nugetversion


c. Configure TeamCity

i. Set it up to monitor the correct branch

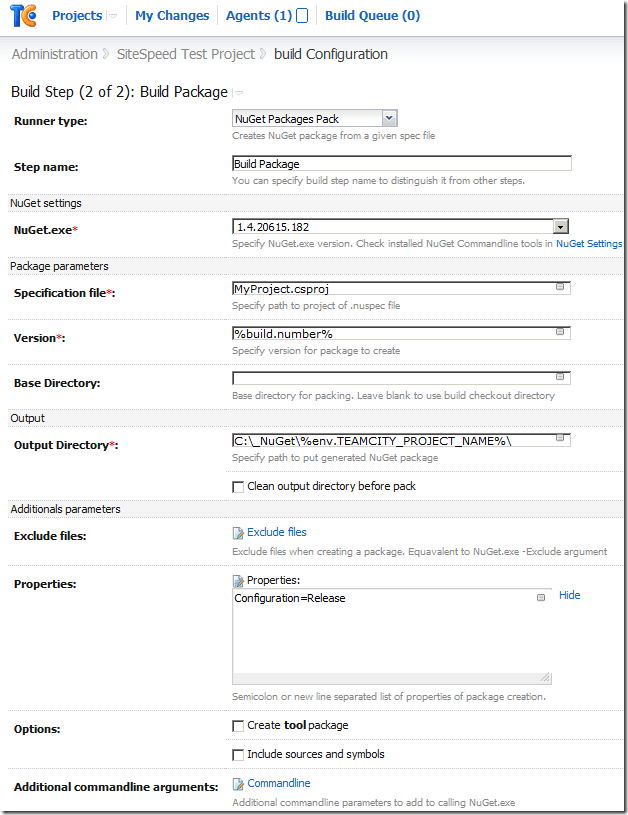
ii. Create a nuget package as a build step, setting the output directory to a location that can be accessed from your web server; I went for a local folder that had been configured for sharing:

teamcity_nuget_1

In addition to this, there is a great blog post about setting your nuget package as a downloadable artifact from your build, which I’m currently adapting this solution to use; I’m getting stuck with the Publish step though, since I only want to publish to a private feed. Hmm. Next blog post, perhaps.


3) On the web server (or “management” server)

a. Install NuGet for the command line

i. Head over to http://nuget.codeplex.com/releases

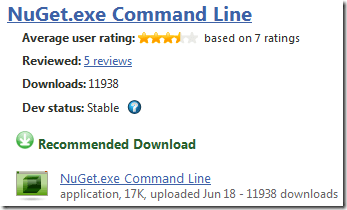
ii. Select the command line download:

nuget_cmdline_dl

iii. Save it somewhere on the server and add it to your %PATH% if you like


b. Configure installation of the nuget package

i. Get the package onto the server it needs to be installed on

Using Nuget, install the package from the TeamCity package output directory:
[code]nuget install "<MyNuGetProject>" –Source <path to private nuget repo>[/code]
e.g.
[code]nuget install "RposboWeb" –Source \\build\_packages\[/code]
This will generate a new folder for the updated package in the current directory. What’s awesome about this is it means you’ve got a history of your updates, so breaking changes notwithstanding you could rollback/update just by pointing IIS at a different folder.

Which brings me on to…

ii. Update IIS to reference the newly created folder

Using appcmd, change the folder your website references to the “content” folder within the installed nuget package:
[code]appcmd.exe set vdir "<MyWebRoot>/" /physicalpath:"<location of installed package>\content"[/code]
e.g.
[code]appcmd.exe set vdir "RposboWeb/" /physicalpath:"D:\Sites\RposboWeb 1.12\content"[/code]

So, the obvious tricky bit here is getting the name of the package that’s just been installed in order to update IIS. At first I thought I could create a powershell build step in TeamCity which takes the version as a parameter and creates an update batch file using something like the below:
[code]param([string]$version = "version")
$stream = [System.IO.StreamWriter] "c:\_NuGet\install_latest.bat"
$stream.WriteLine("nuget install \"<MyNugetProject>\" –Source <path to private nuget repo>")
$stream.WriteLine("\"%systemroot%\system32\inetsrv\appcmd.exe\" set vdir \"<MyWebRoot>/\" /physicalpath:\"<root location of installed package>" + $version + "\content\"")
$stream.Close()[/code]
However, my powershell knowledge is miniscule so this automated installation file generation isn’t working yet…

I’ll continue working on both this installation file generation version and also a powershell version that uses IIS7 administration provider instead of appcmd.
 

In conclusion

  • change some code – done (1)
  • commit to local git – done (1)
  • push to remote repo – done (1)
  • TeamCity picks it up, builds, runs tests, etc – done (2)
  • creates a nuget package – done (2)
  • deploys to a private nuget repo – done (2)
  • subscribed endpoint servers pick up/are informed of the updated package – done/in progress (3)
  • endpoint servers install the updated package – done/in progress (3)

 
Any help on expanding my knowledge gaps is appreciated – please leave a comment or tweet me! I’ll add another post in this series as I progress.
 

References

NuGet private feeds
http://haacked.com/archive/2010/10/21/hosting-your-own-local-and-remote-nupack-feeds.aspx
http://blog.davidebbo.com/2011/04/easy-way-to-publish-nuget-packages-with.html
 
TeamCity nuget support
http://blogs.jetbrains.com/dotnet/2011/08/native-nuget-support-in-teamcity/
 
Nuget command line reference
http://docs.nuget.org/ | http://docs.nuget.org/docs/reference/command-line-reference
 
IIS7 & Powershell
http://blogs.iis.net/thomad/archive/2008/04/14/iis-7-0-powershell-provider-tech-preview-1.aspx
http://learn.iis.net/page.aspx/447/managing-iis-with-the-iis-70-powershell-snap-in/
http://technet.microsoft.com/en-us/library/ee909471(WS.10).aspx
 

* to steal a nice quote from Scott Hanselman

AppHarbor, Heroku, Git, and the Sweet, Sweet CI Process

The background: I thought that my Mobile TFL Bus Countdown site might be suddenly very popular for a very short time (for about a weekend perhaps) and didn’t want to pay for the potential sudden jolt in hosting costs from my own servers. As such, I developed it locally using git as VCS, pushed it to my newly acquired Appharbor account, and just saw it suddenly available to browse at rposbo.apphb.com

The pitch: For your own small website/app you probably edit it locally on your PC, maybe you even have source control like a good dev, you’ll compile the code and then you’ll copy it to your hosting provider, probably using FTP/ via a web interface/ SCP/ SSH.

Then at work you’re probably shouting about how awesome CI builds are and how to introduce continuous deployment as part of a branching and build strategy.

You might even use Azure or EC2 at work, maybe for your own little home projects too. Maybe you’ve learned a bit of git but your office uses TFS (ugh) or SVN (meh).

So why not do this for your own stuff? For free? In the cloud?

Imagine the ideal workflow: make some code changes –> commit them to (D)VCS –> push them to a (remote) repo –> the push kicks off a build the committed project (git hook) –> run any associated tests, then if they pass –> deploy the app to the cloud.

That’s exactly what Appharbor and Heroku do! Let’s start with the pretty one:

Heroku

Heroku says it’s a “cloud application platform” for running scalable Ruby, Node.js, Clojure, and Java sites/apps. To create and deploy a new site is, apparently, as easy as:

[code gutter=”off”]$ heroku create
Created sushi.herokuapp.com | [email protected]:sushi.git

$ git push heroku master
—–&gt; Heroku receiving push
—–&gt; Rails app detected
—–&gt; Compiled slug size is 8.0MB
—–&gt; Launching… done, v1
http://sushi.herokuapp.com deployed to Heroku[/code]

So here the flow is: write some code –> commit to git –> push to Heroku –> code is built –> code is deployed. Done.

heroku homepage

The Heroku website is fantastically full of all the information you’d want to get started, and their pictorial representation of how their solution works and the various levels of databases you can buy are geek-awesome:

heroku databases

“This app needs a BAKU DATABASE!! GRRAARRRR!!” Go and have a look and bask in the beautiful piccies and animations. No wonder this is (apparently) the place to go to write and deploy cloud hosted Facebook apps.

Thanks to Heroku I’m finally beaing pushed to learn Ruby, but haven’t managed anything quite yet, hence no demo of the Heroku flow – wait a few more posts and I’ll have something Ruby-fied and certainly some Node.js as I’ve been meaning to get into that for a while, possibly even Clojure (sounds fun) and Java (old school!).

Next up is one for the .net crowd:

appharbor

Appharbor sells itself as “Azure done right” which confused me. The website itself is verrrry low on information so I just assumed it would deploy my app to Azure. Turns out I was wrong:

appharbor chat on twitter

Despite my being pedantic over their homepage tagline I took the dive and just signed up. Only once you’ve done this do you get to see the money shot – the intro video; a new MVC app in Visual Studio to EC2 cloud via git + appharbor in a matter of minutes:

Now I have my account and I have a great intro vid I just hop into my code directory;

[code gutter=”off”]git init
git add .
git commit –m "init"
git remote add appharbor <git repo url appharbor gave me>
git push appharbor master[/code]

And that’s it. Committed code is checked out on their servers, built, any associated tests are executed, if everything passes then it gets deployed – and you can see all this from your Appharbor account:

appharbor deployment

(mine didn’t actually have anything to build, as it was a single html page and that really basic asmx web proxy I wrote).

In conclusion; you now have absolutely no excuse to not write and deploy whatever applications you feel like writing. There is no hosting to worry about, no build server – it just works. Use Appharbor for your .Net and use Heroku as an excuse to look at their pretty pictures and learn something that’s not .Net.

I know I will.

Comments appreciated.

London Buses and The Javascript Geolocation API

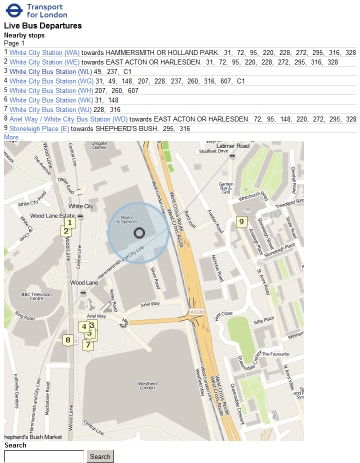
The wonderful people at Transport For London (TFL) recently released (but didn’t seem to publicise) a new page on their site that would give you a countdown listing of buses due to arrive at any given stop in London.

This is the physical one (which only appears on some bus stops):

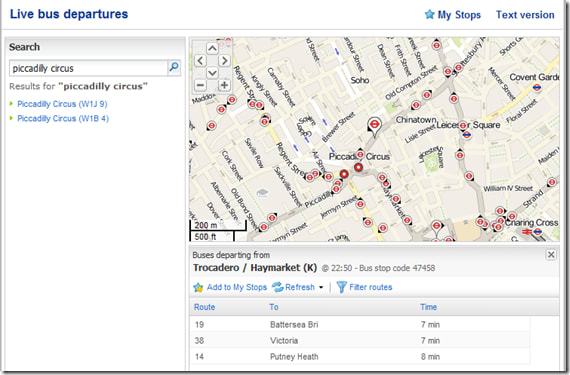
And this is the website one, as found at countdown.tfl.gov.uk

countdown

Before I continue with the technical blithering, I’d like quantify how useful this information is by way of a use case: you’re in a pub/bar/club, a little worse for wear, the tubes have stopped running, no cash for a cab, it’s raining, no jacket. You can see a bus stop from a window, but you’ve no idea how long you’d have to wait in the rain before your cheap ride home arrived. IF ONLY this information were freely available online so you can check if you have time for another drink/comfort break/say your goodbyes before a short stroll to hail the arriving transport.

With this in mind I decided to create a mobile friendly version of the page.

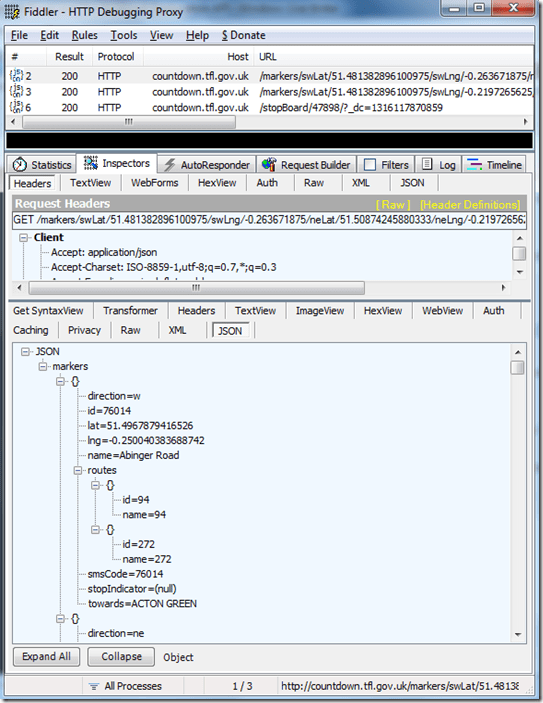
If you visit the tfl site (above) and fire up fiddler you can see that the request for stops near you hits one webservice which returns json data,

fiddler_tfl_countdown_1

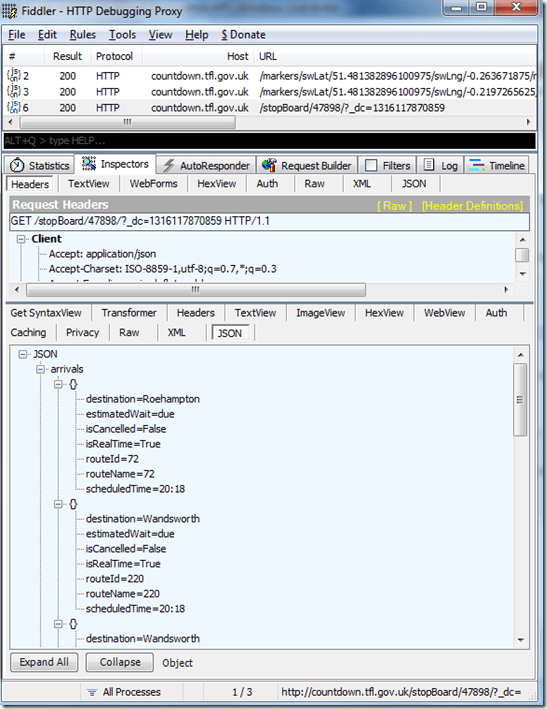
and then when you select a stop there’s another call to another endpoint which returns json data for the buses due at that stop:

fiddler_tfl_countdown_2

Seems easy enough. However, the structure of the requests which follow on from a search for, say, the postcode starting with “W6” is a bit tricky:


http://countdown.tfl.gov.uk/markers/
swLat/51.481382896100975/
swLng/-0.263671875/
neLat/51.50874245880333/
neLng/-0.2197265625/
?_dc=1315778608026

That doesn’t say something easy like “the postcode W6”, does it? It says “these exact coordinates on the planet Earth”.

So how do I emulate that? Enter JAVASCRIPT’S NAVIGATOR.GEOLOCATION!

Have you ever visited a page or opened an app on your phone and saw a popup asking for your permission to share your location with the page/app? Something like:

Or in your browser:

image

This is quite possibly the app attempting to utilise the javascript geolocation API in order to try and work out your latitude and longitudinal position.

This information can be easily accessed by browsers which support the javascript navigator.geolocation API. Even though the API spec is only a year old, diveintohtml5 point out it’s actually currently supported on quite a few browsers, including the main mobile ones.

The lat and long can be gleaned from the method

[javascript]
navigator
.geolocation
.getCurrentPosition
[/javascript]

which just takes a callback function as a parameter passing a “position” object e.g.

[javascript]
navigator
.geolocation
.getCurrentPosition(showMap);

function show_map(position) {
var latitude = position.coords.latitude;
var longitude = position.coords.longitude;
// let’s show a map or do something interesting!
}
[/javascript]

Using something similar to this we can pad the single position to create a small area instead, which we pass to the first endpoint, retrieve a listing of bus stops within that area, allow the user to select one, pass that stop ID as a parameter to the second endpoint to retrieve a list of the buses due at that stop, and display them to the user.

My implementation is:

[javascript]
$(document).ready(function() {
// get lat long
if (navigator.geolocation){
navigator
.geolocation
.getCurrentPosition(function (position) {
getStopListingForLocation(
position.coords.latitude,
position.coords.longitude);
});
} else {
alert(‘could not get your location’);
}
});
[/javascript]

Where getStopListingForLocation is just

[javascript]
function getStopListingForLocation(lat, lng){
var swLat, swLng, neLat, neLng;
swLat = lat – 0.01;
swLng = lng – 0.01;
neLat = lat + 0.01;
neLng = lng + 0.01;

var endpoint =
‘http://countdown.tfl.gov.uk/markers’ +
‘/swLat/’ + swLat +
‘/swLng/’ + swLng +
‘/neLat/’ + neLat +
‘/neLng/’ + neLng + ‘/’;

$.ajax({
type: ‘POST’,
url: ‘Proxy.asmx/getMeTheDataFrom’,
data: "{‘here’:’"+endpoint+"’}",
contentType: "application/json; charset=utf-8",
dataType: "json",
success: function(data) {
displayStopListing(data.d);
}
});
}
[/javascript]

The only bit that had me confused for a while was forgetting that browsers don’t like cross browser ajax requests. The data will be returned and is visible in fiddler, but the javascript (or jQuery in my case) will give a very helpful “error” error.

As such, I created the World’s Simplest Proxy:

[csharp]
[System.Web.Script.Services.ScriptService]
public class Proxy: System.Web.Services.WebService
{

[WebMethod]
public string getMeTheDataFrom(string here)
{
using (var response = new System.Net.WebClient())
{
return response.DownloadString(here);
}
}
}
[/csharp]

All this does, quite obviously, is to forward a request and pass back the response, running on the server – where cross domain requests are just peachy.

Then I have a function to render the json response

[javascript]
function displayStopListing(stopListingData){
var data = $.parseJSON(stopListingData);
$.each(data.markers, function(i,item){
$("<li/>")
.text(item.name + ‘ (stop ‘ + item.stopIndicator + ‘) to ‘ + item.towards)
.attr("onclick", "getBusListingForStop(" + item.id + ")")
.attr("class", "stopListing")
.attr("id", item.id)
.appendTo("#stopListing");
});
}
[/javascript]

And then retrieve and display the bus listing

[javascript]
function getBusListingForStop(stopId){
var endpoint = ‘http://countdown.tfl.gov.uk/stopBoard/’ + stopId + ‘/’;

$("#" + stopId).attr("onclick","");

$.ajax({
type: ‘POST’,
url: ‘Proxy.asmx/getMeTheDataFrom’,
data: "{‘here’:’"+endpoint+"’}",
contentType: "application/json; charset=utf-8",
dataType: "json",
success: function(data) { displayBusListing(data.d, stopId); }
});
}

function displayBusListing(busListingData, stopId){
var data = $.parseJSON(busListingData);

$("<h2 />").text("Buses Due").appendTo("#" + stopId);

$.each(data.arrivals, function(i,item){

$("<span/>")
.text(item.estimatedWait)
.attr("class", "busListing time")
.appendTo("#" + stopId);

$("<span/>")
.text(item.routeName + ‘ to ‘ + item.destination)
.attr("class", "busListing info")
.appendTo("#" + stopId);

$("<br/>")
.appendTo("#" + stopId);
});
}
[/javascript]

(yes, my jQuery is pants. I’m working on it..)

These just need some very basic HTML to hold the output

[html]
<h1>Bus Stops Near You (tap one)</h1>
<ul id="stopListing"></ul>
[/html]

Which ends up looking like

The resultingfull HTML can be found here, the Most Basic Proxy Ever is basically listed above, but also in “full” here. If you want to see this in action head over to rposbo.apphb.com.

Next up – how this little page was pushed into the cloud in a few seconds with the wonder of AppHarbor and git.

UPDATE

Since creation of this “app” TFL have created a very nice mobile version of their own which is much nicer than my attempt! Bookmark it at m.countdown.tfl.gov.uk :


Sending Tweets from Amazon EC2

Given how unstable the EC2 microinstance I use is, I wanted to be able to automatically restart the blog related services and alert me that a restart had occurred.

I decided to try and get the alert via a tweet and doing this is actually pretty easy. All it consists of doing is:

1) Register a Twitter app at dev.twitter.com

2) Set up a new Twitter account  for your tweets to come from

3) Authenticate your new account with your new app

4) Configure something to use your app to send tweets from your new account

Luckily, this has all already been done by someone much cleverer than me, so I copied them! Have a look at this blog post by Jeff Miller explaining how to use the python Twitter API script Tweepy.

My EC2 instance already had python installed so all I needed to do was install git, get the tweepy code from the github repo here (the location of the github repo in the article is incorrect, so a little googling helped me find the correct location), and follow the instructions exactly!

Essentially this consisted of:

sudo yum -y install git
sudo git clone git://github.com/tweepy/tweepy.git
cd tweepy
sudo python setup.py install

Then follows some copying and pasting of auth keys and urls to end up with a nice script on the EC2 instance which was authorised to send tweets from my new twitter account, @rposboEC2.

All that was left was to link this into the startup script:

sudo nano /etc/rc.d/rc.local

by adding in a new line at the end and set the status to include my own twitter account so I see it as a mention and will therefore also receive an email alert automatically:

sudo python /home/ec2-user/tweepy/ec2Event.py '@rposbo EC2 microinstance event raised: Restarted'

Done! Firing off this script now restarts Apache and mysql and sends the tweet below:

Project: Hands-free (or as close as possible) DVD Backup


I’ve recently bought a 2TB LaCie LaCinema Classic HD Media HDD as the solution to my overly complex home media solution. The previous solution involved a networked Mac Mini hooked to the TV, streaming videos from an NSLU2 Linksys NAS (unslung, obviously) or my desktop in another room, using my laptop to VNC in to the Mac and control VLC.

Not exactly a solution my wife could easily use.

The LaCinema is a wonderful piece of kit; very simple interface, small but mighty remote control, is recognised as a media device on your network, can handle HD video, and pretty reasonable for the capacity and functionality. Plus it’s so easy to use I can throw the remote to the missus and she’ll be happy to use it.

Now comes the hard part: transferring a couple of hundred DVDs to the LaCinema internal HD. Ripping CDs is easy, since you can configure even Windows Media Player to detect a CD being inserted, access the CDDB, create the correct folders, rip the CD, even eject it when done.

Nothing comparable seems to exist for DVDs, which is extremely frustrating. You always need to have manual interaction to either specify the name of the DVD you’re ripping, the streams you want to rip, the size and format of the output video file, etc.

I can’t be arsed with all that faffing around for my sprawling DVD collection, so I thought about creating a solution.

I’ve gone for a windows service with a workflow-esque model that has the following steps:

1. Detect a DVD being inserted
2. Look up the film/series name, year, genre, related images online
3. Determine which sections and streams to rip
4. Rip to local PC
5. Move to media centre

Over the next few posts I’ll go into a bit more detail on the challenges each stage posed and the solutions I came up with. I’ll post the code online and would love for some constructive feedback!

This isn’t about me making something that everyone should look at and go “oooh, he’s so clever”, it’s about having a solution for ripping a DVD library that everyone can use and tweak to suit their own requirements. As such, help is always appreciated.