Unit Testing Powershell with Pester

I write a lot of Powershell these days; it’s my go-to language for quick jobs that need to interact with external systems, like an API, a DB, or the file system for example.

Nothing to configure, nothing to deploy, nothing to set up really; just hack a script together and run it. Perfect for one-off little tasks.

I’ve used it for all manner of things in my career so far, most notably for Azure automation back before Azure had decent automation in place. We’re talking pre-Resource Manager environment creation stuff.

I would tie together a suite of separate scripts which would individually:

  • create a Storage account,
  • get the key for the Storage account,
  • create a DB instance,
  • execute a DB initialisation script,
  • create a Service Bus,
  • execute a Service Bus initialisation script,
  • deploy Cloud Services,
  • start/stop/restart those services

Tie that lot together and I could spin up an entire environment easily.

powershell_azure_createdb

Continue reading

Save 24% With The Last Frontier of Minification: HTML!

As a web developer, front end developer, or web performance enthusiast (or all of those), it’s likely that you’re already minifying your JavaScript (or uglifying it) and most likely your css too.

Why do we do this?

We minify specifically to reduce the bytes going over the wire; trying to get our websites as tiny as possible in order to shoot them through the internet faster than our competitor’s.

We obsess over optimising our images, carefully choosing the appropriate format and tweaking the quality percentage, hoping to achieve the balance between clarity and file size.

So we have teeny tiny JavaScript; we have clean, minified, uncssed css; we have perfectly small images (being lazy loaded, no doubt).

So what’s left?…

The ever-overlooked … HTML minification!

Thats right! HTML! BOOM!

Seriously though; HTML may be the one remaining frontier for optimisation. If you’ve covered off all the other static files – the css, js, and images – then not optimising html seems like a wasted opportunity.

If you view the source of most websites you visit you’ll probably find line after line of white space, acres of indents, reams of padding, novels in the forms of comments.

Every single one of these is a wasted opportunity to save bytes; to squeeze the last few bits out of your HTTP response, turning it from a hulking oil tanker into a zippy land speeder.

Continue reading

Getting Browser Location in Chrome and Deprecating Powerful Features on Insecure Origins

A while ago I created the most useful web page I’ve ever written; an extremely basic page to list the bus arrival times, based on your current location anywhere in London!

I have used this page several times a day on an almost daily basis since I created it, as does my wife; every morning we need to know when the next bus will arrive near our house in order to know when to rush out with our children to take them to school.

I used it every morning to check if I needed to rush out the door to catch the rare “express” bus that would get me to the tube much quicker than the usual one.

I discovered just how useful it is whilst in a pub, deciding whether I had time for another drink before heading home; a quick glance at my phone and I could find out that the next bus home wasn’t for 20 minutes – plenty of time!

However, recently it stopped working for me. It still worked just fine on my wife’s iPhone (and hence Safari), but not on my Nexus (Chrome). It works on my laptop too, or at least appeared to.

So what’s going on?

Continue reading

Lazy Loading Images? Don’t Rely On JavaScript!

So much of the internet is now made up of pages containing loads of images; just visit your favourite shopping site and scroll through a product listing page for an example of this.

As you can probably imagine, bringing in all of these images when the page loads can add unnecessary bloat, causing the user to download lots of data they may not see. It can also make the page slow to interact with, due to the page layout constantly changing as new images load in, causing the browser to reprocess the page.

One popular method to deal with this is to “Lazy Load” the images; that is, to only load the images just before the user will need to see them.

If this technique is applied to the “above the fold” content – i.e., the first average viewport-sized section of the page – then the user can get a significantly faster first view experience.

So everyone should always do this, right?

Before we get on to that, let’s look at how this is usually achieved. It’s so easy to find a suitable jQuery plugin or angularjs module that a simple install command later and you’re almost done; just add a new attribute to image tags or JavaScript method to process the images you want to delay loading for.

So surely this is a no-brainer?

Continue reading

Client Hints in Action

Following along from my recent post about responsive images using pure HTML, this post is about the more server-centric option. It doesn’t answer the art direction question, but it can help reduce the amount of HTML required to implement fully responsive images.

Client hint example site

If you are aware of responsive images and the <picture> element, you’ll know that the code required to give the browser enough choices and information in order to have it request the correct image can be somewhat verbose.

This article will cover the other side of the story, allowing the server to help with the decision of which image to show and ultimately greatly reducing the HTML required to achieve responsive images

Continue reading

Responsive Images Basics

srcset, sizes, and picture element

The term “Responsive Images” has been in common use for a while now. It refers to the ability to deliver the most appropriate image for the available viewport size, pixel density, even network connectivity.

For example, a Mac with a huge retina display is capable of displaying an extremely high resolution, large, image; whereas a phone in portrait mode on 3G may be better off with a smaller image – both in terms of dimensions and file size – which has been cropped to focus on the most important part of the image.

To achieve this required a significant amount of effort from the Responsive Images Working Group (RIWG) to help get functionality like the <picture> element and support for srcset and sizes attributes on both <picture> and <img /> into major browsers.

srcset

The srcset attribute allows us to define different sources for the same image, depending on the size and pixel density of the device’s display.

srcset’s “x” – pixel density (dpr)

So to display a different image for different pixel densities (e.g. standard definition or high def/retina) we might use something like:

<img src="img-base.png" 
    srcset="img-1x.png 1x, 
            img-2x.png 2x,
            img-3x.png 3x" />

The browser then decides which image to request based on the device capabilities (and potentially connectivity too).

Continue reading

Introduction to GruntJS for Visual Studio

As a developer, there are often tasks that we need to automate to make our daily lives easier. You may have heard about GruntJS or even Gulp before.

In this article, I am going to run through a quick intro to successfully using gruntjs to automate your build process within the usual IDE of .Net developers: Visual Studio..

gruntjs (Grunt)

gruntjs logo

What is it?

Gruntjs is a JavaScript task runner; one of a few that exist, but only one of two to become mainstream – the other being Gulp. Both do pretty similar things, both have great support and great communities.

Whereas gulp = tasks defined in code, grunt = tasks defined in configuration.

It’s been going on for a while – check this first commit from 2011!

What does it do?

A JavaScript task runner allows you to define a set of tasks, subtasks, and dependent tasks, and execute these tasks at a time of your choosing; on demand, before or after a specific event, or any time a file changes, for example.

These tasks range from things like CSS and JS minification and combination, image optimisation, HTML minification, HTML generation, redact code, run tests, and so on. A large number of the available plugins are in fact grunt wrappers around existing executables, meaning you can now run those programs from a chain of tasks; for example: LESS, WebSocket, ADB, Jira, XCode, SASS, RoboCopy.

The list goes on and on – and you can even add your own to it!

How does it work?

GruntJS is a nodejs module, and as such is installed via npm (node package manager). Which also means you need both npm and nodejs installed to use Grunt.

nodejs logo npm logo

By installing it globally or just into your project directory you’re able to execute it from the command line (or other places) and it will check the current directory for a specific file called “gruntfile.js“. It is in this gruntfile.js that you will specify and configure your tasks and the order in which you would like them to run. Each of those tasks is also a nodejs module, so will also need to be installed via npm and referenced in the package.json file.

The package.json is not a grunt-specific file, but an npm-specific file; when you clone a repo containing grunt tasks, you must first ensure all development dependencies are met by running npm install, which installs modules referenced within this packages.json file. It can also be used by grunt to pull in project settings, configuration, and data for use within the various grunt tasks; for example, adding a copyright to each file with your name and the current date.

Using grunt – WITHOUT Visual Studio

Sounds AMAAAAYYZING, right? So how can you get your grubby mitts on it? I’ve mentioned a few dependencies before, but here they all are:

  • nodejs – grunt is a nodejs module, so needs to run on nodejs.
  • npm – grunt is a nodejs module and depends on many other nodejs packages; sort of makes sense that you’d need a nodejs package manager for this job, eh?
  • grunt-cli – the grunt command line tool, which is needed to actually run grunt tasks
  • package.json – the package dependencies and project information, for npm to know what to install
  • gruntfile.js – the guts of the operation; where we configure the tasks we want to run and when.

First things first

You need to install nodejs and npm (both are installed with nodejs).

grunt-cli

Now you’ve got node and npm, open a terminal and fire off npm install -g grunt-cli to install grunt globally. (You could skip this step and just create a package.json with grunt as a dependency and then run npm install in that directory)

Configuration

The package.json contains information about your project, and the various package dependencies. Think of it as a slice of NuGet’s packages.config and a sprinkle of your project’s .sln file; it contains project-specific data, such as the name, author’s name, repo location, description, as well as defining modules on which your project depends in order to build and run

Create a package.json file with some simple configuration, such as that used on the gruntjs site:

{
  "name": "my-project-name",
  "version": "0.1.0"
}

Or you could run npm-init, but that asks for lots more info that we really need here, so the generated package.json is a bit bloated:
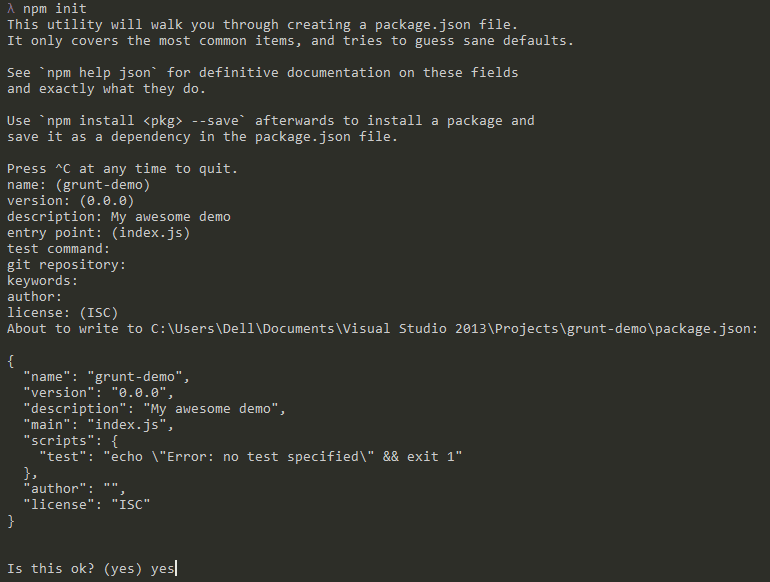
npm init

So, what’s going on in the code above? We’re setting a name for our project and a version. Now we could just add in a few more lines and run npm install to go and get those for us, for example:

{
  "name": "my-project-name",
  "version": "0.1.0",
  "devDependencies": {
    "grunt": "~0.4.5",
    "grunt-contrib-jshint": "~0.10.0",
    "grunt-contrib-nodeunit": "~0.4.1",
    "grunt-contrib-uglify": "~0.5.0"
 }
}

Here we’re saying what we need to run our project; if you’re writing a nodejs or iojs project then you’ll have lots of your own stuff referenced in here, however for us .Net peeps we just have things our grunt tasks need.

Within devDependencies we’re firstly saying we use grunt, and we want at least version 0.4.5; the tilde versioning means we want version 0.4.5 or above, up to but not including 0.5.0.

Then we’re saying this project also needs jshint, nodeunit, and uglify.

A note on packages: “grunt-contrib” packages are those verified and officially maintained by the grunt team.

But what if we don’t want to write stuff in, have to check the right version from the npm website, and then run npm install each time to actually pull it down? There’s another way of doing this.

Rewind back to when we just had this:

{
  "name": "my-project-name",
  "version": "0.1.0"
}

Now if you were to run the following commands, you would have the same resulting package.json as before:

npm install grunt --save-dev
npm install grunt-contrib-jshint --save-dev
npm install grunt-contrib-nodeunit --save-dev
npm install grunt-contrib-uglify --save-dev

However, this time they’re already installed and their correct versions are already set in your package.json file.

Below is an example package.json for an autogenerated flat file website

{
  "name": "webperf",
  "description": "Website collecting articles and interviews relating to web performance",
  "version": "0.1.0",
  "devDependencies": {
    "grunt": "^0.4.5",
    "grunt-directory-to-html": "^0.2.0",
    "grunt-markdown": "^0.7.0"
  }
}

In the example here we’re starting out by just depending on grunt itself, and two other modules; one that creates an html list from a directory structure, and one that generates html from markdown files.

Last step – gruntfile.js

Now you can create a gruntfile.js and paste in something like that specified from the gruntjs site:

module.exports = function(grunt) {
  // Project configuration.
  grunt.initConfig({
    pkg: grunt.file.readJSON('package.json'),
    uglify: {
      options: {
        banner: '/*! <%= pkg.name %> <%= grunt.template.today("yyyy-mm-dd") %> */\n'
      },
      build: {
        src: 'src/<%= pkg.name %>.js',
        dest: 'build/<%= pkg.name %>.min.js'
      }
    }
  });

  // Load the plugin that provides the "uglify" task.
  grunt.loadNpmTasks('grunt-contrib-uglify');

  // Default task(s).
  grunt.registerTask('default', ['uglify']);

};

What’s happening in here then? The standard nodejs module.exports pattern is used to expose your content as a function. Then it’s reading in the package.json file and putting that object into the variable pkg.

Then it gets interesting; we configure the grunt-contrib-uglify npm package with the uglify task, setting a banner for the minified js file to contain the package name – as specified in package.json – and today’s date, then specifying a “target” called build with source and destination directories.

Then we’re telling grunt to bring in the grunt-contrib-uglify npm module (that must already be installed locally or globally).

After the configuration is specified, we’re telling grunt to load the uglify task (which you must have previously installed for this to work) and then set the default grunt task to call the uglify task.

BINGO. Any javascript in the project’s “src” directory will get minified, have a header added, and the result dumped into the project’s “build” directory any time we run grunt.

Example gruntfile.js for an autogenerated website

module.exports = function(grunt) {

  grunt.initConfig({
  markdown: {
    all: {
      files: [
        {
          cwd:'_drafts',
          expand: true,
          src: '*.md',
          dest: 'articles/',
          ext: '.html'
        }
      ]
    },
    options: {
      template: 'templates/article.html',
      preCompile: function(src, context) {
        var matcher = src.match(/@-title:\s?([^@:\n]+)\n/i);
        context.title = matcher && matcher.length > 1 && matcher[1];
      },
      markdownOptions: {
        gfm: false,
        highlight: 'auto'
        }
      }
  },
  to_html: {
    build:{      
        options: {
          useFileNameAsTitle: true,
          rootDirectory: 'articles',
          template: grunt.file.read('templates/listing.hbs'),
          templatingLanguage: 'handlebars',

        },
        files: {
          'articles.html': 'articles/*.html'
        }
    }
  }
});

grunt.loadNpmTasks('grunt-markdown');
grunt.loadNpmTasks('grunt-directory-to-html');

grunt.registerTask('default', ['markdown','to_html']);

};

This one will convert all markdown files in a _drafts directory to html based on a template html file (grunt-markdown), then create a listing page based on the directory structure and a template handlebars file (grunt-directory-to-html).

Using grunt – WITH Visual Studio

Prerequisites

You still need nodejs, npm, and grunt-cli so make sure you install nodejs and npm install -g grunt-cli.

To use task runners within Visual Studio you first need to have a version that supports them. If you already have VS 2015 you can skip these install sections.

Visual Studio 2013.3 or above

If you have VS 2013 then you need to make sure you have at least RC3 or above (free upgrades!). Go and install if from your pals at Microsoft.

This is a lengthy process, so remember to come back here once you’ve done it!

TRX Task Runner Explorer Extension

This gives your Visual Studio an extra window that displays all available tasks, as defined within your grunt or gulp file. So go and install that from the Visual Studio Gallery

NPM Intellisense Extension

You can get extra powers for yourself if you install the intellisense extension, which makes using grunt in Visual Studio much easier. Go get it from the Visual Studio Gallery.

Grunt Launcher Extension

Even more extra powers; right-click on certain files in your solution to launch grunt, gulp, bower, and npm commands using the Grunt Launcher Extension

Tasks Configuration

Create a new web project, or open an existing one, and add a package.json and a gruntfile.js.

Example package.json

{
  "name": "grunt-demo",
  "version": "0.1.0",
  "devDependencies": {
    "grunt": "~0.4.5",
    "grunt-contrib-uglify": "~0.5.0"
 }
}

Example gruntfile.js

module.exports = function(grunt) {
  // Project configuration.
  grunt.initConfig({
    pkg: grunt.file.readJSON('package.json'),
    uglify: {
      options: {
        banner: '/*! <%= pkg.name %> <%= grunt.template.today("yyyy-mm-dd") %> */\n'
      },
      build: {
        src: 'Scripts/bootstrap.js',
        dest: 'Scripts/build/bootstrap.min.js'
      }
    }
  });

  // Load the plugin that provides the "uglify" task.
  grunt.loadNpmTasks('grunt-contrib-uglify');

  // Default task(s).
  grunt.registerTask('default', ['uglify']);

};

Using The Task Runner Extension in Visual Studio

Up until this point the difference between without Visual Studio and with Visual Studio has been non-existent; but here’s where it gets pretty cool.

If you installed everything mentioned above, then you’ll notice some cool stuff happening when you open a project that already contains a package.json.

The Grunt Launcher extension will “do a nuget” and attempt to restore your “devDependencies” npm packages when you open your project:

npm package restore

And the same extension will give you a right click option to force an npm install:
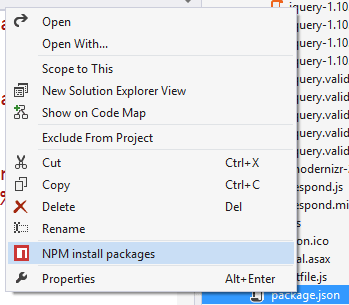
npm package restore - menu

This one also allows you to kick off your grunt tasks straight from a context menu on the gruntfile itself:
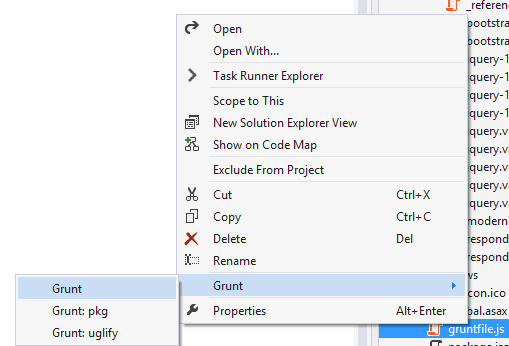
grunt launcher

Assuming you installed the intellisense extension, you now get things like auto-suggestion for npm package versions, along with handy tooltip explainers for what the version syntax actually means:
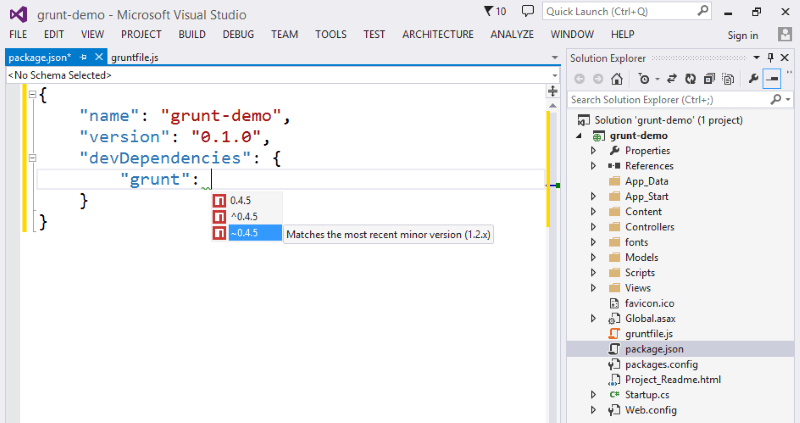
npm intellisense

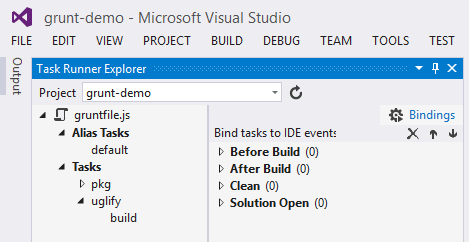
If you’d like some more power over when the grunt tasks run, this is where the Task Runner Explorer extension comes in to play:
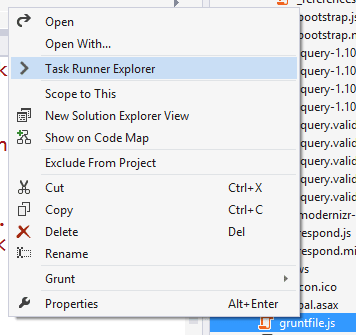
task runner

This gives you a persistent window that lists your available grunt tasks and lets you kick any one of them off with a double click, showing the results in an output window.
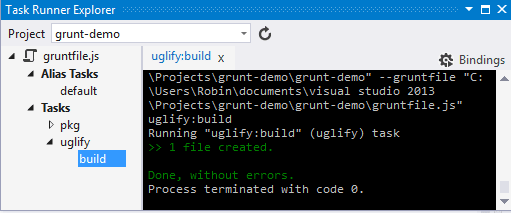
task runner explorer output

Which is equivalent of running the same grunt tasks outside of Visual Studio.

What’s really quite cool with this extension is being able to configure when these tasks run automatically; your options are:

  • Before Build
  • After Build
  • Clean
  • Solution Open

task runner explorer

Which means you can ensure that when you hit F5 in Visual Studio all of your tasks will run to generate the output required to render your website before the website is launched in a browser, or when you execute a “Clean” on the solution it can fire off that task to delete some temp directories, or the output from the last tasks execution.

Summary

Grunt and Gulp are fantastic tools to help you bring in automation to your projects; and now they’re supported in Visual Studio, so even you .Net developers have no excuse to not try playing around with them!

Have a go with the tools above, and let me know how you get on!

Learning By Doing: Java, Maven, Seyren, Hipchat, Github

If you use a graphing system, waiting all day long to see something spike can be painful. And boring.

Spike

Ouch! Seeing those spikes can be annoying, but missing them can be even more annoying. Who can be bothered to stare at graphs all day and night?

Seyren

That’s why recently I had the opportunity to try out Seyren. I’ve been meaning to try it out for a while; it’s a Java-based solution to monitor a graphite endpoint and react to various configured thresholds by alerting external services.

Seyren

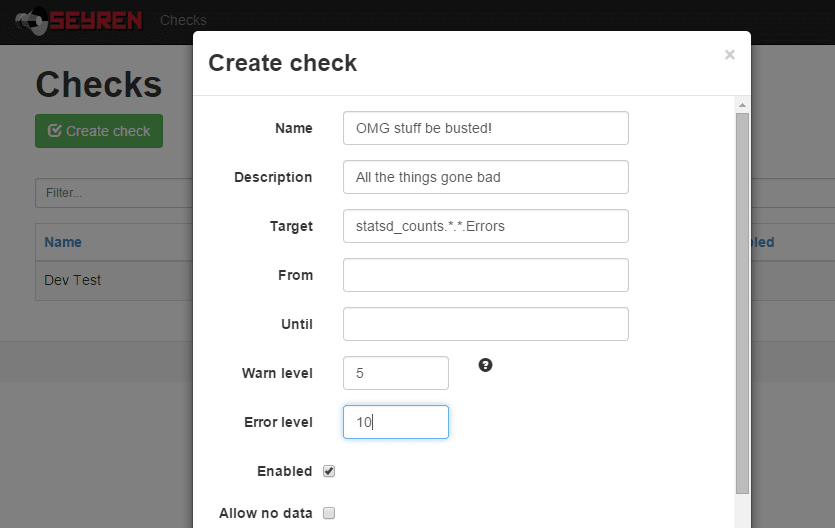
Creating a check

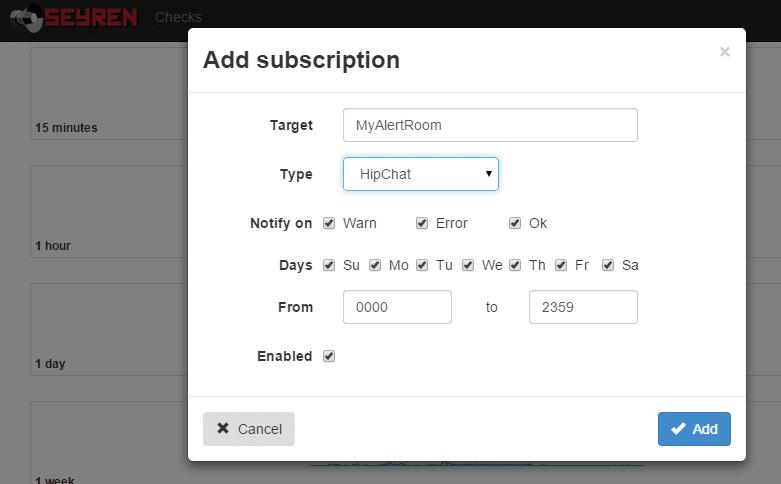
These external services are extensible and currently there is support for systems such as plain old email, Flowdock, Hubot, Irc, PagerDuty, Slack, and – the subject of my interest – Hipchat.

Unfortunately, Seyren only supports Hipchat API v1 (which is deprecated) and as such I couldn't use it. Also it’s written in Java and I’ve never written anything in Java. However, I did do a degree in C++ and that's pretty close, right?…
Right?..

This is the short story of how I contributed to a Java-based open source project, adding support for Hipchat V2 and generally saving the day! (possible exaggerations may exist in this post.)

First up, how I managed to set up a minimal Java development environment on Windows.

Java

Installing Java on Windows

You have two main options for getting the Java Development Kit running on your system:

One:

  1. Head over to the JDK download page on oracle.com
  2. Download and install the Java Development Kit for your OS

Two:

  1. If you haven't already got the amazing Windows package manager chocolately, go and get it!
  2. choco install jdk8

For either one, you may still need to add the Java root dir to your PATH (not the bin subdir) as JAVA_HOME, like this:
JAVA_HOME environment variable

Maven

What is it?

Maven is a build automation tool, used a lot in Java projects. The build configuration is in an xml file – usually named "pom.xml" for Project Object Model – which defines the dependencies and project configuration.

Maven has the concept of plugins, goals, and phases to extend and link stages into build lifecycles. The Build lifecycle is a list of named phases that can be used to give order to goal execution.

One of Maven's standard lifecycles is the default lifecycle, which includes the following phases:

  1. validate
  2. generate-sources
  3. process-sources
  4. generate-resources
  5. process-resources
  6. compile
  7. process-test-sources
  8. process-test-resources
  9. test-compile
  10. test
  11. package
  12. install
  13. deploy

So running mvn test will result in the execution of phases 1 through 10; mvn install will execute phases 1 though 12. You get the idea.

Installing Maven on Windows

Again, a couple of options;

One:

  1. Head over to https://maven.apache.org/
  2. Download the zip
  3. Place the contents in a seriously high level directory such as C:\mvn (Maven doesn't like spaces in pathnames)
  4. Append the bin subdir to your PATH

Two:

  1. choco install maven

Heh.

Either route needs you to open a fresh command line in order to get the updated PATH values maven configures.

Right, now on to the main event!

Seyren

What is it?

Seyren "is an alerting dashboard for Graphite. It supports the following notification channels: Email, Flowdock, HipChat, HTTP, Hubot, IRCcat, PagerDuty, Pushover, SLF4J, Slack, SNMP, Twilio"

You configure it to point at a graphite instance, tell it what metrics to monitor, what thresholds to watch out for, how to notify you of these events, and it will ping graphite every few seconds; should any of those thresholds be met, it will notify you.

Simple as that. Its power is in that simplicity.

Getting the code

Head over to the github repo at https://github.com/scobal/seyren and clone the repo locally.

If you just want to run it, then you can just download the latest release as a Java jar file.

Running Seyren locally

Seyren has a dependency on mongodb where it saves the checks (points at which a configured threshold has changed state)

So, let's set that up.

  • choco install mongodb

Easy. If everything has worked so far, you can open a terminal in the repo directory and run the following maven command to check it builds and the tests pass:

  • mvn clean verify

If all went well, you will need to set up an environment variable or two, such as your graphite instance's url and in my case my hipchat API key. Again, these are just environment variables, like JAVA_HOME.

Once that's done you can run Seyren temporarily within maven for a quick play.

Happy with it? You can use maven to create a jar file using

  • mvn package

    or if you want to skip running the tests again

  • mvn package -DskipTests

That will generate you a bunch of jar files in various target subdirectories; the one we're interested in is in seyren-web – the others are dependencies for it.

You can now start this puppy up within a tomcat instance using (substitute the name of your "war-exec.jar" file in here):

  • java -jar /seyren/seyren-web/target/seyren-web-1.4.0-SNAPSHOT-war-exec.jar

Checkpoint 1

You should now have Java, Maven, MongoDB, and Seyren running happily. Now here's how I managed to implement Hipchat v2 support and get the PR accepted!

Java IDEs

Seriously? Eclipse? I've looked at it before, and couldn't stand it. I even downloaded and installed it, but gave up. Since I'm not building a Java project from scratch, all I needed was a half decent text editor.

As such, I fired up my current favourite editor – SublimeText. I like the simplicity of this editor, and you can easily get it yourself with choco install sublimetext2, naturally.

Having a pretty good understanding of the Hipchat v2 API, I was able to guess and googlebing the necessary Java syntax for updating the existing HipchatNotificationService, as can be seen in this pull request: https://github.com/scobal/seyren/pull/294/files

Being able to easily switch back to command line and run mvn clean verify to get the build feedback and the test results was pretty painless. I got it running by pointing it at the company Hipchat account and checked everything worked as expected, then proceeded to submit a pull request, expecting to receive all manner of awards for my contribution and epic skillz.

Contributing

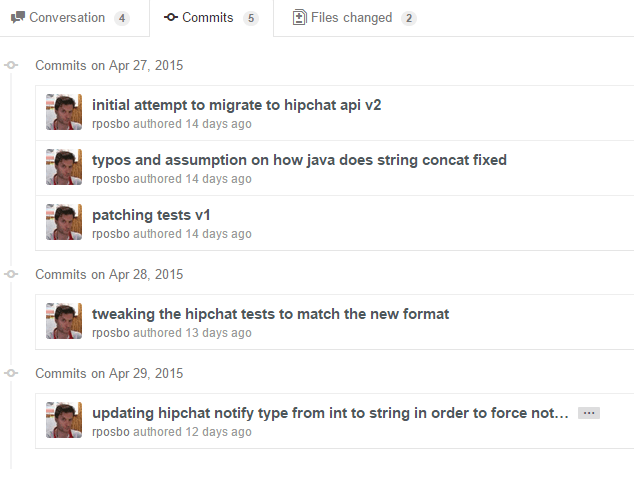
messy comits

Unfortunately I made a few messy commits in my initial pull request and someone had their own PR merged in the meantime (i.e., whilst I spent several days trying to work out how to generate a "jar" file..), but it didn't do anything of value and was even incorrect. Instead of doing the right thing and merging with it, fixing it, reverting their stuff, and submitting a full PR, I was lazy; I submitted a messy list of commits with a message along the lines of "I know it doesn't merge, but that's your fault not mine".

I was tired, I apologise.

I received a request to rebase and squash the commits, then resubmit the PR. I've never done that; I can
git clone
like a pro, but after something like
git mergetool --tool=kdiff3
(my current fave), I'm out of my depth. I had to learn quickly!

In short; rebase appears to rewind your commits, take another branch, and replay the commits one by one over that branch. If any of the commits result in a merge conflict you can fix it before deciding to git rebase --continue. Pretty nice.

Squashing commits is pretty obvious; takes a set of individual commits and merges them into one commit. There are several ways of doing this that I've read about, but the one I find easiest is to "soft reset" your local branch using
git reset HEAD~3 --soft

In this example I will effectively uncommit the latest 3 commits, but the key is the --soft option – your changes are not undone (as with --hard), merely uncommited.

You can now commit all of the changes from those 3 commits into one, and give it a nice, clear, commit message.

That's what I did, and that's how my first Java OSS contribution was accepted!

References

Setup StatsD and Graphite in one script

Trying to get this working over the past 6 months has almost driven me insane. However, thanks to this epic script as a starting point, my script below ACTUALLY WORKS (for me, on my machine, YMMV).

I can create a VM powershell-stylee and then ssh in to create this script, and execute it.

It results in a statsd endpoint which pushes metrics to the local Graphite (carbon) instance regularly. Good luck, let me know if it works for you too!