Introduction to GruntJS for Visual Studio

As a developer, there are often tasks that we need to automate to make our daily lives easier. You may have heard about GruntJS or even Gulp before.

In this article, I am going to run through a quick intro to successfully using gruntjs to automate your build process within the usual IDE of .Net developers: Visual Studio..

gruntjs (Grunt)

gruntjs logo

What is it?

Gruntjs is a JavaScript task runner; one of a few that exist, but only one of two to become mainstream – the other being Gulp. Both do pretty similar things, both have great support and great communities.

Whereas gulp = tasks defined in code, grunt = tasks defined in configuration.

It’s been going on for a while – check this first commit from 2011!

What does it do?

A JavaScript task runner allows you to define a set of tasks, subtasks, and dependent tasks, and execute these tasks at a time of your choosing; on demand, before or after a specific event, or any time a file changes, for example.

These tasks range from things like CSS and JS minification and combination, image optimisation, HTML minification, HTML generation, redact code, run tests, and so on. A large number of the available plugins are in fact grunt wrappers around existing executables, meaning you can now run those programs from a chain of tasks; for example: LESS, WebSocket, ADB, Jira, XCode, SASS, RoboCopy.

The list goes on and on – and you can even add your own to it!

How does it work?

GruntJS is a nodejs module, and as such is installed via npm (node package manager). Which also means you need both npm and nodejs installed to use Grunt.

nodejs logo npm logo

By installing it globally or just into your project directory you’re able to execute it from the command line (or other places) and it will check the current directory for a specific file called “gruntfile.js“. It is in this gruntfile.js that you will specify and configure your tasks and the order in which you would like them to run. Each of those tasks is also a nodejs module, so will also need to be installed via npm and referenced in the package.json file.

The package.json is not a grunt-specific file, but an npm-specific file; when you clone a repo containing grunt tasks, you must first ensure all development dependencies are met by running npm install, which installs modules referenced within this packages.json file. It can also be used by grunt to pull in project settings, configuration, and data for use within the various grunt tasks; for example, adding a copyright to each file with your name and the current date.

Using grunt – WITHOUT Visual Studio

Sounds AMAAAAYYZING, right? So how can you get your grubby mitts on it? I’ve mentioned a few dependencies before, but here they all are:

  • nodejs – grunt is a nodejs module, so needs to run on nodejs.
  • npm – grunt is a nodejs module and depends on many other nodejs packages; sort of makes sense that you’d need a nodejs package manager for this job, eh?
  • grunt-cli – the grunt command line tool, which is needed to actually run grunt tasks
  • package.json – the package dependencies and project information, for npm to know what to install
  • gruntfile.js – the guts of the operation; where we configure the tasks we want to run and when.

First things first

You need to install nodejs and npm (both are installed with nodejs).

grunt-cli

Now you’ve got node and npm, open a terminal and fire off npm install -g grunt-cli to install grunt globally. (You could skip this step and just create a package.json with grunt as a dependency and then run npm install in that directory)

Configuration

The package.json contains information about your project, and the various package dependencies. Think of it as a slice of NuGet’s packages.config and a sprinkle of your project’s .sln file; it contains project-specific data, such as the name, author’s name, repo location, description, as well as defining modules on which your project depends in order to build and run

Create a package.json file with some simple configuration, such as that used on the gruntjs site:

{
  "name": "my-project-name",
  "version": "0.1.0"
}

Or you could run npm-init, but that asks for lots more info that we really need here, so the generated package.json is a bit bloated:
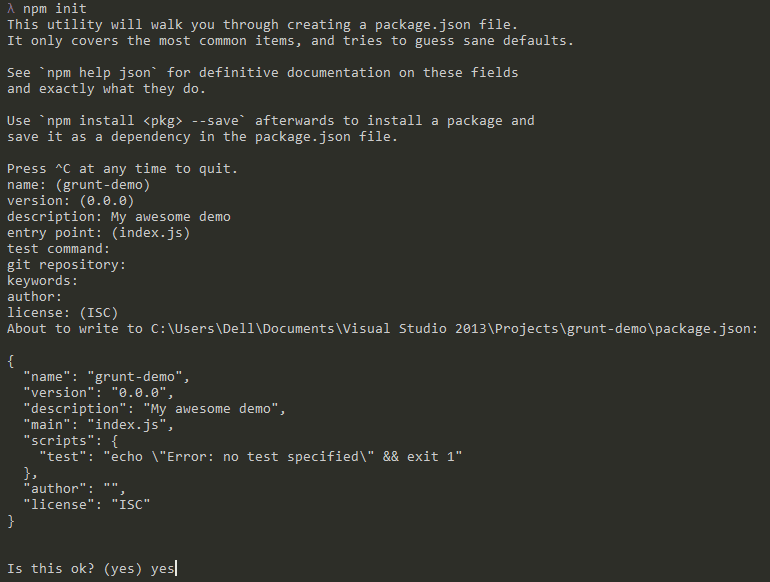
npm init

So, what’s going on in the code above? We’re setting a name for our project and a version. Now we could just add in a few more lines and run npm install to go and get those for us, for example:

{
  "name": "my-project-name",
  "version": "0.1.0",
  "devDependencies": {
    "grunt": "~0.4.5",
    "grunt-contrib-jshint": "~0.10.0",
    "grunt-contrib-nodeunit": "~0.4.1",
    "grunt-contrib-uglify": "~0.5.0"
 }
}

Here we’re saying what we need to run our project; if you’re writing a nodejs or iojs project then you’ll have lots of your own stuff referenced in here, however for us .Net peeps we just have things our grunt tasks need.

Within devDependencies we’re firstly saying we use grunt, and we want at least version 0.4.5; the tilde versioning means we want version 0.4.5 or above, up to but not including 0.5.0.

Then we’re saying this project also needs jshint, nodeunit, and uglify.

A note on packages: “grunt-contrib” packages are those verified and officially maintained by the grunt team.

But what if we don’t want to write stuff in, have to check the right version from the npm website, and then run npm install each time to actually pull it down? There’s another way of doing this.

Rewind back to when we just had this:

{
  "name": "my-project-name",
  "version": "0.1.0"
}

Now if you were to run the following commands, you would have the same resulting package.json as before:

npm install grunt --save-dev
npm install grunt-contrib-jshint --save-dev
npm install grunt-contrib-nodeunit --save-dev
npm install grunt-contrib-uglify --save-dev

However, this time they’re already installed and their correct versions are already set in your package.json file.

Below is an example package.json for an autogenerated flat file website

{
  "name": "webperf",
  "description": "Website collecting articles and interviews relating to web performance",
  "version": "0.1.0",
  "devDependencies": {
    "grunt": "^0.4.5",
    "grunt-directory-to-html": "^0.2.0",
    "grunt-markdown": "^0.7.0"
  }
}

In the example here we’re starting out by just depending on grunt itself, and two other modules; one that creates an html list from a directory structure, and one that generates html from markdown files.

Last step – gruntfile.js

Now you can create a gruntfile.js and paste in something like that specified from the gruntjs site:

module.exports = function(grunt) {
  // Project configuration.
  grunt.initConfig({
    pkg: grunt.file.readJSON('package.json'),
    uglify: {
      options: {
        banner: '/*! <%= pkg.name %> <%= grunt.template.today("yyyy-mm-dd") %> */\n'
      },
      build: {
        src: 'src/<%= pkg.name %>.js',
        dest: 'build/<%= pkg.name %>.min.js'
      }
    }
  });

  // Load the plugin that provides the "uglify" task.
  grunt.loadNpmTasks('grunt-contrib-uglify');

  // Default task(s).
  grunt.registerTask('default', ['uglify']);

};

What’s happening in here then? The standard nodejs module.exports pattern is used to expose your content as a function. Then it’s reading in the package.json file and putting that object into the variable pkg.

Then it gets interesting; we configure the grunt-contrib-uglify npm package with the uglify task, setting a banner for the minified js file to contain the package name – as specified in package.json – and today’s date, then specifying a “target” called build with source and destination directories.

Then we’re telling grunt to bring in the grunt-contrib-uglify npm module (that must already be installed locally or globally).

After the configuration is specified, we’re telling grunt to load the uglify task (which you must have previously installed for this to work) and then set the default grunt task to call the uglify task.

BINGO. Any javascript in the project’s “src” directory will get minified, have a header added, and the result dumped into the project’s “build” directory any time we run grunt.

Example gruntfile.js for an autogenerated website

module.exports = function(grunt) {

  grunt.initConfig({
  markdown: {
    all: {
      files: [
        {
          cwd:'_drafts',
          expand: true,
          src: '*.md',
          dest: 'articles/',
          ext: '.html'
        }
      ]
    },
    options: {
      template: 'templates/article.html',
      preCompile: function(src, context) {
        var matcher = src.match(/@-title:\s?([^@:\n]+)\n/i);
        context.title = matcher && matcher.length > 1 && matcher[1];
      },
      markdownOptions: {
        gfm: false,
        highlight: 'auto'
        }
      }
  },
  to_html: {
    build:{      
        options: {
          useFileNameAsTitle: true,
          rootDirectory: 'articles',
          template: grunt.file.read('templates/listing.hbs'),
          templatingLanguage: 'handlebars',

        },
        files: {
          'articles.html': 'articles/*.html'
        }
    }
  }
});

grunt.loadNpmTasks('grunt-markdown');
grunt.loadNpmTasks('grunt-directory-to-html');

grunt.registerTask('default', ['markdown','to_html']);

};

This one will convert all markdown files in a _drafts directory to html based on a template html file (grunt-markdown), then create a listing page based on the directory structure and a template handlebars file (grunt-directory-to-html).

Using grunt – WITH Visual Studio

Prerequisites

You still need nodejs, npm, and grunt-cli so make sure you install nodejs and npm install -g grunt-cli.

To use task runners within Visual Studio you first need to have a version that supports them. If you already have VS 2015 you can skip these install sections.

Visual Studio 2013.3 or above

If you have VS 2013 then you need to make sure you have at least RC3 or above (free upgrades!). Go and install if from your pals at Microsoft.

This is a lengthy process, so remember to come back here once you’ve done it!

TRX Task Runner Explorer Extension

This gives your Visual Studio an extra window that displays all available tasks, as defined within your grunt or gulp file. So go and install that from the Visual Studio Gallery

NPM Intellisense Extension

You can get extra powers for yourself if you install the intellisense extension, which makes using grunt in Visual Studio much easier. Go get it from the Visual Studio Gallery.

Grunt Launcher Extension

Even more extra powers; right-click on certain files in your solution to launch grunt, gulp, bower, and npm commands using the Grunt Launcher Extension

Tasks Configuration

Create a new web project, or open an existing one, and add a package.json and a gruntfile.js.

Example package.json

{
  "name": "grunt-demo",
  "version": "0.1.0",
  "devDependencies": {
    "grunt": "~0.4.5",
    "grunt-contrib-uglify": "~0.5.0"
 }
}

Example gruntfile.js

module.exports = function(grunt) {
  // Project configuration.
  grunt.initConfig({
    pkg: grunt.file.readJSON('package.json'),
    uglify: {
      options: {
        banner: '/*! <%= pkg.name %> <%= grunt.template.today("yyyy-mm-dd") %> */\n'
      },
      build: {
        src: 'Scripts/bootstrap.js',
        dest: 'Scripts/build/bootstrap.min.js'
      }
    }
  });

  // Load the plugin that provides the "uglify" task.
  grunt.loadNpmTasks('grunt-contrib-uglify');

  // Default task(s).
  grunt.registerTask('default', ['uglify']);

};

Using The Task Runner Extension in Visual Studio

Up until this point the difference between without Visual Studio and with Visual Studio has been non-existent; but here’s where it gets pretty cool.

If you installed everything mentioned above, then you’ll notice some cool stuff happening when you open a project that already contains a package.json.

The Grunt Launcher extension will “do a nuget” and attempt to restore your “devDependencies” npm packages when you open your project:

npm package restore

And the same extension will give you a right click option to force an npm install:
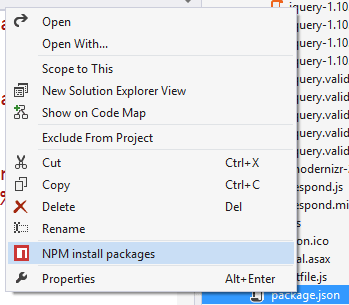
npm package restore - menu

This one also allows you to kick off your grunt tasks straight from a context menu on the gruntfile itself:
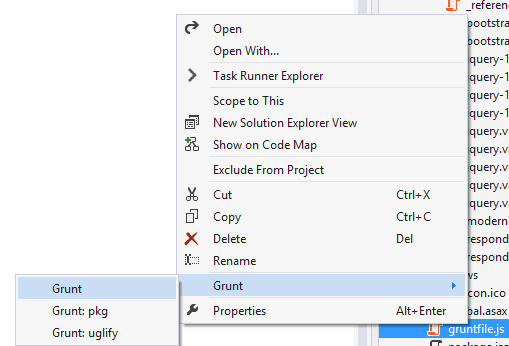
grunt launcher

Assuming you installed the intellisense extension, you now get things like auto-suggestion for npm package versions, along with handy tooltip explainers for what the version syntax actually means:
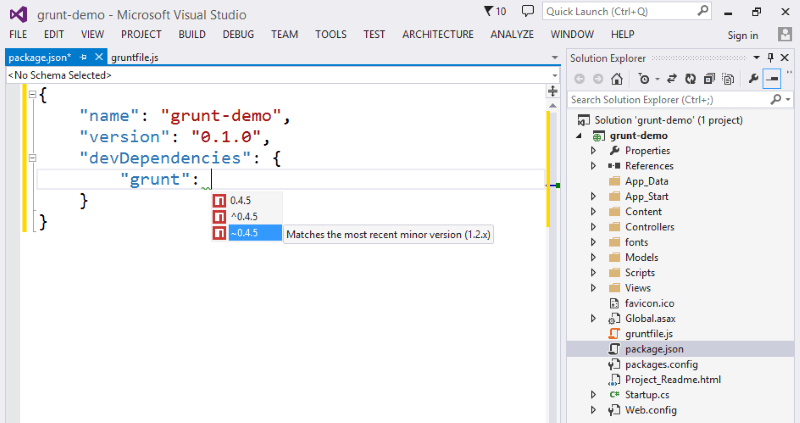
npm intellisense

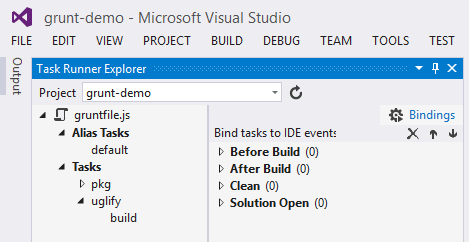
If you’d like some more power over when the grunt tasks run, this is where the Task Runner Explorer extension comes in to play:
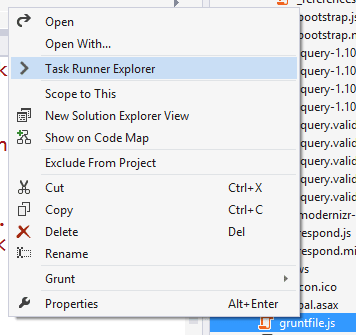
task runner

This gives you a persistent window that lists your available grunt tasks and lets you kick any one of them off with a double click, showing the results in an output window.
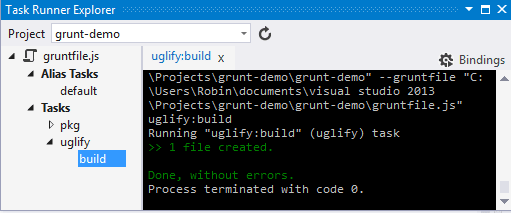
task runner explorer output

Which is equivalent of running the same grunt tasks outside of Visual Studio.

What’s really quite cool with this extension is being able to configure when these tasks run automatically; your options are:

  • Before Build
  • After Build
  • Clean
  • Solution Open

task runner explorer

Which means you can ensure that when you hit F5 in Visual Studio all of your tasks will run to generate the output required to render your website before the website is launched in a browser, or when you execute a “Clean” on the solution it can fire off that task to delete some temp directories, or the output from the last tasks execution.

Summary

Grunt and Gulp are fantastic tools to help you bring in automation to your projects; and now they’re supported in Visual Studio, so even you .Net developers have no excuse to not try playing around with them!

Have a go with the tools above, and let me know how you get on!

Upload to Azure Blob Storage using Powershell

I needed to automate the process of uploading images to Azure blob storage recently, and found that using something like the excellent Azure Storage Explorer would not set the Content Type correctly (defaulting to “application/octetstream”). As such, here’s a little script to loop through a directory and do a basic check on extensions to set the content type for PNG or JPEG:

The magic is in Set-AzureStorageBlobContent.

Don’t forget to do the usual dance of calling the following!

These select your publish settings file, and set which subscription is the currently active one:

  • Import-AzurePublishSettingsFile
  • Set-AzureSubscription
  • Select-AzureSubscription

Update

Actually, the Aug 2014 version of Azure Storage Explorer already sets the content type correctly upon upload. Oh well. Still a handy automation script though!

Getting past Powershell & SQL’s “Incorrect syntax near ‘GO’ ” message

Many a night have I bashed my head on the keyboard when seeing “Incorrect syntax near ‘GO'” come back from a powershell script trying to execute a batch SQL script.

After learning that “GO” is not actually SQL, and more of a SQL Server Management Studio “batch helper”, I quickly knocked together this powershell script to execute SQL batch scripts remotely. Fits nicely into an environment creation pipeline, so it does.

Param(
    [string]$Server,
    [string]$DB,
    [string]$user,
    [string]$Pwd,
    [string]$Script
)

$batches = $Script -split "GO\r\n"

$SqlConnection = New-Object System.Data.SqlClient.SqlConnection
$SqlConnection.ConnectionString = "Server=$Server;Database=$DB;User ID=$user;Password=$Pwd;Trusted_Connection=False;Encrypt=True;Connection Timeout=30;"
$SqlConnection.Open()

foreach($batch in $batches)
{
    if ($batch.Trim() -ne ""){

        $SqlCmd = New-Object System.Data.SqlClient.SqlCommand
        $SqlCmd.CommandText = $batch
        $SqlCmd.Connection = $SqlConnection
        $SqlCmd.ExecuteNonQuery()
    }
}
$SqlConnection.Close()

nuget: cannot prompt for input in non-interactive mode

If you’ve ever seen this annoying error in your various build server logs, or even when running msbuild locally from the command line, you’re probably getting annoyed.

There are a few solutions (such as including the user credentials in plain text in a config file – eep!) but this is one which I’ve used when I really get stuck.

Ensure you’re logged in as the user which will be running the builds (if not yourself), and update the nuget source reference (which will be in a user-specific appdata config file) with the password:

nuget sources update -Name <whatever you called it> -source http://your.nuget.repo/authed/feed/ -User <your username> -pass <your pwd>

This will save an encrypted password in a user-specific config file on that computer, and should mean you don’t get prompted for that source anymore.

Several more options are detailed over here: http://www.xavierdecoster.com/nuget-package-restore-from-a-secured-feed

‘$(TargetPlatformVersion)’ > ‘X.X’ Error

Every now and then I’ll find that Visual Studio just blows up – seemingly without me having changed anything – throwing the error:

numeric comparison error

A numeric comparison was attempted on "$(TargetPlatformVersion)" that evaluates to "" instead of a number, in condition "'$(TargetPlatformVersion)' > '8.0'".

Where the number at the end changes every so often.

How to fix this? Annoyingly simple.

Repair Resharper and restart Visual Studio.
repair resharper

Hope that saves you a few hours..!

My NuGet

Want your own NuGet repo? Don’t want to pay for MyGet or similar?

Here’s how I’ve done it recently at Mailcloud (over an espresso that didn’t even have time to get cold – it’s that easy)

Setting up a NuGet Server

Creating your own nuget server could barely be any easier than it is now.

Open Visual Studio -> New Project -> WebSite

visual studio new website

Empty Website

visual studio empty azure website

Open Package Manager/Console -> Install-Package Nuget.Server

install nuget server

It’ll look something like this afterwards:

nuget server installed

Add API key to appsettings

nuget server add api key

For the API key: I just grabbed mine from newguid.com:
newguid.com

Publish site

If you’re using Azure and you selected the “Create remote resources” back at the start when creating the project, you can just push this straight out to the newly created website with a right click on the project -> publish :

publish azure website

Or use powershell, or msbuild to webdeploy, or ftp it somewhere, or keep it local – your call, buddy!

And that’s the hard part done 🙂

Using it

First visit

nuget server first visit

If you haven’t configured an API key then the first visit page will alert you to this.

Push a package

This is done in the usual manner – don’t forget your API key:

push a package

Check the repo

pushed package

Let’s reference our shiny new nuget repo:

Add a new source

Edit your Package Manager settings and add in a new source, using your new repo:

package manager sources

Find your packages!

Now you can open Package Manager window or console and find your pushed nuget package:

new source packages

Happy packaging!

Using NuGet at Mailcloud

So what is NuGet, anyway?

Intro

When working with shared functionality across multiple .Net projects and team members, historically your options are limited to something like;

  1. Copy a dll containing the common functionality into your solution
  2. Register the dll into the GAC on whichever machine it needs to run
  3. Reference the project itself within your solution

There are several problems with these such as;

  • ensuring all environments have the correct version of the dll as well as any dependencies already installed
  • tight dependencies between projects, potentially breaking several when the shared project is updated
  • trust – is this something you’re willing to install into a GAC if it’s from a 3rd party?
  • so many more, much more painful, bad bad things

So how can you get around this pain?

I’m glad you asked.

Treasure! Rubies, Gems, oh my.

ruby

The ruby language has had this problem solved for many, many years – since around 2004, in fact.

Using the gem command you could install a ruby package from a central location into your project, along with all dependencies, e.g.:

gem install rails --include-dependencies

This one would pull down rails as well as packages that rails itself depended on.

You could search for gems, update your project’s gems, remove old versions, and remove the gem from your project entirely; all with minimal friction. No more scouring the internets for information on what to download, where to get it from, how to install it, and then find out you need to repeat this for a dozen other dependent packages!

You use a .gemspec file to define the contents and meta data for your gem before pushing the gem to shared repository.

Pe(a)rls of Wisdom

cpan

Even ruby gems were borne from a frustration that the ruby ecosystem wasn’t supported as well as Perl; Perl had CPAN (Comprehensive Perl Archive Network) for over a DECADE before ruby gems appeared – it’s been up since 1995!

Nubular / Nu

Nubular

If Perl had CPAN since 1995, and ruby had gems since 2005, where is the .Net solution?

I’d spent many a project forgetting where I downloaded PostSharp from or RhinoMocks, and having to repeat the steps of discovery before I could even start development; leaving the IDE in order to browse online, download, unzip, copy, paste, before referencing within the IDE, finding there were missing dependencies, rinse, repeat.

Around mid-2010 Dru Sellers and gang (including Rob Reynolds aka @ferventcoder) built the fantastic “nu[bular]” project; this was itself a ruby gem, and could only be installed using ruby gems; i.e., to use nu you needed to install ruby and rubygems.


Side note: Rob was no stranger to the concept of .Net gems and has since created the incredible Chocolatey apt-get style package manager for installing applications instead of just referencing packages within your code projects, which I’ve previously waxed non-lyrical about

Once installed you were able to pull down and install .Net packages into your projects (again, these were actually just ruby gems). At the time of writing it still exists as a ruby gem and you can see the humble beginnings and subsequent death (or rather, fading away) of the project over on its homepage (this google group).

I used this when I first heard about it and found it to be extremely promising; the idea that you can centralise the package management for the .Net ecosystem was an extremely attractive proposition; unfortunately at the time I was working at a company where introducing new and exciting (especially open source) things was generally considered Scary™. However it still had some way to go.

NuPack

NuPack

In October 2006 Nu became Nu v2, at which point it became NuPack; The Epic Trinity of Microsoft awesomeness – namely Scott Guthrie, Scott Hanselman, and Phil Haack – together with Dave Ebbo and David Fowler and the Nubular team took a mere matter of months to create the first fully open sourced project that was central to an MS product – i.e., VisualStudio which was accepted into the ASP.Net open source gallery in Oct 2006

It’s referred to as NuPack in the ASP.MVC 3 Beta release notes from Oct 6 2010 but underwent a name change due to a conflict with an existing product, NUPACK from Caltech.

NuGet! (finally)

nuget

There was a vote, and if you look through the issues listed against the project in codeplex you can see some of the other suggestions.

(Notice how none of the names available in the original vote are “NuGet”..)

Finally we have NuGet! The associated codeplex work item actually originally proposed “Nugget”, but that was change to NuGet.

Okay already, so what IS NuGet?!

Essentially the same as a gem; an archive with associated metadata in a manifest file (.nuspec for nuget, .gemspec for gems). It’s blindingly simple in concept, but takes a crapload of effort and smarts to get everything working smoothly around that simplicity.

All of the details for creating a package are on the NuGet website.

Using NuGet at Mailcloud

We decided to use MyGet initially to kick off our own private nuget feed (but will migrate shortly to a self-hosted solution most likely; I mean, look at how easy it is! Install-Package NuGet.Server, deploy, profit!)

The only slight complexity was allowing the private feed’s authentication to be saved with the package restore information; I’ll get on to this shortly as there are a couple of options.

Creating a package

Once you’ve created a project that you’d like to share across other projects, it’s simply a matter of opening a prompt in the directory where your csproj file lives and running:

nuget spec

to create the nuspec file ready for you to configure, which looks like this:

<?xml version="1.0"?>
<package >
  <metadata>
    <id>$id$</id>
    <version>$version$</version>
    <title>$title$</title>
    <authors>$author$</authors>
    <owners>$author$</owners>
    <licenseUrl>http://LICENSE_URL_HERE_OR_DELETE_THIS_LINE</licenseUrl>
    <projectUrl>http://PROJECT_URL_HERE_OR_DELETE_THIS_LINE</projectUrl>
    <iconUrl>http://ICON_URL_HERE_OR_DELETE_THIS_LINE</iconUrl>
    <requireLicenseAcceptance>false</requireLicenseAcceptance>
    <description>$description$</description>
    <releaseNotes>Summary of changes made in this release of the package.</releaseNotes>
    <copyright>Copyright 2014</copyright>
    <tags>Tag1 Tag2</tags>
  </metadata>
</package>

Fill in the blanks and then run:

nuget pack YourProject.csproj

to end up with a .nupkg file in your working directory.

.nupkg

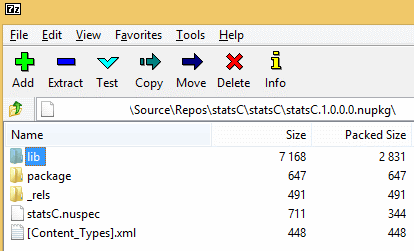
As previously mentioned, this is just an archive. As such you can open it yourself in 7Zip or similar and find something like this:

.nupkg guts

Your compiled dll can be found in the lib dir.

Pushing to your package feed

If you’re using MyGet then you can upload your nupkg via the MyGet website directly into your feed.

If you like the command line, and I do like my command line, then you can use the nupack command to do this for you:

nuget push MyPackage.1.0.0.nupkg <your api key> -Source https://www.myget.org/F/<your feed name>/api/v2/package

Once this has completed your package will be available at your feed, ready for referencing within your own projects.

Referencing your packages

If you’re using a feed that requires authentication then there are a couple of options.

Edit your NuGet sources (Options -> Package Manager -> Package Sources) and add in your main feed URL, e.g.

http://www.myget.org/F/<your feed name>/

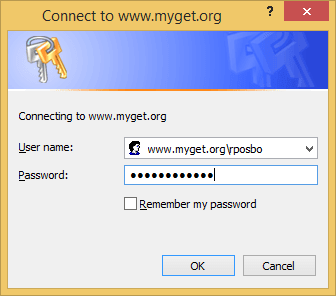
If you do this against a private feed then an attempt to install a package pops up a windows auth prompt:

myget.auth

This will certainly work locally, but you may have problems when using a build server such as teamcity or VisualStudio Online due to the non-interactive authentication.

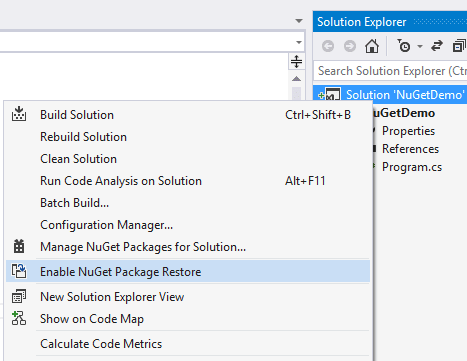
One solution to this is to actually include your password (in plain text – eep!) in your nuget.config file. To do this, right click your solution and select “Enable Package Restore”.

package restore

This will create a .nuget folder in your solution containing the nuget executable, a config file and a targets file. Initially the config file will be pretty bare. If you edit it and add in something similar to the following then your package restore will use the supplied credentials for the defined feeds:

<?xml version="1.0" encoding="utf-8"?>
<configuration>
  <solution>
    <add key="disableSourceControlIntegration" value="true" />
  </solution>
  <packageSources>
    <clear />
    <add key="nuget.org" value="https://www.nuget.org/api/v2/" />
    <add key="Microsoft and .NET" value="https://www.nuget.org/api/v2/curated-feeds/microsoftdotnet/" />
    <add key="MyFeed" value="https://www.myget.org/F/<feed name>/" />
  </packageSources>
  <disabledPackageSources />
  <packageSourceCredentials>
    <MyFeed>
      <add key="Username" value="myusername" />
      <add key="ClearTextPassword" value="mypassword" />
    </MyFeed>
  </packageSourceCredentials>
</configuration>

So we resupply the package sources (need to clear them first else you get duplicates), then add a packageSourceCredentials section with an element matching the name you gave your packageSource in the section above it.

Alternative Approach

Don’t like plain text passwords? Prefer auth tokens? Course ya do. Who doesn’t? In that case, another option is to use the secondary feed URL MyGet provides instead of the primary one, which contains your auth token (which can be rescinded at any time) and looks like:

https://www.myget.org/F/<your feed name>/auth/<auth token>/

Notice the extra “auth/blah-blah-blah” at the end of this version.

Summary

NuGet as a package manager solution is pretty slick. And the fact that it’s open sourced and can easily be self-hosted internally means it’s an obvious solution for managing those shared libraries within your project, personal or corporate.

Extra References

http://weblogs.asp.net/bsimser/archive/2010/10/06/unicorns-triple-rainbows-package-management-and-lasers.aspx

http://devlicio.us/blogs/rob_reynolds/archive/2010/09/21/the-evolution-of-package-management-for-net.aspx

Headless VirtualBox

VirtualBox

I tend to create a lot of proofs of concept, be it applications or servers, and this process will usually start with spinning up a VM. For this I prefer to use Oracle’s VirtualBox mainly because it’s free and easy to use.

However, using VirtualBox each time I want to start and stop the VM isn’t great as it will open up the VM in a new window and you need to have both the VM window and VirtualBox running on your machine at the same time.

Luckily you can use the “start” command to run VirtualBox’s VBoxHeadless application to boot up a VM without starting VirtualBox itself and without having a window open, other than the command line.

start "Build Server VM" /D"C:\Program Files\Oracle\VirtualBox\" /MIN VBoxHeadless.exe --startvm "Server 2008 32"

Just make sure the name of the VM at the end of the command is the same as that within VirtualBox:

VirtualBox dashboard

You can then access this via RDP (if your VM is windows) or SSH (if it’s Linux), as can anyone else on your network, should you have configured its network settings correctly.

Scripting the setup of a developer PC, Part 4 of 4 – Installing Custom Stuff, Interesting Things Encountered, and Conclusion

This is the final part of a four part series on attempting to automate installation and setup of a development PC with a few scripts and some funky tools. If you haven’t already, why not read the introductory post about ninite, the second part about the command line version of WebPI or perhaps the third instalment about the interesting chocolatey project? Disclaimer: this series was inspired by a blog from Maarten Balliauw

Installing Custom Stuff

There are some other applications out there which I need to be able to install via script as well, such as SQL Server 2008 R2 Tools; although WebPI (and with Chocolately Beta) can install SQL Tools, you’re actually limited to the express versions (AFAIK), and I need the standard install.

Since I have the ISO for this on the network, I can run virtualclonedrive from commandline (after chocolatey installs it) to mount the iso and run the setup application using “vcdmount.exe /l=<drive letter> <iso path>”.

Execute VCDMount with no params to get this helpful dialog for other command line params:

image

So let’s get on with it then:

SQL Server 2008 R2 Tools

It looks like SQL Server has its own command line install options; if I mount the network ISO and pass the parameters “/ACTION=install /IACCEPTSQLSERVERLICENSETERMS /Q /FEATURES=Tools,ADV_SSMS” I should be able to install SQL tools unattended. There is a dependency on Windows Installer 4.5 being installed correctly for this one to work; make sure your WebPI install worked earlier!


Visual Studio 2010

It looks like VS2010 has its own command line install options; if I mount the network ISO and pass the parameters “/q /full /norestart” I should be able to install VS2010 unattended. There is an entry for “VS2010SP1Core” in the WebPI xml feeds, and I have tried using that to no avail; see “Interesting Things Encountered” section at the end for a note about WebPI & VS2010.

So the final install script should look like:

@echo off

REM VS2010
"c:\Program Files (x86)\Elaborate Bytes\VirtualCloneDrive\vcdmount.exe" /l=E "Z:\Installation\SetupDevPC\VS2010SP1.ISO" 

E:/Setup/setup.exe /q /full /norestart

REM SQL Tools
"c:\Program Files (x86)\Elaborate Bytes\VirtualCloneDrive\vcdmount.exe" /l=E "Z:\Installation\SetupDevPC\SQLServer2008Tools.ISO"

E:/setup.exe /ACTION=install /IACCEPTSQLSERVERLICENSETERMS /Q /FEATURES=Tools,ADV_SSMS

Something to bear in mind is that this doesn’t work if you haven’t restarted since running the chocolatey powershell script. As such, I’ve edited the chocolatey powershell script to end with:
[powershell]shutdown /r /t 0 /d P:0:0[/powershell]

If all goes well you shouldn’t actually see anything of note; VirtualCloneDrive’s VCDMount mounts each ISO into drive “E” (VCD default install has only one virtual drive defined, in my case that was “E”) and calls the relevant executable with parameters to attempt to force a silent install. VS2010 is completely silent! SQL at least gives a few lines of feedback.

The Bad News

Unfortunately VS2010’s setup.exe doesn’t wait before returning to the script; as such, you would see the call to VS2010’s setup.exe kick off then a few seconds later a call to SQL2008’s setup.exe, which fails since there’s another install already happening.

Again, just as unfortunately, SQL2008 won’t install straight after VS2010 – it demands a restart.

The “Meh” News

My preference is now to install SQL2008 first, since this is a blocking process, then VS2010, then let it restart (remove the “/norestart” flag for VS2010).

Hence the last script is actually:

@echo off

REM SQL Tools
"c:\Program Files (x86)\Elaborate Bytes\VirtualCloneDrive\vcdmount.exe" /l=E "Z:\Installation\SetupDevPC\SQLServer2008Tools.ISO"

E:/setup.exe /ACTION=install /IACCEPTSQLSERVERLICENSETERMS /Q /FEATURES=Tools,ADV_SSMS

REM VS2010
"c:\Program Files (x86)\Elaborate Bytes\VirtualCloneDrive\vcdmount.exe" /l=E "Z:\Installation\SetupDevPC\VS2010SP1.ISO" 

E:/Setup/setup.exe /q /full

Along with the previous powershell script and the beta chocolatey nupkg, the existing script for ninite and webpi and their components, the final directory contents now look like:

281211_autoinstall_iso_dir_contents

The End Result

The Result!

Which brings us FINALLY on to the:

Conclusion

Although it is entirely possible to script the setup of a develop PC without requiring ever seeing a GUI currently, using the tools I’ve chosen to use here, it seems that it can’t be done in a fully automated fashion. Certain products still popped up a confirmation dialog, others required a reboot when I’d specifically suppressed one. Some dependencies were not always resolved correctly.

As such, I hope that you have enjoyed this introduction into my attempt to teach myself some command line WebPI, ninite, chocolatey, and general hackery, and if you have any comments or suggestions please feel free to let me know in the comments or via twitter; I’ve kept various snapshots of my VM I used for this series, so I’ll happily try out any good suggestions!

It would appear that this is a nice set of basic scripts to get a development PC up and running, however once this has been done it makes much more sense to create an image and use that for future setups. There will be a follow up post about creating an image of this configured PC so that future developer PCs can use the image instead of having to reinstall everything, which should be a pretty basic one since it’s nothing new!

Finally, these articles are already out of date! WebPI is now on v4 and the chocolatey “beta” I mentioned is actually now the mainline. No doubt everything else will be out of date in a few more days.

Interesting Things Encountered

  • The webpicmdline tool still raises the odd dialog prompting for a restart (e.g. for MVC3), even with the “suppressreboot” option. Using a really loooong product list I’d specified in one webpi command fails for a lot of them. After rebooting, webpicmd didn’t automatically pick up and carry on as expected; this is why I’ve cut the initial webpi product list to a small number and done the others via chocolatey.

  • Webpicmdline doesn’t install things in the order you list them, which can be a bit odd. i.e., WindowsInstaller45 attempts to install after .Net 4 and promptly fails. Do it on its own and you’re fine.

  • Chocolatey’s webpi support didn’t initially work; I had to restart before I could install anything. I believe this to be related to the webpi installation of WindowsInstaller45 whose required reboot I had suppressed.

  • VS2010’s “/q /full” setup options are incredibly “q” – nothing appears at all; no command line feedback, no GUI. I had to fire off setup.exe without params just to see the GUI load and show me it’s already halfway through the install process! Fantastic.

  • VS2010 exists within the WebPI listing as “VS2010SP1Core” but seems to always fail with an error about needing “VS2010SP1Prerequisite”; this product also exists in the same WebPI feed but was always failing to install via webpicmdline and chocolatey for me. Let me know if you get this working!

The Resulting Scripts

Setup_Step1.cmd

Ninite & WebPI

@echo off

REM Ninite stuff
cmd /C "Z:\Installation\SetupDevPC\Ninite_DevPC_Utils.exe"

REM WebPI stuff
cmd /C "Z:\Installation\SetupDevPC\webpicmdline.exe /AcceptEula /SuppressReboot /Products:PowerShell,PowerShell2,NETFramework20SP2,NETFramework35,NETFramework4"

cmd /C "Z:\Installation\SetupDevPC\webpicmdline.exe /AcceptEula /SuppressReboot /Products:WindowsInstaller31,WindowsInstaller45"

shutdown /r /t 0 /d P:0:0

Setup_Step2.ps1

Chocolatey
[powershell]# Chocolatey
iex ((new-object net.webclient).DownloadString(‘http://bit.ly/psChocInstall’))

# install applications
cinst virtualclonedrive
cinst sysinternals
cinst msysgit
cinst fiddler
cinst tortoisesvn

# getting the latest build for webpi support: git clone git://github.com/chocolatey/chocolatey.git | cd chocolatey | build | cd _{tab}| cinst chocolatey -source %cd%
# I’ve already done this and the resulting nugetpkg is also saved in the same network directory:
cinst chocolatey –source "Z:\Installation\SetupDevPC\"

# Now I’ve got choc I may as well use it to install a bunch of other stuff from WebPI;
# things that didn’t always work when I put them in the looong list of comma delimited installs
# IIS
cinst IIS7 -source webpi
cinst ASPNET -source webpi
cinst BasicAuthentication -source webpi
cinst DefaultDocument -source webpi
cinst DigestAuthentication -source webpi
cinst DirectoryBrowse -source webpi
cinst HTTPErrors -source webpi
cinst HTTPLogging -source webpi
cinst HTTPRedirection -source webpi
cinst IIS7_ExtensionLessURLs -source webpi
cinst IISManagementConsole -source webpi
cinst IPSecurity -source webpi
cinst ISAPIExtensions -source webpi
cinst ISAPIFilters -source webpi
cinst LoggingTools -source webpi
cinst MetabaseAndIIS6Compatibility -source webpi
cinst NETExtensibility -source webpi
cinst RequestFiltering -source webpi
cinst RequestMonitor -source webpi
cinst StaticContent -source webpi
cinst StaticContentCompression -source webpi
cinst Tracing -source webpi
cinst WindowsAuthentication -source webpi

shutdown /r /t 0 /d P:0:0
[/powershell]

Setup_Step3.cmd

VCDMount

@echo off

REM SQL Tools
"c:\Program Files (x86)\Elaborate Bytes\VirtualCloneDrive\vcdmount.exe" /l=E "Z:\Installation\SetupDevPC\SQLServer2008Tools.ISO"

E:/setup.exe /ACTION=install /IACCEPTSQLSERVERLICENSETERMS /Q /FEATURES=Tools,ADV_SSMS

REM VS2010
"c:\Program Files (x86)\Elaborate Bytes\VirtualCloneDrive\vcdmount.exe" /l=E "Z:\Installation\SetupDevPC\VS2010SP1.ISO"

E:/Setup/setup.exe /q /full

Hope you enjoyed the articles, any feedback is appreciated.