A Brief History of HTML: Part 1

Inspired by one of the tracks at the fantastic EdgeConf London 2015, I realised that the term Progressive Enhancement has become confused and ill-defined.

As a reasonably old-school web developer, this is an all too familiar term for me: back in the 1990s JavaScript either didn’t exist or was not fully supported, HTML was upgrading from nothing to 2 to 3 to 4, CSS didn’t really exist, and there was no such thing as jQuery.

Over the next few articles, I’ll be looking back at the evolution of HTML and relevant related technologies and protocols, hoping to arm developers interested in the concept of progressive enhancement with an understanding of the origins of the term and the reason for its existence. This should give you a pause for thought when you need to have a discussion about what lovely shiny new tech to use in your next project.

Progressive Enhancement is not just about turning off JavaScript, not by a long shot. Hopefully soon you’ll see what it might encompass over the next few articles.

Part 1: HTML of the 1990s

To really get an appreciation of why progressive enhancement exists, let’s take a journey back in time..

rillyrillyrillywanna

It’s the 90s. The Spice Girls ruled the Earth before eventually being destroyed by BritPop.

HTML wasn’t even standardised. Imagine that for a second; different browsers (of which there were very few) implemented some of their own tags. There was no W3C to help out, only a first draft of a possible standard from Tim Berners-Lee whilst he worked this world wide web concept at CERN.

Ignore how unstandardised HTML was for a moment; even the underlying protocol for the internet wasn’t fully agreed yet.

There was a small-scale Betamax-VHS battle between protocols for suitability of the future of the internet: HTTP vs Gopher.

HTTP

We all know what HyperText Transfer Protocol is; clients, servers, sessions, verbs, requests, responses, headers, bodies – oh my!

Hit a server on port 80, execute request using headers and a verb, get a response with headers and body.

But don’t forget we’re talking about the 90s here; HTTP 1.0 was proposed in 1996, but HTTP 1.1 – the version that is only just being replaced by HTTP2 – was not even standardised until 1999, and has been barely changed for over 15 years.

Gopher

The Gopher protocol is very interesting; it’s heavily based on a menu structure for accessing documents intended to feel like navigating a file system.

Hit a server on port 70, get an empty response, send a new line, get a listing back containing titles of documents or directories and magic strings that represent them, client sends back one of these magic strings, server sends that directory listing or document.

This was probably a more suitable match to the requirements of the early web; i.e., groups of documents and listings being requested and searched.

Gopher was released around 1991 but only stuck around for a few years, due to murmurs around licencing which put people off using it for fear of being charged.

Double the fun!

Most browsers of the early 90s supported both protocols. Some of the more “basic” browsers still do (GO, LYNX!)

How would you ensure your content is available cross-browser if some browsers support different protocols? Which protocol would you choose? Would you try to implement content on multiple protocols?

Unstandardised HTML

Up until the early-mid 1990s we had browsers which worked on a basic definition of what HTML looked like at the time, and also Gopher.

Browsers at this time generally supported both HTTP and Gopher, up until IE6 and FF 3.6 ish; although there are a selection of browsers that still support Gopher, such as Classica (a fork of Mozilla for Mac), Galeon (GNOME browser based on Gecko), K-Meleon (basically Galeon for Windows), and OmniWeb (for Mac, from the team that bought you OmniGraffle).

There are loads of other browsers, one of my favourites is the text-based browser Lynx, started in 1993 sometime, and is STILL BEING DEVELOPED! This is utterly incredible, as far as I’m concerned. The lynx-dev mailing list has entries from the current month of writing this article and the latest release of Lynx is a little over a year old. Some of the recent messages in the mailing list point out site that refuses to work without JavaScript support. I wonder how it handles angularjs sites?

There was an attempt to standardize HTML with Sir Tim Berners-Lee (one of the inventors of the modern internet – he was not yet Sir at the time though..) putting out a draft of version 1 of the Hypertext Markup Lanauge (yeah, that’s what it stands for – had you forgotten?). It didn’t really get solidified quickly enough though; the damage was already being done!

HTML standardized

Now we’re getting towards the mid 90s; a new draft for standardizing HTML came out and actually got traction; the main browsers of the time mostly implemented HTML 2.0.

During the following few years browsers gradually evolve. HTML 2.0 isn’t able to define the sort of world they’re now able to create for users, however it’s still several years before the next version of HTML has a draft defined, and the browser vendors are getting both restless and innovative.

As such, they start to support their own elements and attributes. This is the start of the problem we’ve had to face for the next couple of decades; by the time HTML 3.2 has been defined, the browsers have left the beaten path to implement strange new functionality. Thought iFrame was a standard? Nope; IE only. Firefox instead had the ill-fated ILayer and Layer.

HTML 3.2 had to include some of the tags from some of the browsers and define them as standard. Obviously, the browser vendors didn’t implement all of their competitor’s tags whether they were defined in an HTML draft or not. Nor did they stop using their bespoke tags.

We’ll pick the impact of this up a bit later.

Mobile development

As we get to the mid-late 90s we can see a deluge of mobile devices starting to enter the market and the types of device vary massively from continent to continent.

These start off as calls and texts only, before supporting some form of more complex data transfer once the networks could support it.

These small(-ish) devices could now access the internet, but they were limited by processing power, memory, storage, screen size, screen capabilities (colour, for example, and lack of fonts), input method, and bandwidth to name but a few. As such, the current HTML 3.2 couldn’t be supported, so smart people did clever things.

Two of the main solutions to appear were WML (influenced by HDML Handheld Device Markup Language) and iHTML (which was borne of C-HTML – Compact-HTML).

WML is similar to HTML but not a subset, as it contained concepts not required by HTML 3.2 devices; iHTML/C-HTML however, is a subset of HTML.

However, they both had limited support for more complex elements like tables, jpeg images, and fonts (!)

WML, WAP

Wireless Markup Language and the Wireless Application Protocol were fascinating; many many years ago I created an executive recruitment website’s patented WAP site with end to end job posting, searching, application, confirmation, etc – all from a WAP device.

WML looks like a mixture of XML and HTML; everything is in a WML document (the deck) and the contents of each document are split into one or more cards. Each card (or maybe deck) had a limited size, else your content would be truncated by the device’s lack of memory or processing power (I remember having to try to intelligently chop content before reaching 1000 chars across cards); this was important when attempting to port content across from an HTML site to a WML site. Only one card is displayed at a time on the device, and navigation between them would be via the device’s left and right arrow keys, or similar.

<?xml version="1.0"?>
<!DOCTYPE wml PUBLIC "-//WAPFORUM//DTD WML 1.2//EN"
"http://www.wapforum.org/DTD/wml12.dtd">

<wml>
<card id="intro" title="Intro">
<p>
Hi, here is a quick WML demo
</p>
<p>
   <anchor>
      <prev/> <!-- displays a "Back" link -->
   </anchor>
</p>
</card>

<card id="next" title="Where to we go from here?">
<p>
Now will you take the <a href="#red">red</a> pill or the <a href="#blue">blue</a> pill?
</p>
<p>
   <anchor>
      <prev/>
   </anchor>
</p>
</card>

<card id="blue" title="End of the road">
<p>
Your journey ends here.
</p>
<p>
   <anchor>
      <prev/>
   </anchor>
</p>
</card>

<card id="red" title="Wonderland">
<p>
Down the rabbit hole we go!
</p>
<p>
   <anchor>
      <prev/>
   </anchor>
</p>
</card>
</wml>

You can see how it looks like a combination of XML with HTML interspersed. Unfortunately, WAP was sllooowww – you had decks of cards to hide just how slow it was; once you navigated outside of a deck you were pretty much using dial-up to load the next deck.

i-mode

i-mode logo

Whilst Europe and the U.S. were working with WML, right at the end of the 1990s Japan’s NTT DoCoMo mobile network operator defined a new mobile HTML; a specific flavour of C-HTML (Compact HTML) which was generally referred to as “i-mode” but also responded to the names “i-HTML”, “i-mode-HTML”, “iHTML”, and Jeff.

Ok, maybe not Jeff.

Since this was defined by a network operator, they also had a slightly customised protocol to enable i-mode to work as well as it possibly could on their network.

One of the possible reasons i-mode didn’t make it big outside of Japan could be due to the networks elsewhere in the world simply not being good enough at the time, such that weird gateways had to convert traffic to work over WAP. Yuk; without the concept of decks and cards for local content navigation, this meant that every click would effectively dial up and request a new page.

i-mode didn’t have the limitations of WML and WAP, and was implemented in such a way that you pressed one button on a handset to access the i-mode home screen and from there could access the official, vetted, commercial i-mode sites without typing in a single http://.

Sure, if you really wanted to, you could type in a URL, but a lot of the phones in Japan at the time had barcode readers which means that QR codes were used for i-mode website distribution, and QR codes still remain commonplace thanks to this.

Think about this for a second; the biggest and most powerful mobile network operator in Japan defined a subset of HTML which all of their user’s phones would support, and had a proprietary protocol to ensure it was a snug fit.

All of this was achieved by a team within DoCoMo led by the quite incredible Mari Mastunaga, whom Fortune Magazine selected as one of the most powerful women in business in Japan at the time – think about that for a moment: one of the most powerful women in business, in I.T., in Japan, in 1999. Seriously impressive achievement.

Mari Mastunaga

So what?

Let’s pause here for now and take stock of the what was happening in terms of web development in the 90s. If you wanted to have a site that worked across multiple devices and multiple browsers, you needed to think about: proprietary elements and attributes outside of HTML 3.2; users with browsers on HTML 2; users on WML; users on i-mode C-HTML; and that’s to name but a few concerns.

You needed many versions of many browsers to test on – maybe via VMs, or maybe rely on something like Multiple IE which had its own quirks but allowed you to launch many IE versions at once!


But that wouldn’t help you test across operating systems; don’t forget that IE had a Mac version for a few years. Ouch.

You needed emulators up the wazoo; Nokia had a great WAP one, and if you could fight through the text-heavy Japanese sites you could find some i-mode emulators too.

Progressive Enhancement at the time was less about coding for the lowest common denominator, but using a serious amount of hacky user-agent sniffing to send custom versions of pages to the device; in some cases this would mean reformatting the contents of a page completely via a proxy or similar (e.g., for WML).

You may think this is all way in the past, and if you do unfortunately you’re living in a tech bubble; sure, you have good wifi, a reliable connection, a decent phone, an up to date laptop with the newest operating system, etc, etc.

Even now i-mode is huge in Japan; if you’re not on iPhone, chances are you’re on i-mode (or something similar, like Softbank Mobile) and have to think about the current i-mode implementation (yes, they’re still making i-mode phones); Facebook recently had issues with their mobile site going awry thanks to how i-mode handles padding on certain cells if you’re sending over standard HTML.

If you have an audience in China, remember how many Windows XP IE7 (IE8 if you’re lucky) users are there.

Expecting anyone from Burma? Your site better work damn well on Opera Mini as well.

And don’t even get me started on Blackberrys.

Next up

We move into the next decade and look at what the 2000s had in store for HTML and the web.

EdgeConf 2015 – provoking thoughts.

edgeconf 2015 logo

Recently I was lucky enough to attend this year’s EdgeConf in the Facebook London offices.

Edgeconf is a one day non-conference all about current and upcoming web technologies, filled with some of the big hitters of the web development world and those instrumental in browser development.

The structure of an average section of Edgeconf is to give a brief intro to a topic which the attendees should be eminently familiar, then have everyone discuss and debate this topic, throwing out questions and opinions to the panellists or each other, such that insights can be gained as to how to better implement support in browsers, or what the web community could do to help adopt it, or decide it’s just something that’s not ready yet.

It’s very different to a normal conference, and is utterly engrossing. The fact that the attendees are hand picked and there are only a hundred or so of them means you end up with extremely well targeted and knowledgeable discussions going on.

I think I saw almost every big name web development twitter persona I follow in that one room. Scary stuff.

Having been fortunate enough to attend the 2014 Edgeconf, where there were some fascinating insights into accessibility and – surprisingly – ad networks not always being the baddies, I was looking forwards to what the day could bring.

Before the conference all attendees were invited to the edgeconf Slack team; there were various channels to help everyone get into the spirit as well as get all admin messages and general discussion.

During the day the slack channels were moving so rapidly that I often found myself engrossed in that discussion instead of the panel up in front of us.

Incredibly, every session – panel or break out – was being written up during, and presumably also after, the event, which is an achievement within itself. There was a lot of debating and discussing going on for the entire day, so hats off to those who managed to write everything up.

Hosted in the fantastic Facebook London offices, with their candy shop, coffee bar, and constant supply of caffeinated beverages, we were all buzzing to get talking.

facebook

Panel discussions

The morning started in earnest with several panel discussion on security, front end data, components and modules, and progressive enhancement.

The structure was excellent, and the best application of Slack that I’ve seen; each panel discussion had a slack channel that the panel and the moderator could see, so the audience discussions were open to them and a few times audience members were called out to expand on a comment made in the slack channel.

When we wanted to make a point or ask a question, we merely added ourselves to a queue (using a /q command) and the moderator would ensure a throwable microphone made its way to us as soon as there was a break in the panel discussion.

These squishy cubes were getting thrown all over the crowd in possibly the most efficient way of getting audience participation.

These discussions covered some great topics. I’m not going to cover the specifics since there were live scribes for all of the events:, the notes for which can be found at the edgeconf hub – I only appear as “anon” a few times..

Break out sessions

After a break to re-energise and stretch, we could choose which of the 13 breakout sessions to attend during the afternoon (yes, 13!).

These were even less formal that the panel discussions, which really weren’t very formal anyway. They took some of the points raised on the relevant panel’s slack channel or the google moderator question list that had been circulated for several months prior to determine the panel questions also.

The attendees split into one of 4 or 5 sessions at a time, huddled around a table or just a circle of chairs, and with one person leading the main discussion points everyone tried to contribute to possible directions.

For example, we spoke about web components and tried to understand why they’re not being used more; same for service worker. These are great technologies, so why do we not all use them?

The sessions covered service worker, es6, installable apps, sass, security, web components, accessibility, RUM, front end data, progressive enhancement, network ops, interoperability, and polyfills.

Summary

Although Edgeconf will have their own next steps, my personal ones will appear as subsequent posts here. Some of the topics have inspired me to put down further thoughts .

The write up from co-organiser, Andrew Betts, is a great read.

Stay tuned!

Introduction to GruntJS for Visual Studio

As a developer, there are often tasks that we need to automate to make our daily lives easier. You may have heard about GruntJS or even Gulp before.

In this article, I am going to run through a quick intro to successfully using gruntjs to automate your build process within the usual IDE of .Net developers: Visual Studio..

gruntjs (Grunt)

gruntjs logo

What is it?

Gruntjs is a JavaScript task runner; one of a few that exist, but only one of two to become mainstream – the other being Gulp. Both do pretty similar things, both have great support and great communities.

Whereas gulp = tasks defined in code, grunt = tasks defined in configuration.

It’s been going on for a while – check this first commit from 2011!

What does it do?

A JavaScript task runner allows you to define a set of tasks, subtasks, and dependent tasks, and execute these tasks at a time of your choosing; on demand, before or after a specific event, or any time a file changes, for example.

These tasks range from things like CSS and JS minification and combination, image optimisation, HTML minification, HTML generation, redact code, run tests, and so on. A large number of the available plugins are in fact grunt wrappers around existing executables, meaning you can now run those programs from a chain of tasks; for example: LESS, WebSocket, ADB, Jira, XCode, SASS, RoboCopy.

The list goes on and on – and you can even add your own to it!

How does it work?

GruntJS is a nodejs module, and as such is installed via npm (node package manager). Which also means you need both npm and nodejs installed to use Grunt.

nodejs logo npm logo

By installing it globally or just into your project directory you’re able to execute it from the command line (or other places) and it will check the current directory for a specific file called “gruntfile.js“. It is in this gruntfile.js that you will specify and configure your tasks and the order in which you would like them to run. Each of those tasks is also a nodejs module, so will also need to be installed via npm and referenced in the package.json file.

The package.json is not a grunt-specific file, but an npm-specific file; when you clone a repo containing grunt tasks, you must first ensure all development dependencies are met by running npm install, which installs modules referenced within this packages.json file. It can also be used by grunt to pull in project settings, configuration, and data for use within the various grunt tasks; for example, adding a copyright to each file with your name and the current date.

Using grunt – WITHOUT Visual Studio

Sounds AMAAAAYYZING, right? So how can you get your grubby mitts on it? I’ve mentioned a few dependencies before, but here they all are:

  • nodejs – grunt is a nodejs module, so needs to run on nodejs.
  • npm – grunt is a nodejs module and depends on many other nodejs packages; sort of makes sense that you’d need a nodejs package manager for this job, eh?
  • grunt-cli – the grunt command line tool, which is needed to actually run grunt tasks
  • package.json – the package dependencies and project information, for npm to know what to install
  • gruntfile.js – the guts of the operation; where we configure the tasks we want to run and when.

First things first

You need to install nodejs and npm (both are installed with nodejs).

grunt-cli

Now you’ve got node and npm, open a terminal and fire off npm install -g grunt-cli to install grunt globally. (You could skip this step and just create a package.json with grunt as a dependency and then run npm install in that directory)

Configuration

The package.json contains information about your project, and the various package dependencies. Think of it as a slice of NuGet’s packages.config and a sprinkle of your project’s .sln file; it contains project-specific data, such as the name, author’s name, repo location, description, as well as defining modules on which your project depends in order to build and run

Create a package.json file with some simple configuration, such as that used on the gruntjs site:

{
  "name": "my-project-name",
  "version": "0.1.0"
}

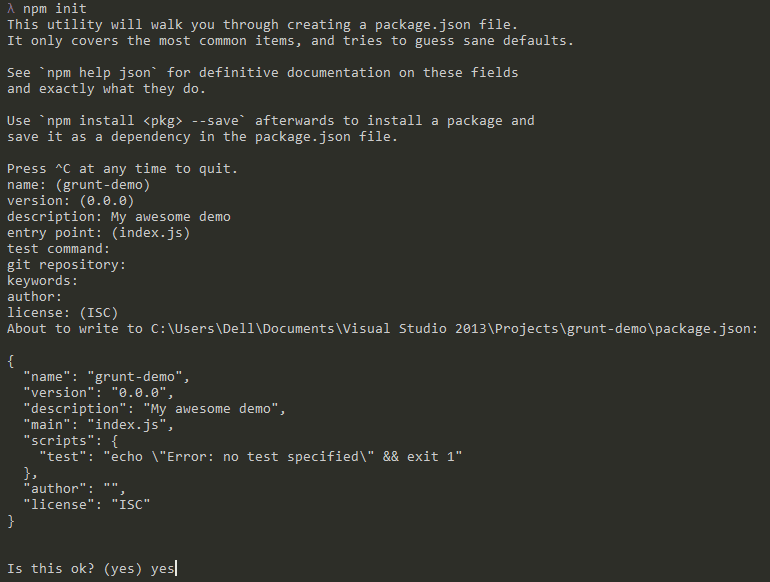
Or you could run npm-init, but that asks for lots more info that we really need here, so the generated package.json is a bit bloated:

npm init

So, what’s going on in the code above? We’re setting a name for our project and a version. Now we could just add in a few more lines and run npm install to go and get those for us, for example:

{
  "name": "my-project-name",
  "version": "0.1.0",
  "devDependencies": {
    "grunt": "~0.4.5",
    "grunt-contrib-jshint": "~0.10.0",
    "grunt-contrib-nodeunit": "~0.4.1",
    "grunt-contrib-uglify": "~0.5.0"
 }
}

Here we’re saying what we need to run our project; if you’re writing a nodejs or iojs project then you’ll have lots of your own stuff referenced in here, however for us .Net peeps we just have things our grunt tasks need.

Within devDependencies we’re firstly saying we use grunt, and we want at least version 0.4.5; the tilde versioning means we want version 0.4.5 or above, up to but not including 0.5.0.

Then we’re saying this project also needs jshint, nodeunit, and uglify.

A note on packages: “grunt-contrib” packages are those verified and officially maintained by the grunt team.

But what if we don’t want to write stuff in, have to check the right version from the npm website, and then run npm install each time to actually pull it down? There’s another way of doing this.

Rewind back to when we just had this:

{
  "name": "my-project-name",
  "version": "0.1.0"
}

Now if you were to run the following commands, you would have the same resulting package.json as before:

npm install grunt --save-dev
npm install grunt-contrib-jshint --save-dev
npm install grunt-contrib-nodeunit --save-dev
npm install grunt-contrib-uglify --save-dev

However, this time they’re already installed and their correct versions are already set in your package.json file.

Below is an example package.json for an autogenerated flat file website

{
  "name": "webperf",
  "description": "Website collecting articles and interviews relating to web performance",
  "version": "0.1.0",
  "devDependencies": {
    "grunt": "^0.4.5",
    "grunt-directory-to-html": "^0.2.0",
    "grunt-markdown": "^0.7.0"
  }
}

In the example here we’re starting out by just depending on grunt itself, and two other modules; one that creates an html list from a directory structure, and one that generates html from markdown files.

Last step – gruntfile.js

Now you can create a gruntfile.js and paste in something like that specified from the gruntjs site:

module.exports = function(grunt) {
  // Project configuration.
  grunt.initConfig({
    pkg: grunt.file.readJSON('package.json'),
    uglify: {
      options: {
        banner: '/*! <%= pkg.name %> <%= grunt.template.today("yyyy-mm-dd") %> */\n'
      },
      build: {
        src: 'src/<%= pkg.name %>.js',
        dest: 'build/<%= pkg.name %>.min.js'
      }
    }
  });

  // Load the plugin that provides the "uglify" task.
  grunt.loadNpmTasks('grunt-contrib-uglify');

  // Default task(s).
  grunt.registerTask('default', ['uglify']);

};

What’s happening in here then? The standard nodejs module.exports pattern is used to expose your content as a function. Then it’s reading in the package.json file and putting that object into the variable pkg.

Then it gets interesting; we configure the grunt-contrib-uglify npm package with the uglify task, setting a banner for the minified js file to contain the package name – as specified in package.json – and today’s date, then specifying a “target” called build with source and destination directories.

Then we’re telling grunt to bring in the grunt-contrib-uglify npm module (that must already be installed locally or globally).

After the configuration is specified, we’re telling grunt to load the uglify task (which you must have previously installed for this to work) and then set the default grunt task to call the uglify task.

BINGO. Any javascript in the project’s “src” directory will get minified, have a header added, and the result dumped into the project’s “build” directory any time we run grunt.

Example gruntfile.js for an autogenerated website

module.exports = function(grunt) {

  grunt.initConfig({
  markdown: {
    all: {
      files: [
        {
          cwd:'_drafts',
          expand: true,
          src: '*.md',
          dest: 'articles/',
          ext: '.html'
        }
      ]
    },
    options: {
      template: 'templates/article.html',
      preCompile: function(src, context) {
        var matcher = src.match(/@-title:\s?([^@:\n]+)\n/i);
        context.title = matcher && matcher.length > 1 && matcher[1];
      },
      markdownOptions: {
        gfm: false,
        highlight: 'auto'
        }
      }
  },
  to_html: {
    build:{      
        options: {
          useFileNameAsTitle: true,
          rootDirectory: 'articles',
          template: grunt.file.read('templates/listing.hbs'),
          templatingLanguage: 'handlebars',

        },
        files: {
          'articles.html': 'articles/*.html'
        }
    }
  }
});

grunt.loadNpmTasks('grunt-markdown');
grunt.loadNpmTasks('grunt-directory-to-html');

grunt.registerTask('default', ['markdown','to_html']);

};

This one will convert all markdown files in a _drafts directory to html based on a template html file (grunt-markdown), then create a listing page based on the directory structure and a template handlebars file (grunt-directory-to-html).

Using grunt – WITH Visual Studio

Prerequisites

You still need nodejs, npm, and grunt-cli so make sure you install nodejs and npm install -g grunt-cli.

To use task runners within Visual Studio you first need to have a version that supports them. If you already have VS 2015 you can skip these install sections.

Visual Studio 2013.3 or above

If you have VS 2013 then you need to make sure you have at least RC3 or above (free upgrades!). Go and install if from your pals at Microsoft.

This is a lengthy process, so remember to come back here once you’ve done it!

TRX Task Runner Explorer Extension

This gives your Visual Studio an extra window that displays all available tasks, as defined within your grunt or gulp file. So go and install that from the Visual Studio Gallery

NPM Intellisense Extension

You can get extra powers for yourself if you install the intellisense extension, which makes using grunt in Visual Studio much easier. Go get it from the Visual Studio Gallery.

Grunt Launcher Extension

Even more extra powers; right-click on certain files in your solution to launch grunt, gulp, bower, and npm commands using the Grunt Launcher Extension

Tasks Configuration

Create a new web project, or open an existing one, and add a package.json and a gruntfile.js.

Example package.json

{
  "name": "grunt-demo",
  "version": "0.1.0",
  "devDependencies": {
    "grunt": "~0.4.5",
    "grunt-contrib-uglify": "~0.5.0"
 }
}

Example gruntfile.js

module.exports = function(grunt) {
  // Project configuration.
  grunt.initConfig({
    pkg: grunt.file.readJSON('package.json'),
    uglify: {
      options: {
        banner: '/*! <%= pkg.name %> <%= grunt.template.today("yyyy-mm-dd") %> */\n'
      },
      build: {
        src: 'Scripts/bootstrap.js',
        dest: 'Scripts/build/bootstrap.min.js'
      }
    }
  });

  // Load the plugin that provides the "uglify" task.
  grunt.loadNpmTasks('grunt-contrib-uglify');

  // Default task(s).
  grunt.registerTask('default', ['uglify']);

};

Using The Task Runner Extension in Visual Studio

Up until this point the difference between without Visual Studio and with Visual Studio has been non-existent; but here’s where it gets pretty cool.

If you installed everything mentioned above, then you’ll notice some cool stuff happening when you open a project that already contains a package.json.

The Grunt Launcher extension will “do a nuget” and attempt to restore your “devDependencies” npm packages when you open your project:

npm package restore

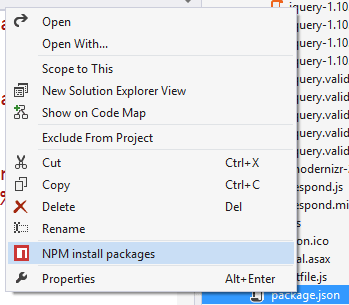
And the same extension will give you a right click option to force an npm install:

npm package restore - menu

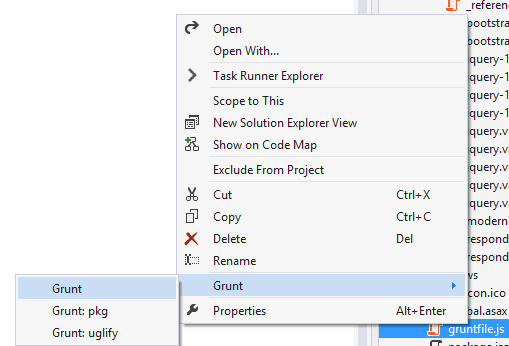
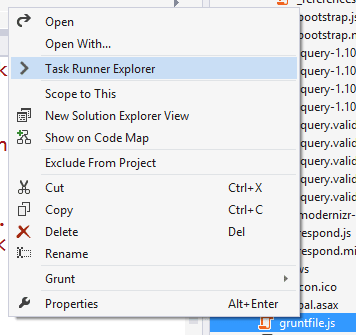
This one also allows you to kick off your grunt tasks straight from a context menu on the gruntfile itself:

grunt launcher

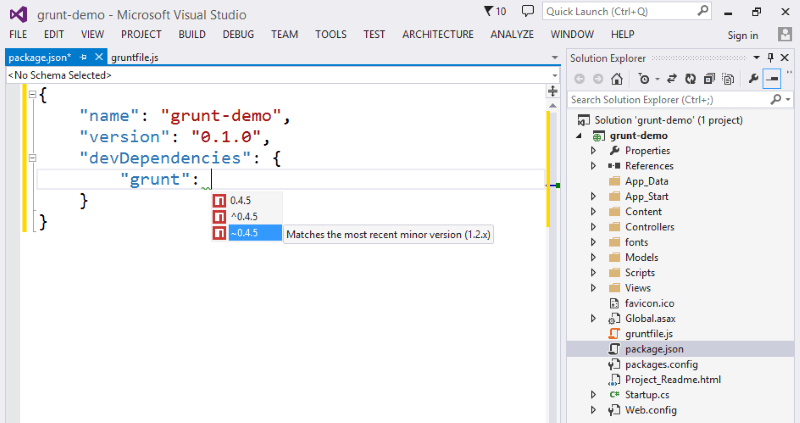
Assuming you installed the intellisense extension, you now get things like auto-suggestion for npm package versions, along with handy tooltip explainers for what the version syntax actually means:

npm intellisense

If you’d like some more power over when the grunt tasks run, this is where the Task Runner Explorer extension comes in to play:

task runner

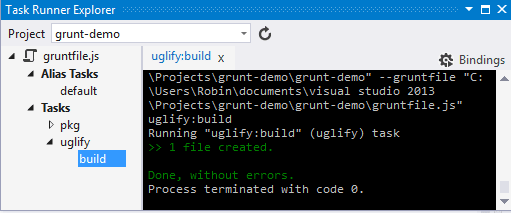
This gives you a persistent window that lists your available grunt tasks and lets you kick any one of them off with a double click, showing the results in an output window.

task runner explorer output

Which is equivalent of running the same grunt tasks outside of Visual Studio.

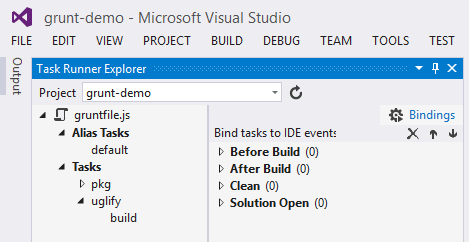
What’s really quite cool with this extension is being able to configure when these tasks run automatically; your options are:

  • Before Build
  • After Build
  • Clean
  • Solution Open

task runner explorer

Which means you can ensure that when you hit F5 in Visual Studio all of your tasks will run to generate the output required to render your website before the website is launched in a browser, or when you execute a “Clean” on the solution it can fire off that task to delete some temp directories, or the output from the last tasks execution.

Summary

Grunt and Gulp are fantastic tools to help you bring in automation to your projects; and now they’re supported in Visual Studio, so even you .Net developers have no excuse to not try playing around with them!

Have a go with the tools above, and let me know how you get on!

My Thoughts On #NoEstimates

What?

The #NoEstimates idea is to break all pieces of work into similar sized chunks based on a consistent “slicing heuristic”; not give sizes or estimates up front, and hope to be able to predict future development based on how long each one of those similarly complex small tasks ends up taking to deliver. But also very importantly: ensure you deliver regularly.

It’s less about “not estimating”, and more about improving how you work such that estimates are less necessary. Deliver regularly, focusing on the flow, is key to this.

About that slicing heuristic: a heuristic is an approach to problem solving that is known to not be perfect, but is good enough for the time being. So a “slicing heuristic” is best guess at deciding how to split large pieces of work into similarly complex tasks. You’ll make it better each time you try until you something that works for your team.

An example slicing heuristic would be that a feature can only consist of one acceptance test; if you have more than one acceptance test, slice the feature into two or more features.

I’m probably over simplifying the concept, but it’s a pretty simple concept in the first place!

Why?

Whilst coming up with the latest iteration of the development process at Mailcloud, I coincidentally stumbled upon an article about #NoEstimates and subsequently various videos on the subject, and more articles, with support from more articles.

The idea is an interesting one, if only due to my dislike of day-long planning meetings/sizing sessions where inevitably everything ends up being a 3,5 or a 40.

Seems like a lovely idea, right? It also seems fundamentally flawed for reasons such as an inability to give a reasonable quote or estimate to a client up front, especially for extremely large projects. Also, the team has to be able to split the work into chunks of similar complexity, which is easier said than done; ever been in a sizing meeting where everything ends up almost the same size? You require a team’s ability to be consistently effective and efficient, as opposed to just being “consistent” (and not in a good way).

I’m no fan of huge, minutely detailed, projects, so perhaps these aren’t so bad?

Given that I’m one of those pesky critical thinkers, I went out and did a little research on the opposition. There are some extremely vocal detractors of this concept.

The most vocal and well known detractors of #noestimates appear to be those with significant experience in several large projects over more than 2 or 3 decades, with a background in statistical analysis, probability, and software project management.

A quote to sum up this perspective, which appears to have been adapted from a Lao Tsu quote:

“Those who have knowledge of probability, statistics, and the processes described by them can predict their future behaviour. Those without this knowledge, skills, or experience cannot”

i.e., stop being lazy and learn basic stats.

Most vocal and well known #NoEstimates proponents are either also proponents of XP or have more experience in small to medium scale projects and put less importance on statistical analysis.

There’s a lot of – quite childish – banter between these two camps on twitter an in blogs, trying to say who is right, when it’s quite obvious that these different approaches suit different projects; if your client has a fixed budget and a deadline, then not being able to give any confidence in meeting that deadline within that budget (i.e., no estimates) is not going to be a feasible option. Similarly, if you’re not quite certain what you’re building yet, or only know the start and are able to follow the Product Owner and user feedback, then estimating an uncertain backlog to give a realistic finish date is likewise unlikely.

As such, it would appear that you have to – as I always do – make up your own mind, and in some cases take a little from all available sources to create something that works for you and your team or company.

That’s exactly what I’m doing at the moment, and it’s possibly not anything that really exists yet; a little XP, a little kanban, a little scrum, a little noestimates (hey, why not? We’re a start-up!); and a damned lot of trello.

This is Dev Process version v5; I don’t doubt for a second we’ll have a v6, v7, and so on as the team grows and as the product changes.

Interested in learning more about #NoEstimates? You can check out the book, and get a free chapter to kick off with.

No Estimates Book

Learning By Doing: Java, Maven, Seyren, Hipchat, Github

If you use a graphing system, waiting all day long to see something spike can be painful. And boring.

Spike

Ouch! Seeing those spikes can be annoying, but missing them can be even more annoying. Who can be bothered to stare at graphs all day and night?

Seyren

That’s why recently I had the opportunity to try out Seyren. I’ve been meaning to try it out for a while; it’s a Java-based solution to monitor a graphite endpoint and react to various configured thresholds by alerting external services.

Seyren

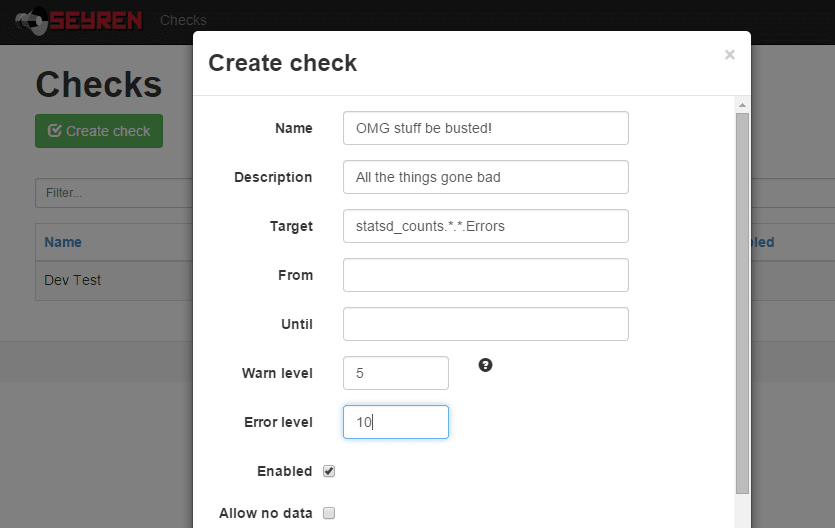
Creating a check

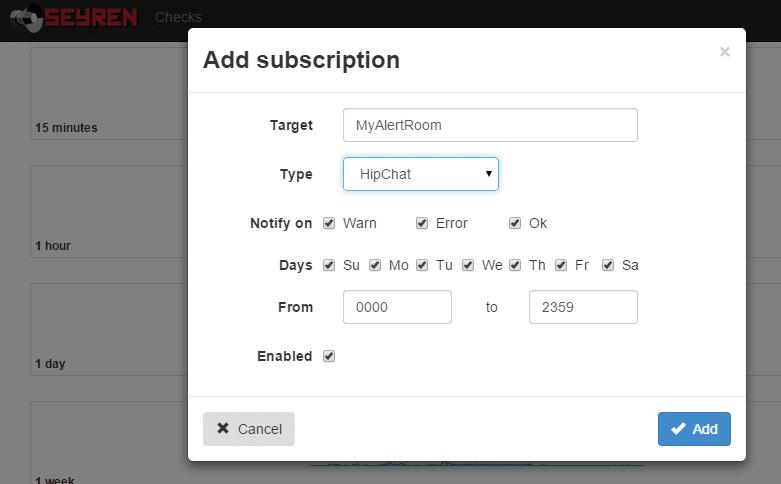
These external services are extensible and currently there is support for systems such as plain old email, Flowdock, Hubot, Irc, PagerDuty, Slack, and – the subject of my interest – Hipchat.

Unfortunately, Seyren only supports Hipchat API v1 (which is deprecated) and as such I couldn't use it. Also it’s written in Java and I’ve never written anything in Java. However, I did do a degree in C++ and that's pretty close, right?…
Right?..

This is the short story of how I contributed to a Java-based open source project, adding support for Hipchat V2 and generally saving the day! (possible exaggerations may exist in this post.)

First up, how I managed to set up a minimal Java development environment on Windows.

Java

Installing Java on Windows

You have two main options for getting the Java Development Kit running on your system:

One:

  1. Head over to the JDK download page on oracle.com
  2. Download and install the Java Development Kit for your OS

Two:

  1. If you haven't already got the amazing Windows package manager chocolately, go and get it!
  2. choco install jdk8

For either one, you may still need to add the Java root dir to your PATH (not the bin subdir) as JAVA_HOME, like this:
JAVA_HOME environment variable

Maven

What is it?

Maven is a build automation tool, used a lot in Java projects. The build configuration is in an xml file – usually named "pom.xml" for Project Object Model – which defines the dependencies and project configuration.

Maven has the concept of plugins, goals, and phases to extend and link stages into build lifecycles. The Build lifecycle is a list of named phases that can be used to give order to goal execution.

One of Maven's standard lifecycles is the default lifecycle, which includes the following phases:

  1. validate
  2. generate-sources
  3. process-sources
  4. generate-resources
  5. process-resources
  6. compile
  7. process-test-sources
  8. process-test-resources
  9. test-compile
  10. test
  11. package
  12. install
  13. deploy

So running mvn test will result in the execution of phases 1 through 10; mvn install will execute phases 1 though 12. You get the idea.

Installing Maven on Windows

Again, a couple of options;

One:

  1. Head over to https://maven.apache.org/
  2. Download the zip
  3. Place the contents in a seriously high level directory such as C:\mvn (Maven doesn't like spaces in pathnames)
  4. Append the bin subdir to your PATH

Two:

  1. choco install maven

Heh.

Either route needs you to open a fresh command line in order to get the updated PATH values maven configures.

Right, now on to the main event!

Seyren

What is it?

Seyren "is an alerting dashboard for Graphite. It supports the following notification channels: Email, Flowdock, HipChat, HTTP, Hubot, IRCcat, PagerDuty, Pushover, SLF4J, Slack, SNMP, Twilio"

You configure it to point at a graphite instance, tell it what metrics to monitor, what thresholds to watch out for, how to notify you of these events, and it will ping graphite every few seconds; should any of those thresholds be met, it will notify you.

Simple as that. Its power is in that simplicity.

Getting the code

Head over to the github repo at https://github.com/scobal/seyren and clone the repo locally.

If you just want to run it, then you can just download the latest release as a Java jar file.

Running Seyren locally

Seyren has a dependency on mongodb where it saves the checks (points at which a configured threshold has changed state)

So, let's set that up.

  • choco install mongodb

Easy. If everything has worked so far, you can open a terminal in the repo directory and run the following maven command to check it builds and the tests pass:

  • mvn clean verify

If all went well, you will need to set up an environment variable or two, such as your graphite instance's url and in my case my hipchat API key. Again, these are just environment variables, like JAVA_HOME.

Once that's done you can run Seyren temporarily within maven for a quick play.

Happy with it? You can use maven to create a jar file using

  • mvn package

    or if you want to skip running the tests again

  • mvn package -DskipTests

That will generate you a bunch of jar files in various target subdirectories; the one we're interested in is in seyren-web – the others are dependencies for it.

You can now start this puppy up within a tomcat instance using (substitute the name of your "war-exec.jar" file in here):

  • java -jar /seyren/seyren-web/target/seyren-web-1.4.0-SNAPSHOT-war-exec.jar

Checkpoint 1

You should now have Java, Maven, MongoDB, and Seyren running happily. Now here's how I managed to implement Hipchat v2 support and get the PR accepted!

Java IDEs

Seriously? Eclipse? I've looked at it before, and couldn't stand it. I even downloaded and installed it, but gave up. Since I'm not building a Java project from scratch, all I needed was a half decent text editor.

As such, I fired up my current favourite editor – SublimeText. I like the simplicity of this editor, and you can easily get it yourself with choco install sublimetext2, naturally.

Having a pretty good understanding of the Hipchat v2 API, I was able to guess and googlebing the necessary Java syntax for updating the existing HipchatNotificationService, as can be seen in this pull request: https://github.com/scobal/seyren/pull/294/files

Being able to easily switch back to command line and run mvn clean verify to get the build feedback and the test results was pretty painless. I got it running by pointing it at the company Hipchat account and checked everything worked as expected, then proceeded to submit a pull request, expecting to receive all manner of awards for my contribution and epic skillz.

Contributing

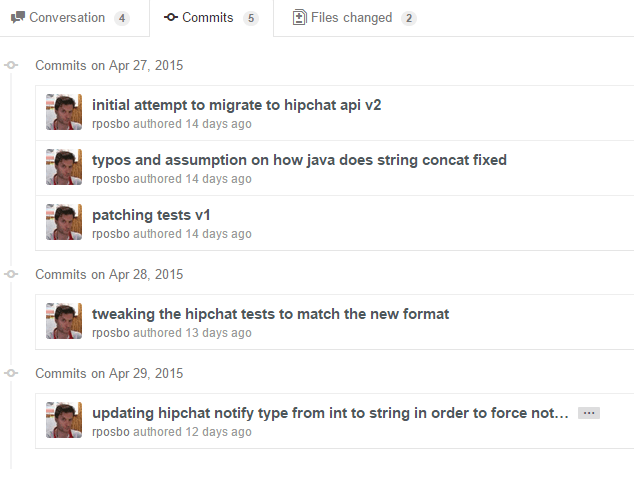
messy comits

Unfortunately I made a few messy commits in my initial pull request and someone had their own PR merged in the meantime (i.e., whilst I spent several days trying to work out how to generate a "jar" file..), but it didn't do anything of value and was even incorrect. Instead of doing the right thing and merging with it, fixing it, reverting their stuff, and submitting a full PR, I was lazy; I submitted a messy list of commits with a message along the lines of "I know it doesn't merge, but that's your fault not mine".

I was tired, I apologise.

I received a request to rebase and squash the commits, then resubmit the PR. I've never done that; I can
git clone
like a pro, but after something like
git mergetool --tool=kdiff3
(my current fave), I'm out of my depth. I had to learn quickly!

In short; rebase appears to rewind your commits, take another branch, and replay the commits one by one over that branch. If any of the commits result in a merge conflict you can fix it before deciding to git rebase --continue. Pretty nice.

Squashing commits is pretty obvious; takes a set of individual commits and merges them into one commit. There are several ways of doing this that I've read about, but the one I find easiest is to "soft reset" your local branch using
git reset HEAD~3 --soft

In this example I will effectively uncommit the latest 3 commits, but the key is the --soft option – your changes are not undone (as with --hard), merely uncommited.

You can now commit all of the changes from those 3 commits into one, and give it a nice, clear, commit message.

That's what I did, and that's how my first Java OSS contribution was accepted!

References

Aside

A Question: What’s Your Third Place?

Cheers!

I’ve been thinking recently about the concept of the Third Place, which is usually defined by:

  • The “first place” is the home and those that one lives with;
  • The “second place” is the workplace where people may actually spend most of their time;
  • “Third places”, then, are “anchors” of community life and facilitate and foster broader, more creative interaction.

With hallmarks such as those defined by Ray Oldenburg in his book The Great Good Place which explores such hangouts at the heart of the community:

  • Free or inexpensive
  • Food and drink, while not essential, are important
  • Highly accessible: proximate for many (walking distance)
  • Involve regulars – those who habitually congregate there
  • Welcoming and comfortable
  • Both new friends and old should be found there.

[wiki]

Apparently, even Starbucks was shaped by someone wanting to create a third place as a coffee shop in the style of the traditional Italian coffeehouse.

How I Define It

For me, a third place is somewhere physical or virtual (I’ll get on to this again later) that’s not work and not home, that allows me to mentally relax and defocus from the concerns of everyday life usually associated with those places.

It must be somewhere that affords me the luxury of uninterrupted thought to consider whatever worry, concern, or even slight niggle that has been bugging me about places one and two. By gaining that mental distance I’m able to more easily find solutions or just generally be at peace.

Many years ago my “third places” would have been friend’s houses (massive all-nighter gaming sessions!) or pubs, since that’s all I really did outside of home, work/study, commute.

Physical

Coffee shop

Then I grew older and it became almost entirely pubs and bars.

Thankfully, London being a major city has a significant number of social places, and a few of these are reasons for me loving this city as much as I do; if you’ve never spent a lazy afternoon wandering around the Tate Modern, Royal Festival Hall, or just exploring Southbank in general, or the British Museum, British Library, The Barbican, then I thoroughly recommend you do. (*)

That’s not even scratching the surface of the available resources for public Zen; the museum district around South Kensington offers the V&A, Science Museum, and the Natural History Museum – all amazing, all fascinating, all full of people just milling around (all with free wifi!)

The benefit of these sorts of places for my psychological well-being is immense.

However, since becoming a parent my third places have significantly changed; I’ve no money for pubs and bars and very little time for visiting London’s great spaces so for a few years that Third Place became my cycle commute; a chance to spend an hour not thinking about usual day to day concerns, instead focussing solely on staying alive in central London’s rush hour traffic!

I’d often find that a good, fast – safe – cycle ride would result in my brain having deciphered that coding, architecture, or management problem I’d just mentally left behind in the office, possibly more efficiently than finding a space to walk around in and force myself to think it through.

Virtual

I have previously spent much time working from coffee shops or those great places mentioned above, moving from one to another as I need to; I no longer have that luxury.

Having moved both house and job recently, I am no longer able to fit cycling into my daily routine and I don’t spend enough time on one single form of public transport to achieve that same state of Zen – constantly changing from bus to tube to tube to bus interrupts any such defocusing.

Several years ago a few articles claiming the internet as a third place were published; a couple that stood out for me were Scott Hanselman’s The Developer Theory of the Third Place (2007) and The internet as the 3rd place from Advomatic.

The time people invest in Facebook, Twitter, Tumblr, Pinterest, and any other forums of social media allow them to treat these as their social interaction outside of the work and the home (presumably whilst still physically inside of work or home) and for some people this brings similar benefits as a physical location and have almost all of the same hallmarks;

  • Free or inexpensive
  • Highly accessible: proximate for many (walking distance)
  • Involve regulars – those who habitually congregate there
  • Welcoming and comfortable
  • Both new friends and old should be found there.

The same is true of most well known techie online hangouts; StackOverflow or Reddit as great examples of this.

So What’s My Point?

I’m writing this as I’ve realised why I’m gradually more uneasy these days; I think I’ve lost my third place. No bars, pubs, gaming sessions, time to just wander around, time to cycle.

The virtual places are no longer that engaging; Facebook is just something to look at whilst patting my kids to sleep at night. No time to just hangout on SO, Reddit, FB, other.

I think for a while I immersed myself in learning new things or working all hours on one or many projects, perhaps just blogging; this was probably more of a distraction than escapism and only succeeded in exhausting me such that I haven’t had any energy for a few months!

As such, I’m slightly at a loss, dear reader. What’s your third place? What could mine be?..

Disclaimer

(*) Other cities are available, and are equally amazing.

Thoughts on learning to become a web developer

I was recently asked by a friend for advice on a career change; he wants to get into web development and wasn’t quite sure the best place to start.

Requirements

  • Where do I start??
  • How do I decide between being a front end or back end developer?
  • Attend a course with an instructor or self-learning online?

My thoughts on learning to become a developer

Instructor-led courses or workshops are great for intense, short, periods of studying, where you can ask questions to get explanations for things you may not have understood. I sometimes teach via frameworktraining.co.uk and love how I can focus on whatever areas the attendees want me to; I’ve previously taught an Advanced MVC5 course, but it morphed into an Advanced MVC5/6 course with a focus on security.

I would suggest starting with Pluralsight – you get a free trial of something like 10 days or 200 minutes’ worth, then if you stick with it you pay either $30 or $50 a month for unlimited access to the excellent training videos (and coursework if you pay the $50); I use this all the time to seriously cram before I train a course – usually watching it at double speed!

Pluralsight is extremely well respected as a learning resource for all levels of ability. There are fantastic beginner courses – and even courses for teaching kids to program! I’d suggest checking out the Learning to Program Part 1 and 2 by Scott Allen – his stuff is usually great.

Personally I prefer to use pluralsight to an in-person course, but that’s just how I best learn. You may be different and want to get some in-person help as well.

Check out egghead.io for angularjs (popular javascript framework) videos; again, some free, some paid.

As for Back End vs Front End; just learn the basic concepts, then work out what you prefer.

So. How does that sound to you? Any suggestions?

Thoughts on current (early 2015) options for a cheap, family, desktop computer

I was recently asked by a friend for advice on buying a reasonably priced family computer; I’m sharing my opinions and asking for your thoughts.

Requirements

  • kids homework (project research and documentation),
  • kids learning to type and use a computer,
  • some gaming (minecraft & sims!),
  • Skype,
  • email,
  • affordable

My Response

If Mac, then something like this Mac Mini would be good (~ £470, but you’d also need mouse, and keyboard, so maybe £520ish or more):


Mac Mini

http://www.amazon.co.uk/computers/dp/B005EMLPR6/

If Windows, then I’d recommend something like this Acer Aspire; also tiny, less expense (~ £350), comes with everything except screen:


Acer Aspire

http://www.amazon.co.uk/Acer-Desktop-Pentium-Integrated-Graphics/dp/B00JFZP09C/

If your budget is tighter than that Aspire there are similar ones around, plus refurbished Windows PCs are way cheaper. To keep up with changing requirements of software the specifications are reasonably good, so you could go down a notch (i.e., less RAM, slower CPU, smaller hard drive), but then it would become annoyingly slow that much sooner.

The specs to look for when shopping around for a PC:

So. How does that sound to you? Any suggestions?

Top 5 Biggest Queries of 2014

During this year I became slightly addicted to the fantastic community site bigqueri.es; a site to help people playing around with the data available in Google’s BigQuery share their queries and get help, comments, and validation on that idea.

A query can start a conversation which can end up refining or even changing the direction of the initial idea.

BigQuery contains a few different publicly available large datasets for you to query, including all of Wikipedia, Shakespeare’s works, and Github meta data.

HTTP Archive

The main use of bigqueri.es is for discussing the contents of the HTTP Archive (there are a few about other things, however) and that’s where I’ve been focussing my nerdiness.

What follows is a summary of the five most popular HTTP Archive queries created this year, by page view. I’m hoping that you find them as fascinating as I do, and perhaps even sign up at bigqueri.es and continue the conversation or even sign up for Big Query and submit your query for review.

Here they are, in reverse order:

5) 3rd party content: Who is guarding the cache? (1.5k views)

http://bigqueri.es/t/3rd-party-content-who-is-guarding-the-cache/182

Doug Sillars (@dougsillars) riffs on a previous query by Ilya Grigorik to try investigating what percentage of requests are coming from 3rd parties, what is the total amount of this (in MB), and how much of it is cacheable.

I’ve run what I believe to be the same query over the entire year of 2014 and you can see the results below:

We can see that there’s a generally good show from the 3rd parties, with June and October being particularly highly cacheable; something appears to have happened in September though, as there’s a sudden drop-off after 80 of the top 100 sites whereas the other months we see that same drop-off after 90 sites.

4) Analyzing HTML, CSS, and JavaScript response bodies (2.4k views)

http://bigqueri.es/t/analyzing-html-css-and-javascript-response-bodies/442

Ilya Grigorik (@igrigorik) gets stuck into a recent addition to the HTTP Archive (in fact, it only exists for ONE run due to the sheer volume of data); the response bodies! Mental.

By searching within the response bodies themselves – such as raw HTML, Javascript, and CSS – you’re able to look inside the inner workings of each site. The field is just text and can be interrogated by applying regular expressions or “contains” type functions.

The query he references (actually created as an example query by Steve Souders (@souders)) examines the asynchronous vs synchronous usages of the Google Analytics tracking script, which tells us that threre are 80577 async uses, 44 sync uses and a bizarre 6707 uses that fall into neither category.

I’m working on several queries myself using the response body data; it’s amazing that this is even available for querying! Do be aware that if you’re using BigQuery for this you will very quickly use up your free usage! Try downloading the mysql archive if you’re serious.

3) Sites that deliver Images using gzip/deflate encoding (4.4k views)

http://bigqueri.es/t/sites-that-deliver-images-using-gzip-deflate-encoding/220

Paddy Ganti (@paddy_ganti) starts a great conversation by attempting to discover which domains are disobeying a guideline for reducing payload: don’t gzip images or other binary files, since their own compression algorithms will do a better job than gzip/deflate which might even result in a larger file. Yikes!

The query looks into the response’s’ content type, checking that it’s an image, and compares this with the content encoding, checking if compression has been used.

There are over 19k compressed image responses coming from Akamai alone in the latest dataset:

Although you can see the results suggest a significant number of requests are gzip or deflate encoded images, the great discussion that follows sheds some light on the reasons for this.

2) Are Popular Websites Faster? (4.9k views)

http://bigqueri.es/t/are-popular-websites-faster/162

Doug Sillars (@dougsillars) has another popular query where he looks into the speed index of the most popular websites (using the “rank” column).

We’re all aware of the guideline around keeping a page load as close to a maximum of 2 seconds as possible, so do the “big sites” manage that better than the others?

If we graph the top 1000 sites – split into top 100, 100-500, and 500-1000 – and get a count of sites per Speed Index (displayed as a single whole number along the x-axis; e.g. 2 = SI 2000), we can see the relative performance of each group.

Top 100

The top 100 sites have between 25-30 sites with Speed Indexes around 2000-3000 then drop off sharply.

Top 100-500

Although the next 400 have over 60 sites each with a Speed Index of 2000 or 4000, and almost 90 sites with 3000, their drop off is smoother and there’s a long tail out to 25000.

Top 500-1000

The next 500 have a similar pattern but a much less dramatic drop off, then a gentle tail out to around 25000 again.

This shows that although there are sites in each range which achieve extremely good performance, the distribution of the remainder gets more and more spread out. Essentially the percentage of each range who achieve good performance is reduced.

The post is very detailed with lots of great visualisations of the data, leading to some interesting conclusions.

1) M dot or RWD. Which is faster? (7.6k views)

http://bigqueri.es/t/m-dot-or-rwd-which-is-faster/296

The most popular query by quite a way is another one from Doug Sillars (@dougsillars).

The key question he investigates is whether a website which redirects from the main domain to a mobile-specific domain performs better than a single responsive website.

He identifies those sites which may mobile specific using the cases below:

 WHEN HOST(requests.url)  LIKE 'm.%' then "M dot"
 WHEN HOST(requests.url)  LIKE 't.%' then "T dot"
 WHEN HOST(requests.url)  LIKE '%.mobi%' then "dot mobi"
 WHEN HOST(requests.url)  LIKE 'mobile%' then "mobile"
 WHEN HOST(requests.url)  LIKE 'iphone%' then "iphone"
 WHEN HOST(requests.url)  LIKE 'wap%' then "wap"
 WHEN HOST(requests.url)  LIKE 'mobil%' then "mobil"
 WHEN HOST(requests.url)  LIKE 'movil%' then "movil"
 WHEN HOST(requests.url)  LIKE 'touch%' then "touch"

The key is this clause, used to check when the HTML is being served:

 WHERE requests.firstHtml=true

These are then compared to sites whose url don’t significantly change (such as merely adding or removing “www.”).

The fascinating article goes into a heap of detail and ultimately results in the conclusion that responsively designed websites appear to outperform mobile-specific websites. Obviously, this is only true for well written sites, because it is still easy to make a complete mess of a RWD site!

bigqueri.es

Hopefully this has given you cause to head over to the http://bigqueri.es website, check out what other people are looking into and possibly help out or try your own web performance detective work out over the holiday season.

Setup StatsD and Graphite in one script

Trying to get this working over the past 6 months has almost driven me insane. However, thanks to this epic script as a starting point, my script below ACTUALLY WORKS (for me, on my machine, YMMV).

I can create a VM powershell-stylee and then ssh in to create this script, and execute it.

It results in a statsd endpoint which pushes metrics to the local Graphite (carbon) instance regularly. Good luck, let me know if it works for you too!