Scripting the setup of a developer PC, Part 3 of 4 – Installing.. uh.. everything.. with Chocolatey.

This is part three of a four part series on attempting to automate installation and setup of a development PC with a few scripts and some funky tools. If you haven’t already, why not read the introductory post about ninite or even the second part about the command line version of WebPI? Disclaimer: this series was inspired by a blog from Maarten Balliauw.

Installing.. uh.. everything..: Chocolatey

Chocolatey is sort of “apt-get for windows” using powershell; it doesn’t quite achieve that yet, but the idea is the same; imagine nuget + apt-get. It works exactly like nuget but is meant to install applications instead of development components. The next release will support webpi from within chocolatey, but more on that in a moment.

There’s not much to look at yet, but that’s the point; you just type what you want and it’ll find and install it and any dependencies. I want to install virtualclonedrive, some sysinternals goodies, msysgit, fiddler, and tortoisesvn.

Before you start, make sure you’ve relaxed Powershell’s execution policy to allow remote scripts:
[powershell]Set-ExecutionPolicy Unrestricted[/powershell]

Ok, now we can get on with it. I can now execute a new powershell script to install choc and those apps:

[powershell]# Chocolatey
iex ((new-object net.webclient).DownloadString(‘http://bit.ly/psChocInstall’))

# install applications
cinst virtualclonedrive
cinst sysinternals
cinst msysgit
cinst fiddler
cinst tortoisesvn[/powershell]

This script will download (DownloadString) and execute (iex) the chocolatey install script from the bit.ly URL, which is just a powershell script living in github:
https://raw.github.com/chocolatey/chocolatey/master/chocolateyInstall/InstallChocolatey.ps1

This powershell script currently resolves the location of the chocolatey nuget package:
http://chocolatey.org/packages/chocolatey/DownloadPackage

Then, since a nupkg is basically a zip file, the chocolatey script unzips it to your temp dir and fires off chocolateyInstall.ps1; this registers all of the powershell modules that make up chocolatey. The chocolatey client is essentially a collection of clever powershell scripts that wrap nuget!

Once chocolatey is installed, the above script will fire off “cinst” – an alias for “chocolatey install” – to install each listed application.

What’s even more awesome is that the latest – not yet on the “master” branch – version of Chocolatey can install using webpi. To get this beta version, use the extremely terse and useful command from Mr Chocolatey himself, Rob Reynolds (@ferventcoder):

Adding in the install of this beta version allows me to use choc for a few more webpi components:

[powershell]# Chocolatey
iex ((new-object net.webclient).DownloadString(‘http://bit.ly/psChocInstall’))

# install applications
cinst virtualclonedrive
cinst sysinternals
cinst msysgit
cinst fiddler
cinst tortoisesvn

# getting the latest build for webpi support: git clone git://github.com/chocolatey/chocolatey.git | cd chocolatey | build | cd _{tab}| cinst chocolatey -source %cd%
# I’ve already done this and the resulting nugetpkg is also saved in the same network directory:
cinst chocolatey –source “Z:\Installation\SetupDevPC\”

# Now I’ve got choc I may as well use it to install a bunch of other stuff from WebPI;
# things that didn’t always work when I put them in the looong list of comma delimited installs
# IIS
cinst IIS7 -source webpi
cinst ASPNET -source webpi
cinst BasicAuthentication -source webpi
cinst DefaultDocument -source webpi
cinst DigestAuthentication -source webpi
cinst DirectoryBrowse -source webpi
cinst HTTPErrors -source webpi
cinst HTTPLogging -source webpi
cinst HTTPRedirection -source webpi
cinst IIS7_ExtensionLessURLs -source webpi
cinst IISManagementConsole -source webpi
cinst IPSecurity -source webpi
cinst ISAPIExtensions -source webpi
cinst ISAPIFilters -source webpi
cinst LoggingTools -source webpi
cinst MetabaseAndIIS6Compatibility -source webpi
cinst NETExtensibility -source webpi
cinst RequestFiltering -source webpi
cinst RequestMonitor -source webpi
cinst StaticContent -source webpi
cinst StaticContentCompression -source webpi
cinst Tracing -source webpi
cinst WindowsAuthentication -source webpi[/powershell]

Best bit about this? When you run the first command you’ll download and install the latest version of the specified executable. When this succeeds you’ll get:

[code] has finished successfully! The chocolatey gods have answered your request![/code]

Nice.

You’ll hopefully see your Powershell window update like this a few times:
choc_install (click to embiggen)

But depending on your OS version (I’m using Windows Server 2008 R2) you might see a few alerts about the unsigned drivers you’re installing:
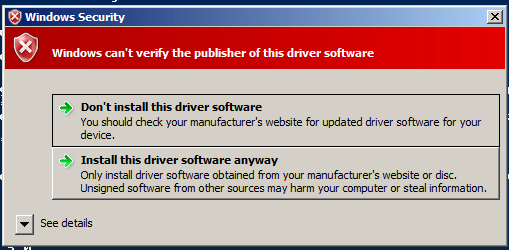
choc_alert

That doesn’t seem to be avoidable, so just click to install and continue.

You might also find that your own attempts to install the beta version of chocolatey fail with errors like these:
choc_install_choc_fail1
or
choc_install_choc_fail2 (click to embiggen)

This is due to how you reference the directory in which your beta choc nuget package lives. If you reference it from a root dir (e.g. “Z:\”) then it’ll fail. Put it in a subdirectory and you’re golden:
choc_install_choc_success2
or using “%cd%” as the source dir (assuming you’re already in that dir):
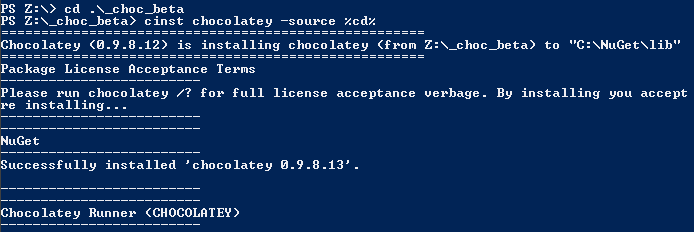
choc_install_choc_success1

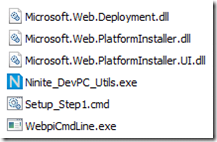
So, with my new powershell script and the beta chocolatey nupkg, along with the existing script for ninite, webpi and their components, my PC Setup directory now looks like this:
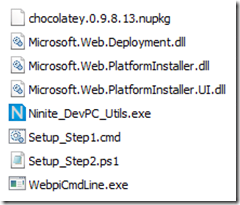
281211_autoinstall_choc_dir_contents

The last part of this series focuses on installing other things that either can’t be done or just didn’t work using one of the previous options, a list of “interesting things encountered”, and a conclusion to the whole project; see you back in:

Scripting the setup of a developer PC, Part 4 of 4 – Installing Custom Stuff, Interesting Things Encountered, and Conclusion.

Update: The chocolatey “beta” I mentioned is actually now in the mainline.

Scripting the setup of a developer PC, Part 2 of 4 – Installing Frameworks and Components with WebPI

This is part two of a four part series on attempting to automate installation and setup of a development PC with a few scripts and some funky tools. If you haven’t already, why not read the introductory post about ninite? Disclaimer: this series was inspired by a blog from Maarten Balliauw.

Installing Frameworks and Components: WebPI

Microsoft’s Web Platform Installer makes finding and installing MS applications and components quite easy by bringing the way to find and install them into one central portal (when it works properly, that is.. grumblegrumble..):

image

It also comes in a command line flavour so you can script your component installation, and that’s what I’ll be using.

The list of available packages can be found with the “/list:available” parameter and it’s pretty long.

You can specify custom XML feeds to define your own products and applications to be installed; something that might be interesting to spin up a new instance of your company website on a new server, if you set your web server to run webpi from commandline using a custom feed pointing to the latest stable build of your web application (that’ll be an interesting follow up post at some point I think)!

A summary of the parameters available to you can be found here.

Fire up a command line and run “WebpiCmdLine.exe /List:available” to get a list of available products and applications. It didn’t look exhaustive to me, so I checked the xml locations listed at the beginning of this command:

For the current version of the WebPI (at time of writing this is v3.0) these are:

https://www.microsoft.com/web/webpi/3.0/webproductlist.xml

https://www.microsoft.com/web/webpi/3.0/webapplicationlist.xml

https://www.microsoft.com/web/webpi/3.0/mediaproductlist.xml

https://www.microsoft.com/web/webpi/3.0/toolsproductlist.xml

https://www.microsoft.com/web/webpi/3.0/enterpriseproductlist.xml


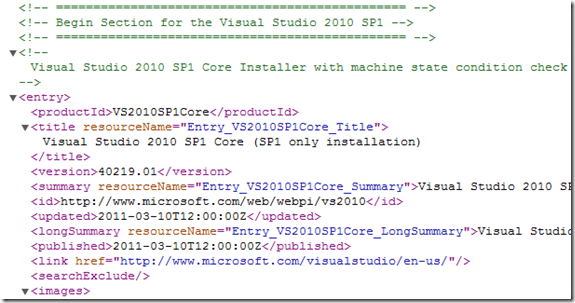
Trawling through these xml files you can see that apparently you can install VS2010SP1…

292111_autoinstall_webpi_VS2010SP1Core

…but not SQL Tools (other than Express). I’ll get onto this lot shortly.


So for the meantime I’m now adding some more to my script to set up the .Net frameworks, Powershell, and Windows Installers:


REM Ninite stuff
cmd /C "Z:\Installation\SetupDevPC\Ninite_DevPC_Utils.exe"

REM WebPI stuff 
cmd /C "Z:\Installation\SetupDevPC\webpicmdline.exe /AcceptEula /SuppressReboot /Products:PowerShell,PowerShell2,NETFramework20SP2,NETFramework35,NETFramework4"

cmd /C "Z:\Installation\SetupDevPC\webpicmdline.exe /AcceptEula /SuppressReboot /Products:WindowsInstaller31,WindowsInstaller45"

Notice the multiple products are comma delimited but without spaces; it bombs if you put a space after the comma.

You can split each product install out into its own webpicmdline.exe call, but this ends up reloading the five xml feeds for each product, which can take an age.

However, I’ve had to split it onto a couple of lines as the install of Windows Installer 4 fails if it’s on the same line as .Net 4. It also requires you to reboot, so since you’ve suppressed this you’ll see some log messages looking like “install: SUCCESS” then “verification: FAILURE”:

[code]Started downloading: WindowsInstaller45
DownloadedWindowsInstaller45
Started installing Products…
Started installing: WindowsInstaller45
Install completed (SuccessRebootRequired): Windows Installer 4.5
Reboot is required for product WindowsInstaller45. Install SUCCESS[/code]

YEY!!

[code]Verifying successful installation…
Windows Installer 4.5 False
Install of Products: FAILURE
Verifying successful log generation…
Windows Installer 4.5 Logs : False
Creation of Product Logs: FAILURE[/code]

uh.. BOOO! So you do actually need to reboot to get this to complete. As such, I’ve added in the final line for this file:

@echo off

REM Ninite stuff 
cmd /C "Z:\Installation\SetupDevPC\Ninite_DevPC_Utils.exe"

REM WebPI stuff 
cmd /C "Z:\Installation\SetupDevPC\webpicmdline.exe /AcceptEula /SuppressReboot /Products:PowerShell,PowerShell2,NETFramework20SP2,NETFramework35,NETFramework4" 

cmd /C "Z:\Installation\SetupDevPC\webpicmdline.exe /AcceptEula /SuppressReboot /Products:WindowsInstaller31,WindowsInstaller45"

shutdown /r /t 0 /d P:0:0

The install directory has grown a little bit too:

281211_autoinstall_webpi_dir_contents


It’s getting a bit trickier now. There are issues with this, and I’ll sum it all up in part 4. However, next up is some sweet goodness:

Scripting the setup of a developer PC, Part 3 of 4 – Installing.. uh.. everything.. with Chocolatey.

Update: there is now a v4 of WebPI command line that requires “/install” as the first parameter and is called WebPICmd instead of webpicmdline. Since I’d downloaded v3, that’s the version I’m scripting for. Check out v4 though, as it has added support for “offline mode”; you can download the installers and dependencies for any number of products (to a network share perhaps) and install from there instead of the interwebs – I will do a follow up article doing exactly that 😉

Scripting the setup of a developer PC, Part 1 of 4 – Installing Applications & Utilities with Ninite

Setting up a development PC can be a bit of a pain, unless you’re smart and create an image following the setup of a brand new vanilla install. But who’s organised enough to do that?! I’ll get onto that option in another post, but this one is more an excuse to play with interesting stuff.

I thought I’d have a play with coding up a set of scripts to do as much of this setup as possible instead; there are a few tools out there to do this sort of thing, and I’ve gone with ninite, webpi, and chocolatey.


I’ll start with the intended ideal option for each tool, and then go into how this doesn’t work perfectly and why, and what the other options are. Part 1 of this series of 4 is for the easiest tool of all:


Installing Applications & Utilities: ninite

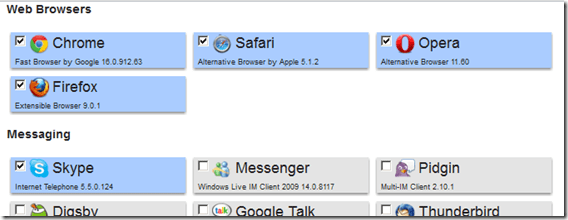
This site allows you to create a single exe installer which contains your own selection of a large number of applications/frameworks/utilities:

232111_autoinstall_ninite_web

For an ASP.Net developer PC I’ve gone with Chrome, Safari, Opera, Firefox, Skype, VLC, Flash, Air, Java, Silverlight, Launchy, 7-Zip, WinSCP, PuTTY, Notepad++, WinMerge, Paint.NET, PDFCreator, Reader, DropBox, and Everything Search for my installer. This installer can be called from the command line but the basic version still opens a graphical interface; however no interaction is required. The Pro version comes with a command line installer, but I’ll not be using that.

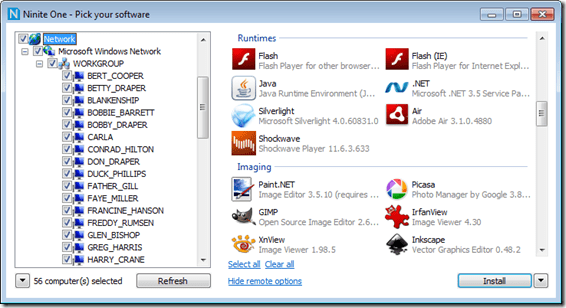
Ninite Pro is absolutely awesome: you can remotely manage installed software and software patches within your network with a silent install process.

232111_autoinstall_ninite_pro


So far my install script set looks like this; pretty bare:

[batch]@echo off
REM Ninite stuff
cmd /C Z:\Installation\SetupDevPC\Ninite_DevPC_Utils.exe[/batch]

And the installation directory is merely one script and one exe:

281211_autoinstall_ninite_dir_contents

That was dead simple! Lovely! Coming up next – something a bit messier:

Scripting the setup of a developer PC, Part 2 of 4 – Installing Frameworks and Components with WebPI.

Content Control Using ASCX–Only UserControls With BatchCompile Turned Off

This is a bit of a painful one; I’ve inherited a “content control” system which is essentially a vast number of ascx files generated outside of the development team, outside of version control, and dumped directly onto the webservers. These did not have to be in the project because the site is configured with batch=”false”.

I had been given the requirement to implement dynamic content functionality within the controls.

These ascx files are referenced directly by a naming convention within a container aspx page to LoadControl(“~/content/somecontent.ascx”) and render within the usual surrounding master page. Although I managed to get this close to pulling them all into a document db and creating a basic CMS instead, unfortunately I found an even more basic method of using existing ascx files and allowing newer ones to have dynamic content.

An example content control might look something like:

[html]
<%@ Control %>
<div>
<ul>
<li>
<span>
<img src="http://memegenerator.net/cache/instances/250×250/8/8904/9118489.jpg" style="height:250px;width:250px;" />
<a href="http://memegenerator.net/">Business Cat</a>
<span class="title">&#163;19.99</span>
</span>
</li>
<li>
<span>
<img src="http://memegenerator.net/cache/instances/250×250/8/8904/9118489.jpg" style="height:250px;width:250px;" />
<a href="http://memegenerator.net/">Business Cat</a>
<span class="title">&#163;19.99</span>
</span>
</li>
<li>
<span>
<img src="http://memegenerator.net/cache/instances/250×250/8/8904/9118489.jpg" style="height:250px;width:250px;" />
<a href="http://memegenerator.net/">Business Cat</a>
<span class="title">&#163;19.99</span>
</span>
</li>
</ul>
</div>
[/html]

One file, no ascx.cs (these are written outside of the development team, remember). There are a couple of thousand of them, so I couldn’t easily go through and edit them to all. How to now allow dynamic content to be injected with minimal change?

I started off with a basic little class to allow content injection to a user control:
[csharp]
public class Inject : System.Web.UI.UserControl
{
public DynamicContent Data { get; set; }
}
[/csharp]

and the class for the data itself:
[csharp]
public class DynamicContent
{
public string Greeting { get; set; }
public string Name { get; set; }
public DateTime Stamp { get; set; }
}
[/csharp]

Then how to allow data to be injected only into the new content files and leave the heaps of existing ones untouched (until I can complete the business case documentation for a CMS and get budget for it, that is)? This method should do it:
[csharp]
private System.Web.UI.Control RenderDataInjectionControl(string pathToControlToLoad, DynamicContent contentToInject)
{
var control = LoadControl(pathToControlToLoad);
var injectControl = control as Inject;

if (injectControl != null)
injectControl.Data = contentToInject;

return injectControl ?? control;
}
[/csharp]

Essentially, get the control, attempt to cast it to the Inject type, if the cast works inject the data and return the cast version of the control, else just return the uncast control.

Calling this with an old control would just render the old control without issues:
[csharp]const string contentToLoad = "~/LoadMeAtRunTime_static.ascx";
var contentToInject = new DynamicContent { Greeting = "Hello", Name = "Dave", Stamp = DateTime.Now };

containerDiv.Controls.Add(RenderDataInjectionControl(contentToLoad, contentToInject));
[/csharp]

232111_codecontrol_static

Now we can create a new control which can be created dynamically:
[html highlight=”1″]
<%@ Control CodeBehind="Inject.cs" Inherits="CodeControl_POC.Inject" %>
<div>
<%=Data.Greeting %>, <%=Data.Name %><br />
It’s now <%= Data.Stamp.ToString()%>
</div>

<div>
<ul>
<li>
<span>
<img src="http://memegenerator.net/cache/instances/250×250/8/8904/9118489.jpg" style="height:250px;width:250px;" />
<a href="http://memegenerator.net/">Business Cat</a>
<span class="title">&#163;19.99</span>
</span>
</li>
<li>
<span>
<img src="http://memegenerator.net/cache/instances/250×250/8/8904/9118489.jpg" style="height:250px;width:250px;" />
<a href="http://memegenerator.net/">Business Cat</a>
<span class="title">&#163;19.99</span>
</span>
</li>
<li>
<span>
<img src="http://memegenerator.net/cache/instances/250×250/8/8904/9118489.jpg" style="height:250px;width:250px;" />
<a href="http://memegenerator.net/">Business Cat</a>
<span class="title">&#163;19.99</span>
</span>
</li>
</ul>
</div>
[/html]

The key here is the top line:

[html highlight=”1″]
<%@ Control CodeBehind="Inject.cs" Inherits="CodeControl_POC.Inject" %>
[/html]

Since this now defines the type of this control to be the same as our Inject class it gives us the same thing, but with a little injected dynamic content

[csharp]
const string contentToLoad = "~/LoadMeAtRunTime_dynamic.ascx";
var contentToInject = new DynamicContent { Greeting = "Hello", Name = "Dave", Stamp = DateTime.Now };

containerDiv.Controls.Add(RenderDataInjectionControl(contentToLoad, contentToInject));
[/csharp]

232111_codecontrol_dynamic

Just a little something to help work with legacy code until you can complete your study of which CMS to implement Smile

Comments welcomed.

A Quirk of Controls in ASP.Net

As part of the legacy codebase I’m working with at the moment I have recently been required to edit a product listing page to do something simple; add an extra link underneath each product.


Interestingly enough the product listing page is constructed as a collection of System.Web.UI.Controls, generating an HTML structure directly in C# which is then styled after being rendered completely flat.


For example:, each item in the listing could look a bit like this
[csharp]
public class CodeControl : Control
{
protected override void CreateChildControls()
{
AddSomeStuff();
}

private void AddSomeStuff()
{
var image = new Image
{
ImageUrl = "http://memegenerator.net/cache/instances/250×250/8/8904/9118489.jpg",
Width = 250,
Height = 250
};
Controls.Add(image);

var hyperlink = new HyperLink { NavigateUrl = "http://memegenerator.net/", Text = "Business Cat" };
Controls.Add(hyperlink);

var title = new HtmlGenericControl();
title.Attributes.Add("class", "title");
title.InnerText = "£19.99";
Controls.Add(title);
}
}
[/csharp]
 

And then the code to render it would be something like:
[csharp]
private void PopulateContainerDiv()
{
var ul = new HtmlGenericControl("ul");

for (var i = 0; i < 10; i++)
{
// setup html nodes
var item = new CodeControl();
var li = new HtmlGenericControl("li");

// every 3rd li reset ul
if (i % 3 == 0) ul = new HtmlGenericControl("ul");

// add item to li
li.Controls.Add(item);

// add li to ul
ul.Controls.Add(li);

// add ul to div
containerDiv.Controls.Add(ul);
}
}
[/csharp]

The resulting HTML looks like:

[html]
<ul><li><img src="http://memegenerator.net/cache/instances/250×250/8/8904/9118489.jpg" style="height:250px;width:250px;" /><a href="http://memegenerator.net/">Business Cat</a><span class="title">&#163;19.99</span></li>
.. snip..
[/html]

And the page itself:

232111_codecontrol_blank_unstyled

I’ve never seen this approach before, but it does make sense; define the content, not the presentation. Then to make it look nicer we’ve got some css to arrange the list items and their content, something like:
[css]
ul { list-style:none; overflow: hidden; float: none; }
li { padding-bottom: 20px; float: left; }
a, .title { display: block; }
[/css]
Which results in the page looking a bit more like

232111_codecontrol_blank_styled


So that’s enough background on the existing page. I was (incorrectly, with hindsight, but that’s why we make mistakes right? How else would we learn? *ahem*..) attempting to implement a change that wrapped the contents of each li in a tag so that some jQuery could pick up the contents of that li and put them somewhere else on the page when a click was registered within the li.

So I did this:
[csharp highlight=”4,10,13″]
// setup html nodes
var item = new CodeControl();
var li = new HtmlGenericControl("li");
var form = new HtmlGenericControl("form");

// every 3rd li reset ul
if (i % 3 == 0) ul = new HtmlGenericControl("ul");

// add item to form
form.Controls.Add(item);

// add form to li
li.Controls.Add(form);

// add li to ul
ul.Controls.Add(li);

// add ul to div
containerDiv.Controls.Add(ul);
[/csharp]

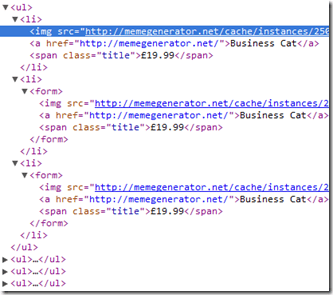
I added in a <form> tag and put the control in there, then put the form in the li and the li in the ul. However, this resulted in the following HTML being rendered:

232111_codecontrol_elem_form

Eh? Why does the first <li> not have a <form> in there but the rest of them do? After loads of digging around my code and debugging I just tried something a bit random and changed it from a <form> to a <span>:
[csharp highlight=”4,10,13″]
// setup html nodes
var item = new CodeControl();
var li = new HtmlGenericControl("li");
var wrapper = new HtmlGenericControl("span");

// every 3rd li reset ul
if (i % 3 == 0) ul = new HtmlGenericControl("ul");

// add item to form
wrapper.Controls.Add(item);

// add form to li
li.Controls.Add(wrapper);

// add li to ul
ul.Controls.Add(li);

// add ul to div
containerDiv.Controls.Add(ul);
[/csharp]

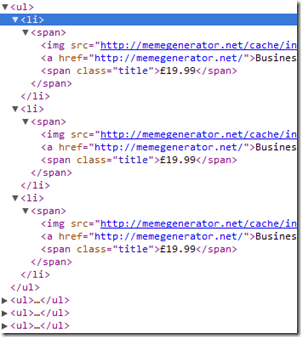
Resulting in this HTML:

232111_codecontrol_elem_span

Wha? So if I use a <span> all is good and a <form> kills the first one? I don’t get it. I still don’t get it, and I’ve not had time to dig into it. in the end I just altered the jQuery to look for closest(‘span’) instead of closest(‘form’) and everything was peachy.


If anyone knows why this might happen, please do comment. It’s bugging me.

Git on Windows: Debugging Problems With Msysgit

Getting git working on Linux is really simple: apt-get install git, ssh-keygen –t rsa –C “[email protected]”, cat ~/.ssh/id_rsa.pub, copy to clipboard, paste in your git repo host, ssh [email protected] (accept the new host key), git clone [email protected]:/yourproject.git, bam, done.


Getting it working with Windows can be a right sod. Or it can be equally simple if you’ve not already tried loads of different methods, leaving loads of other conflicting apps installed.

The Good:

If you follow the github Windows setup tutorial you’ll be pretty much there already.

The Bad:

If you’ve already installed things such as TortoiseGit and PuTTY you may see some confusing errors.

Those along the lines of

[bash]FATAL_ERROR Disconnected: No supported authentication methods available[/bash]

or

[bash]FATAL_ERROR The remote end hung up unexpectedly[/bash]

are usually related to your public key not being correctly used in the connection.

If you can ssh correctly to the repo I found that this can happen if you have the wonderful PuTTY installed and have pageant (key manager) running somewhere, forcing msysgit to use pageant as the key manager instead of OpenSSH (assuming you selected the OpenSSH option in the msysgit installation).

Some say to update the GIT_SSH environment variable (I didn’t have one to delete, so this didn’t help me much). I ended up deleting PuTTY (overkill) and Pageant and ensuring no related processes were running.


If you get errors along the lines of “access denied” when you try to view or delete a repo:

Following the answer to this SO post; the first step is to see what is locking the file. Pop over to sysinternals and make sure you have the wonderful Process Explorer to hand.

You’ll most likely find that the process in question is TGitCache – a process related to TortoiseGit. Kill the process and uninstall if you don’t use it.

HTH

My first productionised powershell script

I’ve been tooling around with powershell recently, trying to teach myself some basics, and a recent support request which would have previously been done manually looked like a perfect opportunity for a little ps1 script.

The request was to disable a feature on the website which is configured from a setting in the web.config file on each server. Since web.configs are xml files, I thought I could treat it as such, traversing and editing values as needed.

So here it is; pretty lengthy for what it’s doing since I don’t know the nicer ways of doing some things (e.g., var foo = (bar == baz ? 0 : 1), and var sna = !sna), and as such any comments to help out would be appreciated:

[powershell]
function ValueToText([string] $val){
if ($val -eq "1"){return "enabled"}
else {return "disabled"}
}

[System.Xml.XmlDocument] $xd = new-object System.Xml.XmlDocument
# pipe-delimited servers to work against
$servers = "192.168.0.1|192.168.0.2|192.168.0.3"

foreach ($server in $servers.Split("|")) {
write-host "Now configuring " $server

$file = "\\" + $server + "\d$\Web\web.config"
$xd.load($file)

# save a backup, just in case I snafu the site
$xd.save($file + ".bak")

# keys to edit
$nodelist = $xd.selectnodes("/configuration/appSettings/add[contains(@key,’Chat’)]")

foreach ($node in $nodelist) {
$key = $node.getAttribute("key")
$val = $node.getAttribute("value")
$setting = ValueToText($val)

$prompt = $key + " is currently " + $setting + ": toggle this? Y/N"
$toggle = read-host $prompt

if ($toggle -eq "Y" -or $toggle -eq "y"){
if ($val -eq "1") {$newbool = "0"}
else {$newbool = "1"}

$node.setAttribute("value", $newbool)

$newsetting = ValueToText($newbool)
$prompt = $key + " is now " + $newsetting
write-host $prompt
}
}
$xd.save($file)
}
write-host * done *
[/powershell]

It’s probably not much more than a “hello world”, but it certainly helped me out recently 🙂

Sony Xperia Mini X10 Pro: Corrupt Card “Fix”

So my phone regularly corrupts anything added to the SD card, even with various brand cards; all larger than the stock 2GB. I’d bought a 32GB one and though maybe it couldn’t handle that size (apparently it can) so went down to 16GB; still photos are corrupting as are podcast downloads, dammit!

Some people said it is linked to the phone not supporting certain class SD cards, some say certain brand, some certain size.

Bizarre fix that worked for me? Connect and mount your phone to your PC or use an IO File Manager app on the phone itself; open the two configuration xml files in the root.

Are they corrupted? Delete them and reboot – new ones are created and the phone works again.

Doubt this is in any way a long term solution, but it stops me throwing it out the window.

No warranties, it works for me, YMMV, etc.

Batch file to create an IIS7 website

Really simple stuff which is helping me out when hosting multiple sites for development on one machine; you either pass in as parameters or specify as responses

  1. the directory name of your site – e.g. “D:\Dev\MySite1” would be “MySite1”
  2. the port number you want it on
  3. the site ID

and it’ll set up the site, migrate your config settings to II7 if necessary, start the new site and let you know the URL to access it.

@echo off
setlocal EnableDelayedExpansion

REM Get parameters from user if they're not specified
if [%1]==[] set /P directory="Enter name of directory/site: "
if [%2]==[] set /P port="Enter port number: "
if [%3]==[] set /P sitenum="Enter site number: "

REM Create site in IIS
%systemroot%\system32\inetsrv\appcmd add site /name:"%directory%" /id:%sitenum% /physicalPath:"D:\Dev\%directory%" /bindings:http/*:%port%:%computername%

REM Attempt to migrate config to IIS7 stylee
%SystemRoot%\system32\inetsrv\appcmd migrate config "%directory%/"

REM Start new site
%SystemRoot%\system32\inetsrv\appcmd start site "%directory%"

echo site "%directory%" now running at http://%computername%:%port%

REM interactive mode
if [%1]==[] (if [%2]==[] (if [%3]==[] (
    pause
    exit
)))

I will change this to pull the next available site ID and port number unless someone else can tell me how to do that.

And yes, this would be very easy in Powershell but I’ve not done that version either..!

Also, if you’d like to know how I managed to get Syntaxhighlighter to work nicely with batch/cmd/dos, leave a comment. There are *no* nice, simple, tutorials out there with common mistakes, so I could paste my steps in here if necessary.