I’m continuing with my plan to create a series of articles for learning Chef from a developer perspective.
Part #1 gave an intro to Chef, Chef Solo, Vagrant, and Virtualbox. I also created my first Ubunutu VM running Apache and serving up the default website.
Part #2 got into creating a cookbook of my own, and evolved it whilst introducing PHP into the mix.
Part #3 wired in MySql and refactored things a bit.
WordPress Restore – Attempt #1: Hack It Together
Now that we’ve got a generic LAMP VM its time to evolve it a bit. In this post I’ll cover adding wordpress to your VM via Chef, scripting a backup of your current wordpress site, and finally creating a carbon copy of that backup on your new wordpress VM.
I’m still focussing on using Chef Solo with Vagrant and VirtualBox for the time being; I’m learning to walk before running!
Kicking off
Create a new directory for working in and create a cookbooks subdirectory; you don’t need to prep the directory with a vagrant init as I’ll add in a couple of clever lines at the top of my new Vagrantfile to initialise it straight from a vagrant up.
Installing WordPress
As in the previous articles, just pull down the wordpress recipe from the opscode repo into your cookbooks directory:
[bash]cd cookbooks
git clone https://github.com/opscode-cookbooks/wordpress.git
[/bash]
Looking at the top of the WordPress default.rb file you can see which other cookbooks it depends on:
[bash]include_recipe "apache2"
include_recipe "mysql::server"
include_recipe "mysql::ruby"
include_recipe "php"
include_recipe "php::module_mysql"
include_recipe "apache2::mod_php5"
[/bash]
From the last post we know that MySql also depends on OpenSSL, and MySql::Ruby depends on build-essentials. Go get those both in your cookbooks directory as well as the others mentioned above:
[bash]git clone https://github.com/opscode-cookbooks/apache2.git
git clone https://github.com/opscode-cookbooks/mysql.git
git clone https://github.com/opscode-cookbooks/openssl.git
git clone https://github.com/opscode-cookbooks/build-essential.git
git clone https://github.com/opscode-cookbooks/php.git
[/bash]
Replace the default Vagrantfile with the one below to reference the wordpress cookbook, and configure the database, username, and password for wordpress to use; I’m basing this one on the Vagrantfile from my last post but have removed everything to do with the “mysite” cookbook:
Vagrantfile
[ruby]Vagrant.configure("2") do |config|
config.vm.box = "precise32"
config.vm.box_url = "http://files.vagrantup.com/precise32.box"
config.vm.network :forwarded_port, guest: 80, host: 8080
config.vm.provision :shell, :inline => "apt-get clean; apt-get update"
config.vm.provision :chef_solo do |chef|
chef.json = {
"mysql" => {
"server_root_password" => "myrootpwd",
"server_repl_password" => "myrootpwd",
"server_debian_password" => "myrootpwd"
},
"wordpress" => {
"db" => {
"database" => "wordpress",
"user" => "wordpress",
"password" => "mywppassword"
}
}
}
chef.cookbooks_path = ["cookbooks"]
chef.add_recipe "wordpress"
end
end
[/ruby]
The lines
[ruby] config.vm.box = "precise32"
config.vm.box_url = "http://files.vagrantup.com/precise32.box"
[/ruby]
mean you can skip the vagrant init stage as we’re defining the same information here instead.
You don’t need to reference the dependant recipes directly since the WordPress one has references to it already.
You also don’t need to disable the default site since the wordpress recipe does this anyway. As such, remove this from the json area:
[ruby] "apache" => {
"default_site_enabled" => false
},
[/ruby]
Note: An issue I’ve found with the current release of the WordPress cookbook
I had to comment out the last line of execution which just displays a message to you saying
[ruby]Navigate to ‘http://#{server_fqdn}/wp-admin/install.php’ to complete wordpress installation.
[/ruby]
For some reason the method “message” on “log” appears to be invalid. You don’t need it though, so if you get the same problem you can just comment it out yourself for now.
To do this, head to line 116 in cookbooks/wordpress/recipes/default.rb and add a # at the start, e.g.:
[ruby]log "wordpress_install_message" do
action :nothing
# message "Navigate to ‘http://#{server_fqdn}/wp-admin/install.php’ to complete wordpress installation"
end
[/ruby]
Give that a
[bash]vagrant up
[/bash]
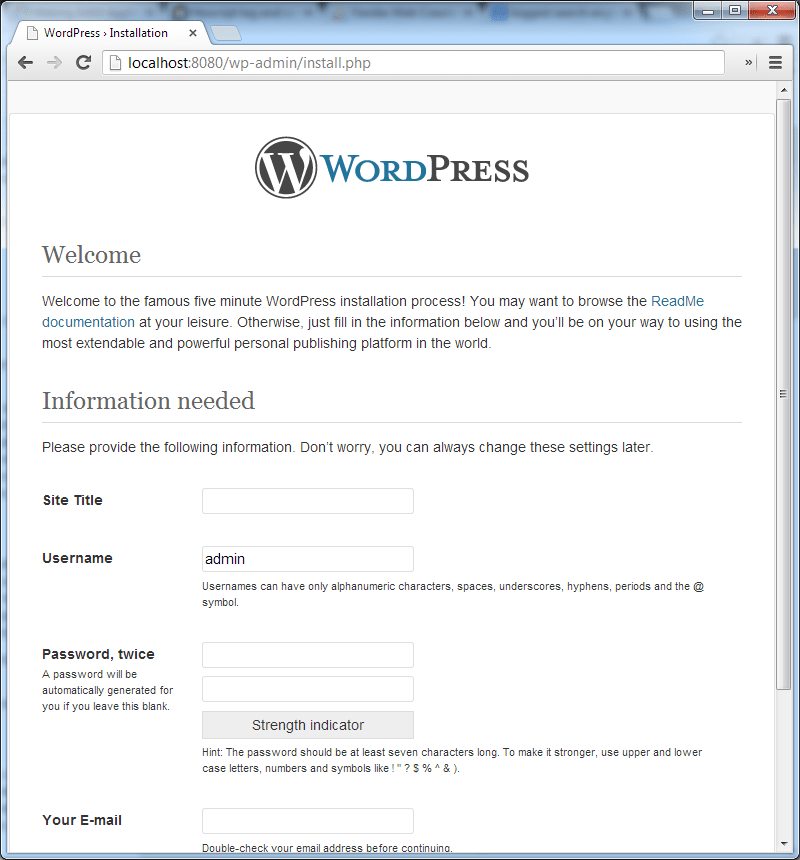
Then browse to localhost:8080/wp-admin/install.php and you should see:

From here you could quite happily set up your wordpress site on a local VM, but I’m going to move on to the next phase in my cunning plan.
Restore a WordPress Backup
I’ve previously blogged about backing a wordpress blog, the output of which was a gziped tar of the entire wordpress directory and the wordpress database tables. I’m now going to restore it to this VM so that I have a functioning copy of my backed up blog.
I’d suggest you head over and read the backup post I link to above, or you can just use the resulting script:
backup_blog.sh
[bash]#!/bin/bash
# Set the date format, filename and the directories where your backup files will be placed and which directory will be archived.
NOW=$(date +"%Y-%m-%d-%H%M")
FILE="rposbowordpressrestoredemo.$NOW.tar"
BACKUP_DIR="/home/<user>/_backup"
WWW_DIR="/var/www"
# MySQL database credentials
DB_USER="root"
DB_PASS="myrootpwd"
DB_NAME="wordpress"
DB_FILE="rposbowordpressrestoredemo.$NOW.sql"
# dump the wordpress dbs
mysql -u$DB_USER -p$DB_PASS –skip-column-names -e "select table_name from information_schema.TABLES where TABLE_NAME like ‘wp_%’;" | xargs mysqldump –add-drop-table -u$DB_USER -p$DB_PASS $DB_NAME > $BACKUP_DIR/$DB_FILE
# archive the website files
tar -cvf $BACKUP_DIR/$FILE $WWW_DIR
# append the db backup to the archive
tar –append –file=$BACKUP_DIR/$FILE $BACKUP_DIR/$DB_FILE
# remove the db backup
rm $BACKUP_DIR/$DB_FILE
# compress the archive
gzip -9 $BACKUP_DIR/$FILE
[/bash]
That results in a gzipped tarball of the entire wordpress directory and the wordpress database dumped to a sql file, all saved in the directory specified at the top – BACKUP_DIR=”/home/<user>/_backup”
First Restore Attempt – HACK-O-RAMA!
For the initial attempt I’m just going to brute-force it, to validate the actual importing and restoring of the backup. The steps are:
- copy an archive of the backup over to the VM (or in my case I’ll just set up a shared directory)
- uncompress the archive into a temp dir
- copy the wordpress files into a website directory
- import the mysql dump
- update some site specific items in mysql to enable local browsing
You can skip that last one if you want to just add some HOSTS entries to direct calls to the actual wordpress backed up site over to your VM.
Prerequisite
Create a backup of a wordpress site using the script above (or similar) and download the archive to your host machine.
I’ve actually done this using another little vagrant box with a base wordpress install for you to create a quick blog to play around with backing up and restoring – repo is over on github.
For restoring
Since this is the HACK-O-RAMA version, just create a bash script in that same directory called restore_backup.sh into which you’ll be pasting the chunks of code from below to execute the restore.
We can then call this script from the Vagrantfile directly. Haaacckkyyyy…
Exposing the archive to the VM
I’m saving the wordpress archive in a directory called “blog_backup” which is a subdirectory of the project dir on the host machine; I’ll share that directory with the VM using this line somewhere in the Vagrantfile:
[ruby]config.vm.synced_folder "blog_backup/", "/var/blog_backup/"
[/ruby]
if you’re using Vagrant v1 then the syntax would be:
[ruby]config.vm.share_folder "blog", "/var/blog_backup/", "blog_backup/"
[/ruby]
Uncompress the archive into the VM
This can be done using the commands below, pasted into that restore_backup.sh
[bash]# pull in the backup to a temp dir
mkdir /tmp/restore
# untar and expand it
cd /tmp/restore
tar -zxvf /var/blog_backup/<yoursite>.*.tar.gz
[/bash]
Copy the wordpress files over
[bash]# copy the website files to the wordpress site root
sudo cp -Rf /tmp/restore/var/www/wordpress/* /var/www/wordpress/
[/bash]
Import the MySQL dump
[bash]# import the db
mysql -uroot -p<dbpassword> wordpress < /tmp/restore/home/<user>/_backup/<yoursite>.*.sql
[/bash]
Update some site-specific settings to enable browsing
Running these db updates will allow you to browse both the wordpress blog locally and also the admin pages:
[bash]# set the default site to locahost for testage
mysql -uroot -p<dbpassword> wordpress -e "UPDATE wp_options SET option_value=’http://localhost:8080′ WHERE wp_options.option_name=’siteurl’"
mysql -uroot -p<dbpassword> wordpress -e "UPDATE wp_options SET option_value=’http://localhost:8080′ WHERE wp_options.option_name=’home’"
[/bash]
Note: Pretty Permalinks
If you’re using pretty permalinks – i.e., robinosborne.co.uk/2013/07/02/chef-for-developers/ instead of http://robinosborne.co.uk/?p=1418 – then you’ll need to both install the apache::mod_rewrite recipe and configure your .htaccess to allow mod_rewrite to do its thing. Create the .htaccess below to enable rewrites and save it in the same dir as your restore script.
.htaccess
[bash]<IfModule mod_rewrite.c>
RewriteEngine On
RewriteBase /
RewriteRule ^index\.php$ – [L]
RewriteCond %{REQUEST_FILENAME} !-f
RewriteCond %{REQUEST_FILENAME} !-d
RewriteRule . /index.php [L]
</IfModule>
[/bash]
restore_backup.sh
[bash]# copy over the .htaccess to support mod_rewrite for pretty permalinks
sudo cp /var/blog_backup/.htaccess /var/www/wordpress/
sudo chmod 644 /var/www/wordpress/.htaccess
[/bash]
Also add this to your Vagrantfile:
[ruby]chef.add_recipe "apache2::mod_rewrite"
[/ruby]
The final set up and scripts
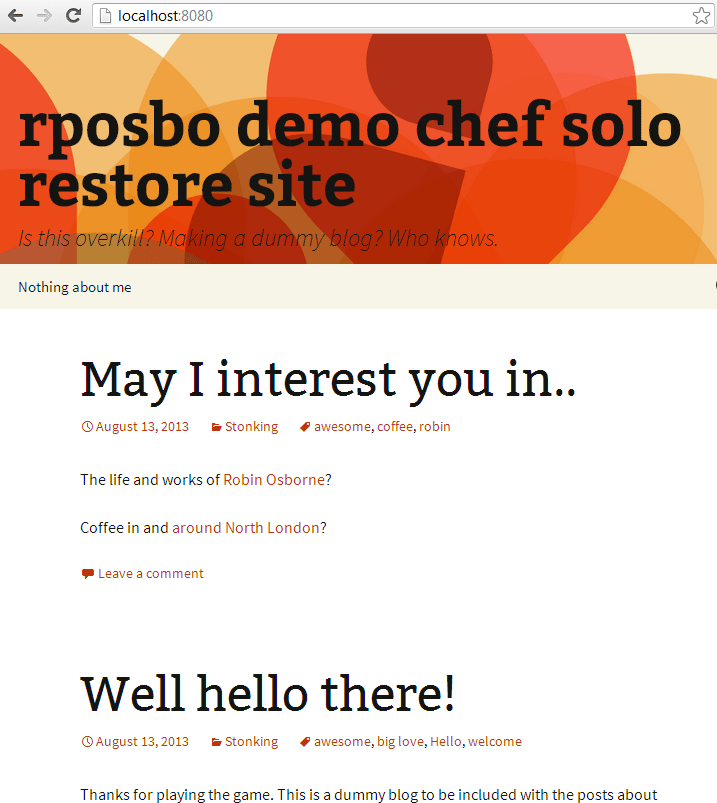
Bringing this all together we now have a backed up wordpress blog, restored and running as a local VM:

The files needed to achieve this feat are:
Backup script
To be saved on your blog host, executed on demand, and the resulting archive file manually downloaded (probably SCPed). I have mine saved in a shared directory – /var/vagrant/blog_backup.sh:
blog_backup.sh
[bash]#!/bin/bash
# Set the date format, filename and the directories where your backup files will be placed and which directory will be archived.
NOW=$(date +"%Y-%m-%d-%H%M")
FILE="rposbowordpressrestoredemo.$NOW.tar"
BACKUP_DIR="/home/vagrant"
WWW_DIR="/var/www"
# MySQL database credentials
DB_USER="root"
DB_PASS="myrootpwd"
DB_NAME="wordpress"
DB_FILE="rposbowordpressrestoredemo.$NOW.sql"
# dump the wordpress dbs
mysql -u$DB_USER -p$DB_PASS –skip-column-names -e "select table_name from information_schema.TABLES where TABLE_NAME like ‘wp_%’;" | xargs mysqldump –add-drop-table -u$DB_USER -p$DB_PASS $DB_NAME > $BACKUP_DIR/$DB_FILE
# archive the website files
tar -cvf $BACKUP_DIR/$FILE $WWW_DIR
# append the db backup to the archive
tar –append –file=$BACKUP_DIR/$FILE $BACKUP_DIR/$DB_FILE
# remove the db backup
rm $BACKUP_DIR/$DB_FILE
# compress the archive
gzip -9 $BACKUP_DIR/$FILE
[/bash]
Restore script
To be saved in a directory on the host to be shared with the VM, along with your blog archive.
restore_backup.sh
[bash]# pull in the backup, untar and expand it, copy the website files, import the db
mkdir /tmp/restore
cd /tmp/restore
tar -zxvf /var/blog_backup/rposbowordpressrestoredemo.*.tar.gz
sudo cp -Rf /tmp/restore/var/www/wordpress/* /var/www/wordpress/
mysql -uroot -pmyrootpwd wordpress < /tmp/restore/home/vagrant/_backup/rposbowordpressrestoredemo.*.sql
# create the .htaccess to support mod_rewrite for pretty permalinks
sudo cp /var/blog_backup/.htaccess /var/www/wordpress/
sudo chmod 644 /var/www/wordpress/.htaccess
# set the default site to locahost for testage
mysql -uroot -pmyrootpwd wordpress -e "UPDATE wp_options SET option_value=’http://localhost:8080′ WHERE wp_options.option_name=’siteurl’"
mysql -uroot -pmyrootpwd wordpress -e "UPDATE wp_options SET option_value=’http://localhost:8080′ WHERE wp_options.option_name=’home’"
[/bash]
.htaccess
[bash]<IfModule mod_rewrite.c>
RewriteEngine On
RewriteBase /
RewriteRule ^index\.php$ – [L]
RewriteCond %{REQUEST_FILENAME} !-f
RewriteCond %{REQUEST_FILENAME} !-d
RewriteRule . /index.php [L]
</IfModule>
[/bash]
Vagrantfile
[ruby]Vagrant.configure("2") do |config|
config.vm.box = "precise32"
config.vm.box_url = "http://files.vagrantup.com/precise32.box"
config.vm.network :forwarded_port, guest: 80, host: 8080
config.vm.synced_folder "blog_backup/", "/var/blog_backup/"
config.vm.provision :shell, :inline => "apt-get clean; apt-get update"
config.vm.provision :chef_solo do |chef|
chef.json = {
"mysql" => {
"server_root_password" => "myrootpwd",
"server_repl_password" => "myrootpwd",
"server_debian_password" => "myrootpwd"
},
"wordpress" => {
"db" => {
"database" => "wordpress",
"user" => "wordpress",
"password" => "mywppassword"
}
}
}
chef.cookbooks_path = ["cookbooks"]
chef.add_recipe "wordpress"
chef.add_recipe "apache2::mod_rewrite"
end
# hacky first attempt at restoring the blog from a script on a share
config.vm.provision :shell, :path => "blog_backup/restore_backup.sh"
end
[/ruby]
myrootpwd
The password used to set up the mysql instance; it needs to be consistent in your Vagrantfile and your restore_backup.sh script
mywppassword
if you can’t remember your current wordpress user’s password, look in the /wp-config.php file in the backed up archive.
Go get it
I’ve created a fully working setup for your perusal over on github. This repo, combined with the base wordpress install one will give you a couple of fully functional VMs to play with.
If you pull down the restore repo you’ll just need to run setup_cookbooks.sh to pull down the prerequisite cookbooks, then edit the wordpress default recipe to comment out that damned message line.
Once that’s all done, just run
[bash]vagrant up[/bash]
and watch everything tick over until you get your prompt back. At this point you can open a browser and hit http://localhost:8080/ to see:

Next up
I’ll be trying to move all of this hacky cleverness into a Chef recipe or two. Stay tuned.
One thought on “Chef for Developers: part 4 – WordPress, Backups, & Restoring”