TeamCity + Git + NuGet + AppCmd= automated versioned deployments V1

Attempting to implement a Continuous Deployment workflow whilst still having fun can be tricky. Even more so if you want to use reasonably new tech, and even more if you want to use free tech!

If you’re not planning on using one of the cloud CI solutions then you’re probably (hopefully) looking at something like TeamCity, Jenkins, or CruiseControl.Net. I went with TeamCity after having played with CruiseControl.Net and not liked it too much and having never heard of Jenkins until a few weeks ago.. ahem..

So; my intended ideal workflow would be along the lines of:

  • change some code
  • commit to local git
  • push to remote repo
  • TeamCity picks it up, builds, runs tests, etc (combining and minifing static files – but that’s for another blog post)
  • creates a nuget package
  • deploys to a private nuget repo
  • subscribed endpoint servers pick up/are informed of the updated package
  • endpoint servers install the updated package

Here’s where I’ve got with that so far:


1) On the development machine

a. Within your VisualStudio project ensure the bin directory is included

I need the compiled dlls to be included in my nuget package, so I’m doing this since I’m using the csproj file as the package definition file for nuget instead of a nuspec file.

Depending on your VCS IDE integration, this might have nasty implications which are currently out of scope of my proof of concept (e.g. including the bin dir in the IDE causes the DLLs to be checked into your VCS – ouch!). I’m sure there are better ways of doing this, I just don’t know them yet. If you do, please leave a comment!

In case you don’t already know how to include stuff into your Visual Studio project (hey, I’m not one to judge! There’s plenty of basic stuff I still don’t know about my IDE!):

i. The bin dir not included:
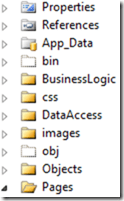
vs2010_bin_excluded

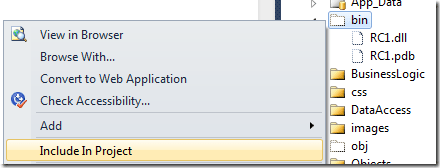
ii. Click the “don’t lie to me“ button*:

vs2010_dltm

iii. Select “include in project”:

vs2010_bin_include_dialog

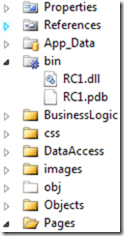
iv. The bin dir is now included:

vs2010_bin_included


b. Configure source control

Set up your code directory to use something that TeamCity can hook into (I’ve used SVN and Git successfully so far)

That’s about it.


2) On the build server

a. Install TeamCity

i. Try to follow the instructions on the TeamCity wiki

b. Install the NuGet package manager TeamCity add in

i. Head to the JetBrains TeamCity public repo

ii. Log in as Guest

iii. Select the zip artifact from either the latest tag (or if you’re feeling cheeky the latest build):
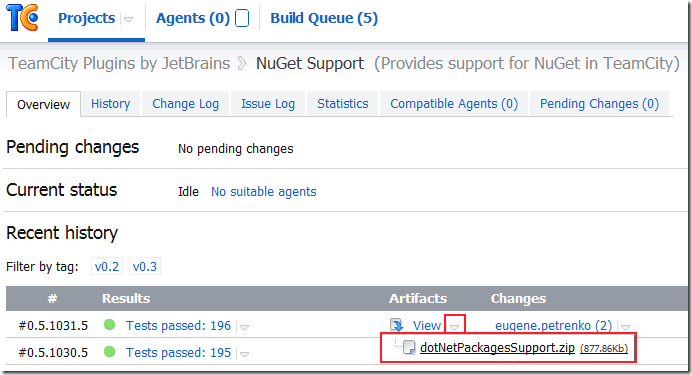
teamcity_nuget_plugin_1

iv. Save it into your own TeamCity’s plugins folder

v. Restart your TeamCity instance

(The next couple of steps are taken from Hadi Hariri’s blog post over at JetBrains which I followed to get this working for me)

vi. Click on Administration | Server Configuration. If the plug-in installed correctly, you should now have a new Tab called NuGet

adminpanelnuget

vii. Click on the “Install additional versions of the NuGet.exe Command Line”. TeamCity will read from the feed and display available versions to you in the dialog box. Select the version you want and click Install
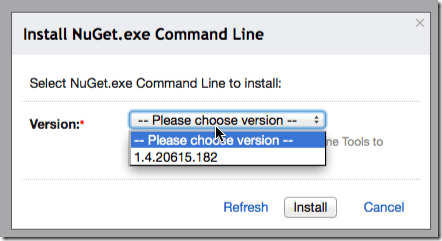
nugetversion


c. Configure TeamCity

i. Set it up to monitor the correct branch

ii. Create a nuget package as a build step, setting the output directory to a location that can be accessed from your web server; I went for a local folder that had been configured for sharing:
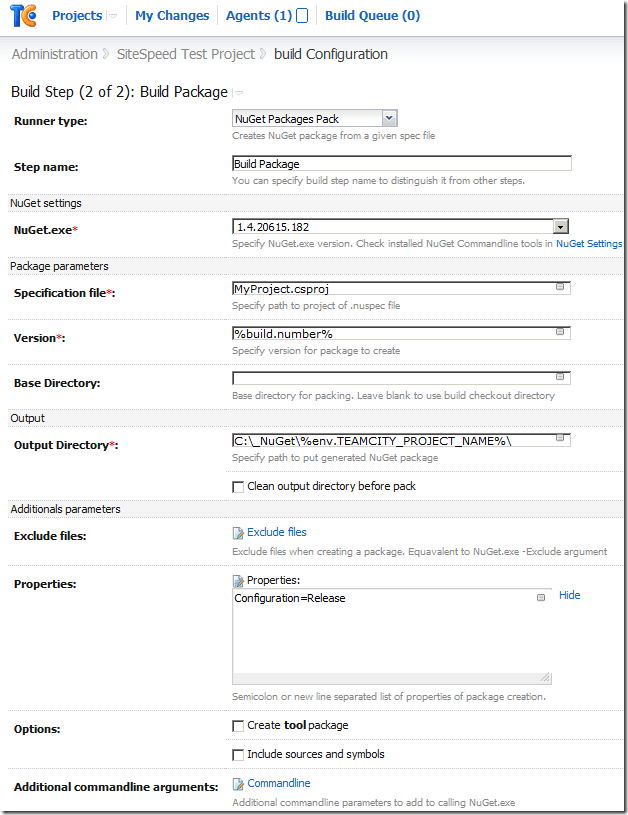
teamcity_nuget_1

In addition to this, there is a great blog post about setting your nuget package as a downloadable artifact from your build, which I’m currently adapting this solution to use; I’m getting stuck with the Publish step though, since I only want to publish to a private feed. Hmm. Next blog post, perhaps.


3) On the web server (or “management” server)

a. Install NuGet for the command line

i. Head over to http://nuget.codeplex.com/releases

ii. Select the command line download:
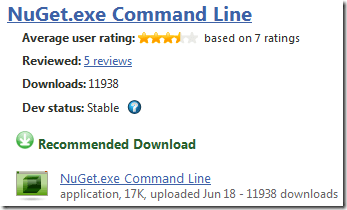
nuget_cmdline_dl

iii. Save it somewhere on the server and add it to your %PATH% if you like


b. Configure installation of the nuget package

i. Get the package onto the server it needs to be installed on

Using Nuget, install the package from the TeamCity package output directory:
[code]nuget install "<MyNuGetProject>" –Source <path to private nuget repo>[/code]
e.g.
[code]nuget install "RposboWeb" –Source \\build\_packages\[/code]
This will generate a new folder for the updated package in the current directory. What’s awesome about this is it means you’ve got a history of your updates, so breaking changes notwithstanding you could rollback/update just by pointing IIS at a different folder.

Which brings me on to…

ii. Update IIS to reference the newly created folder

Using appcmd, change the folder your website references to the “content” folder within the installed nuget package:
[code]appcmd.exe set vdir "<MyWebRoot>/" /physicalpath:"<location of installed package>\content"[/code]
e.g.
[code]appcmd.exe set vdir "RposboWeb/" /physicalpath:"D:\Sites\RposboWeb 1.12\content"[/code]

So, the obvious tricky bit here is getting the name of the package that’s just been installed in order to update IIS. At first I thought I could create a powershell build step in TeamCity which takes the version as a parameter and creates an update batch file using something like the below:
[code]param([string]$version = "version")
$stream = [System.IO.StreamWriter] "c:\_NuGet\install_latest.bat"
$stream.WriteLine("nuget install \"<MyNugetProject>\" –Source <path to private nuget repo>")
$stream.WriteLine("\"%systemroot%\system32\inetsrv\appcmd.exe\" set vdir \"<MyWebRoot>/\" /physicalpath:\"<root location of installed package>" + $version + "\content\"")
$stream.Close()[/code]
However, my powershell knowledge is miniscule so this automated installation file generation isn’t working yet…

I’ll continue working on both this installation file generation version and also a powershell version that uses IIS7 administration provider instead of appcmd.
 

In conclusion

  • change some code – done (1)
  • commit to local git – done (1)
  • push to remote repo – done (1)
  • TeamCity picks it up, builds, runs tests, etc – done (2)
  • creates a nuget package – done (2)
  • deploys to a private nuget repo – done (2)
  • subscribed endpoint servers pick up/are informed of the updated package – done/in progress (3)
  • endpoint servers install the updated package – done/in progress (3)

 
Any help on expanding my knowledge gaps is appreciated – please leave a comment or tweet me! I’ll add another post in this series as I progress.
 

References

NuGet private feeds
http://haacked.com/archive/2010/10/21/hosting-your-own-local-and-remote-nupack-feeds.aspx
http://blog.davidebbo.com/2011/04/easy-way-to-publish-nuget-packages-with.html
 
TeamCity nuget support
http://blogs.jetbrains.com/dotnet/2011/08/native-nuget-support-in-teamcity/
 
Nuget command line reference
http://docs.nuget.org/ | http://docs.nuget.org/docs/reference/command-line-reference
 
IIS7 & Powershell
http://blogs.iis.net/thomad/archive/2008/04/14/iis-7-0-powershell-provider-tech-preview-1.aspx
http://learn.iis.net/page.aspx/447/managing-iis-with-the-iis-70-powershell-snap-in/
http://technet.microsoft.com/en-us/library/ee909471(WS.10).aspx
 

* to steal a nice quote from Scott Hanselman

AppHarbor, Heroku, Git, and the Sweet, Sweet CI Process

The background: I thought that my Mobile TFL Bus Countdown site might be suddenly very popular for a very short time (for about a weekend perhaps) and didn’t want to pay for the potential sudden jolt in hosting costs from my own servers. As such, I developed it locally using git as VCS, pushed it to my newly acquired Appharbor account, and just saw it suddenly available to browse at rposbo.apphb.com

The pitch: For your own small website/app you probably edit it locally on your PC, maybe you even have source control like a good dev, you’ll compile the code and then you’ll copy it to your hosting provider, probably using FTP/ via a web interface/ SCP/ SSH.

Then at work you’re probably shouting about how awesome CI builds are and how to introduce continuous deployment as part of a branching and build strategy.

You might even use Azure or EC2 at work, maybe for your own little home projects too. Maybe you’ve learned a bit of git but your office uses TFS (ugh) or SVN (meh).

So why not do this for your own stuff? For free? In the cloud?

Imagine the ideal workflow: make some code changes –> commit them to (D)VCS –> push them to a (remote) repo –> the push kicks off a build the committed project (git hook) –> run any associated tests, then if they pass –> deploy the app to the cloud.

That’s exactly what Appharbor and Heroku do! Let’s start with the pretty one:

Heroku

Heroku says it’s a “cloud application platform” for running scalable Ruby, Node.js, Clojure, and Java sites/apps. To create and deploy a new site is, apparently, as easy as:

[code gutter=”off”]$ heroku create
Created sushi.herokuapp.com | [email protected]:sushi.git

$ git push heroku master
—–&gt; Heroku receiving push
—–&gt; Rails app detected
—–&gt; Compiled slug size is 8.0MB
—–&gt; Launching… done, v1
http://sushi.herokuapp.com deployed to Heroku[/code]

So here the flow is: write some code –> commit to git –> push to Heroku –> code is built –> code is deployed. Done.

heroku homepage

The Heroku website is fantastically full of all the information you’d want to get started, and their pictorial representation of how their solution works and the various levels of databases you can buy are geek-awesome:

heroku databases

“This app needs a BAKU DATABASE!! GRRAARRRR!!” Go and have a look and bask in the beautiful piccies and animations. No wonder this is (apparently) the place to go to write and deploy cloud hosted Facebook apps.

Thanks to Heroku I’m finally beaing pushed to learn Ruby, but haven’t managed anything quite yet, hence no demo of the Heroku flow – wait a few more posts and I’ll have something Ruby-fied and certainly some Node.js as I’ve been meaning to get into that for a while, possibly even Clojure (sounds fun) and Java (old school!).

Next up is one for the .net crowd:

appharbor

Appharbor sells itself as “Azure done right” which confused me. The website itself is verrrry low on information so I just assumed it would deploy my app to Azure. Turns out I was wrong:

appharbor chat on twitter

Despite my being pedantic over their homepage tagline I took the dive and just signed up. Only once you’ve done this do you get to see the money shot – the intro video; a new MVC app in Visual Studio to EC2 cloud via git + appharbor in a matter of minutes:

Now I have my account and I have a great intro vid I just hop into my code directory;

[code gutter=”off”]git init
git add .
git commit –m "init"
git remote add appharbor <git repo url appharbor gave me>
git push appharbor master[/code]

And that’s it. Committed code is checked out on their servers, built, any associated tests are executed, if everything passes then it gets deployed – and you can see all this from your Appharbor account:

appharbor deployment

(mine didn’t actually have anything to build, as it was a single html page and that really basic asmx web proxy I wrote).

In conclusion; you now have absolutely no excuse to not write and deploy whatever applications you feel like writing. There is no hosting to worry about, no build server – it just works. Use Appharbor for your .Net and use Heroku as an excuse to look at their pretty pictures and learn something that’s not .Net.

I know I will.

Comments appreciated.

London Buses and The Javascript Geolocation API

The wonderful people at Transport For London (TFL) recently released (but didn’t seem to publicise) a new page on their site that would give you a countdown listing of buses due to arrive at any given stop in London.

This is the physical one (which only appears on some bus stops):

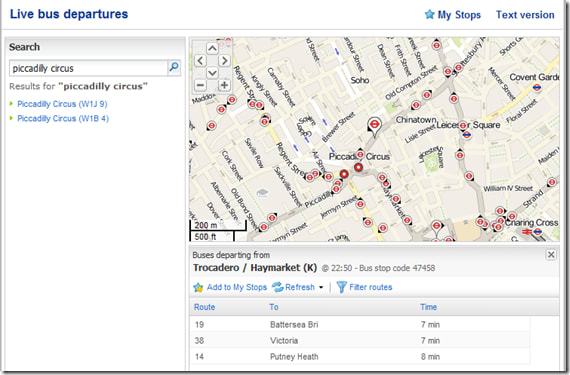
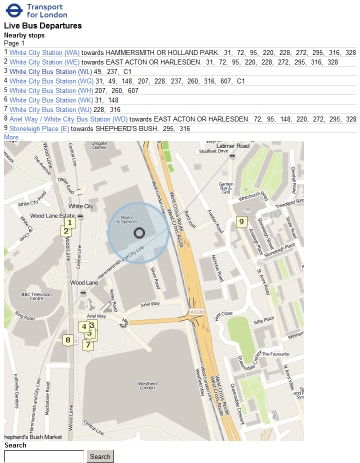
And this is the website one, as found at countdown.tfl.gov.uk

countdown

Before I continue with the technical blithering, I’d like quantify how useful this information is by way of a use case: you’re in a pub/bar/club, a little worse for wear, the tubes have stopped running, no cash for a cab, it’s raining, no jacket. You can see a bus stop from a window, but you’ve no idea how long you’d have to wait in the rain before your cheap ride home arrived. IF ONLY this information were freely available online so you can check if you have time for another drink/comfort break/say your goodbyes before a short stroll to hail the arriving transport.

With this in mind I decided to create a mobile friendly version of the page.

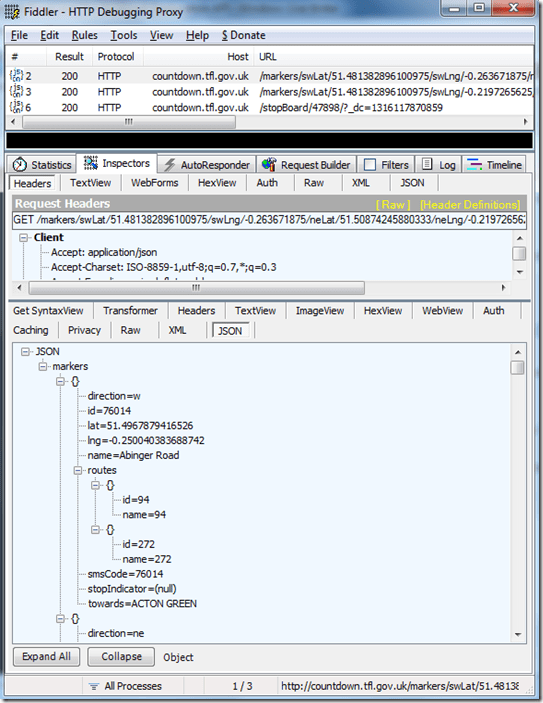
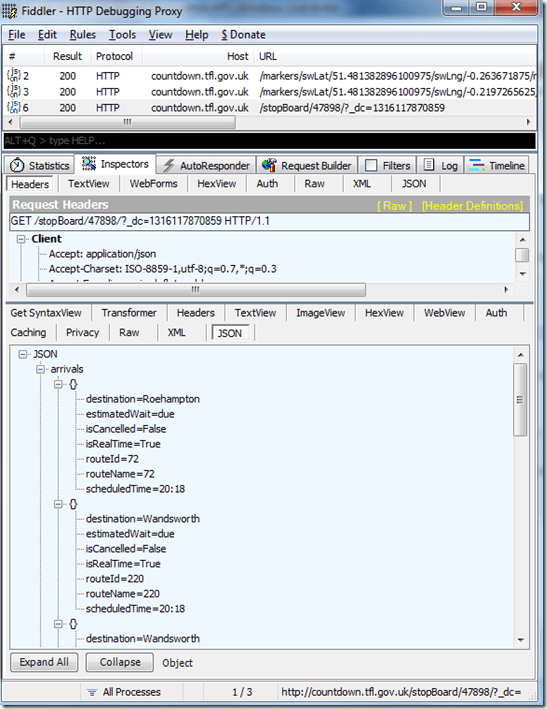
If you visit the tfl site (above) and fire up fiddler you can see that the request for stops near you hits one webservice which returns json data,

fiddler_tfl_countdown_1

and then when you select a stop there’s another call to another endpoint which returns json data for the buses due at that stop:

fiddler_tfl_countdown_2

Seems easy enough. However, the structure of the requests which follow on from a search for, say, the postcode starting with “W6” is a bit tricky:


http://countdown.tfl.gov.uk/markers/
swLat/51.481382896100975/
swLng/-0.263671875/
neLat/51.50874245880333/
neLng/-0.2197265625/
?_dc=1315778608026

That doesn’t say something easy like “the postcode W6”, does it? It says “these exact coordinates on the planet Earth”.

So how do I emulate that? Enter JAVASCRIPT’S NAVIGATOR.GEOLOCATION!

Have you ever visited a page or opened an app on your phone and saw a popup asking for your permission to share your location with the page/app? Something like:

Or in your browser:

image

This is quite possibly the app attempting to utilise the javascript geolocation API in order to try and work out your latitude and longitudinal position.

This information can be easily accessed by browsers which support the javascript navigator.geolocation API. Even though the API spec is only a year old, diveintohtml5 point out it’s actually currently supported on quite a few browsers, including the main mobile ones.

The lat and long can be gleaned from the method

[javascript]
navigator
.geolocation
.getCurrentPosition
[/javascript]

which just takes a callback function as a parameter passing a “position” object e.g.

[javascript]
navigator
.geolocation
.getCurrentPosition(showMap);

function show_map(position) {
var latitude = position.coords.latitude;
var longitude = position.coords.longitude;
// let’s show a map or do something interesting!
}
[/javascript]

Using something similar to this we can pad the single position to create a small area instead, which we pass to the first endpoint, retrieve a listing of bus stops within that area, allow the user to select one, pass that stop ID as a parameter to the second endpoint to retrieve a list of the buses due at that stop, and display them to the user.

My implementation is:

[javascript]
$(document).ready(function() {
// get lat long
if (navigator.geolocation){
navigator
.geolocation
.getCurrentPosition(function (position) {
getStopListingForLocation(
position.coords.latitude,
position.coords.longitude);
});
} else {
alert(‘could not get your location’);
}
});
[/javascript]

Where getStopListingForLocation is just

[javascript]
function getStopListingForLocation(lat, lng){
var swLat, swLng, neLat, neLng;
swLat = lat – 0.01;
swLng = lng – 0.01;
neLat = lat + 0.01;
neLng = lng + 0.01;

var endpoint =
‘http://countdown.tfl.gov.uk/markers’ +
‘/swLat/’ + swLat +
‘/swLng/’ + swLng +
‘/neLat/’ + neLat +
‘/neLng/’ + neLng + ‘/’;

$.ajax({
type: ‘POST’,
url: ‘Proxy.asmx/getMeTheDataFrom’,
data: "{‘here’:’"+endpoint+"’}",
contentType: "application/json; charset=utf-8",
dataType: "json",
success: function(data) {
displayStopListing(data.d);
}
});
}
[/javascript]

The only bit that had me confused for a while was forgetting that browsers don’t like cross browser ajax requests. The data will be returned and is visible in fiddler, but the javascript (or jQuery in my case) will give a very helpful “error” error.

As such, I created the World’s Simplest Proxy:

[csharp]
[System.Web.Script.Services.ScriptService]
public class Proxy: System.Web.Services.WebService
{

[WebMethod]
public string getMeTheDataFrom(string here)
{
using (var response = new System.Net.WebClient())
{
return response.DownloadString(here);
}
}
}
[/csharp]

All this does, quite obviously, is to forward a request and pass back the response, running on the server – where cross domain requests are just peachy.

Then I have a function to render the json response

[javascript]
function displayStopListing(stopListingData){
var data = $.parseJSON(stopListingData);
$.each(data.markers, function(i,item){
$("<li/>")
.text(item.name + ‘ (stop ‘ + item.stopIndicator + ‘) to ‘ + item.towards)
.attr("onclick", "getBusListingForStop(" + item.id + ")")
.attr("class", "stopListing")
.attr("id", item.id)
.appendTo("#stopListing");
});
}
[/javascript]

And then retrieve and display the bus listing

[javascript]
function getBusListingForStop(stopId){
var endpoint = ‘http://countdown.tfl.gov.uk/stopBoard/’ + stopId + ‘/’;

$("#" + stopId).attr("onclick","");

$.ajax({
type: ‘POST’,
url: ‘Proxy.asmx/getMeTheDataFrom’,
data: "{‘here’:’"+endpoint+"’}",
contentType: "application/json; charset=utf-8",
dataType: "json",
success: function(data) { displayBusListing(data.d, stopId); }
});
}

function displayBusListing(busListingData, stopId){
var data = $.parseJSON(busListingData);

$("<h2 />").text("Buses Due").appendTo("#" + stopId);

$.each(data.arrivals, function(i,item){

$("<span/>")
.text(item.estimatedWait)
.attr("class", "busListing time")
.appendTo("#" + stopId);

$("<span/>")
.text(item.routeName + ‘ to ‘ + item.destination)
.attr("class", "busListing info")
.appendTo("#" + stopId);

$("<br/>")
.appendTo("#" + stopId);
});
}
[/javascript]

(yes, my jQuery is pants. I’m working on it..)

These just need some very basic HTML to hold the output

[html]
<h1>Bus Stops Near You (tap one)</h1>
<ul id="stopListing"></ul>
[/html]

Which ends up looking like

The resultingfull HTML can be found here, the Most Basic Proxy Ever is basically listed above, but also in “full” here. If you want to see this in action head over to rposbo.apphb.com.

Next up – how this little page was pushed into the cloud in a few seconds with the wonder of AppHarbor and git.

UPDATE

Since creation of this “app” TFL have created a very nice mobile version of their own which is much nicer than my attempt! Bookmark it at m.countdown.tfl.gov.uk :


Sending Tweets from Amazon EC2

Given how unstable the EC2 microinstance I use is, I wanted to be able to automatically restart the blog related services and alert me that a restart had occurred.

I decided to try and get the alert via a tweet and doing this is actually pretty easy. All it consists of doing is:

1) Register a Twitter app at dev.twitter.com

2) Set up a new Twitter account  for your tweets to come from

3) Authenticate your new account with your new app

4) Configure something to use your app to send tweets from your new account

Luckily, this has all already been done by someone much cleverer than me, so I copied them! Have a look at this blog post by Jeff Miller explaining how to use the python Twitter API script Tweepy.

My EC2 instance already had python installed so all I needed to do was install git, get the tweepy code from the github repo here (the location of the github repo in the article is incorrect, so a little googling helped me find the correct location), and follow the instructions exactly!

Essentially this consisted of:

sudo yum -y install git
sudo git clone git://github.com/tweepy/tweepy.git
cd tweepy
sudo python setup.py install

Then follows some copying and pasting of auth keys and urls to end up with a nice script on the EC2 instance which was authorised to send tweets from my new twitter account, @rposboEC2.

All that was left was to link this into the startup script:

sudo nano /etc/rc.d/rc.local

by adding in a new line at the end and set the status to include my own twitter account so I see it as a mention and will therefore also receive an email alert automatically:

sudo python /home/ec2-user/tweepy/ec2Event.py '@rposbo EC2 microinstance event raised: Restarted'

Done! Firing off this script now restarts Apache and mysql and sends the tweet below:

EC2 Micro Instance Instability

It’s getting a bit daft now – the EC2 microinstance this blog is hosted on seems to keep restarting. When it comes back up, Apache and mysql are stopped, so the site is down.

As such, I’ve just logged in via SSH and fired off the command below to edit the startup script:

sudo nano /etc/rc.d/rc.local

Then added in the lines:

sudo /etc/init.d/httpd start
sudo /etc/init.d/mysqld start

Now whenever the microinstance restarts it will automatically restart Apache and mysql. I hope.

Just for good measure I also added in a line for logging so I have some idea of how often the instance restarts:

date >> /home/ec2-user/restartlog

I’ll add in an email alert or maybe just make it tweet the restart event as well.

Pretty Permalinks

Oh, one more on the EC2 Word press thing; if you want pretty permalinks (i.e., http://robinosborne.co.uk/2011/09/08/pretty-permalinks/ ‎ instead of http://robinosborne.co.uk/?p=85), and you’re running WordPress on an EC2 installation, before you select it in your WordPress “settings” section be sure to edit your Apache config first:

Pop open PuTTY (or whatever terminal you use), log in, run

sudo nano /etc/httpd/conf/httpd.conf

hit ctrl+W and type “override”, do it again until you see:

#
# AllowOverride controls what directives may be placed in .htaccess files.
# It can be "All", "None", or any combination of the keywords:
#   Options FileInfo AuthConfig Limit
#
    AllowOverride None

Change the None to FileInfo, hit ctrl+X to save and exit. Then restart apache with:

sudo /etc/init.d/httpd restart

Done. Hopefully. YMMV 😉

EC2 MicroInstance: The WordPress Hosting Wonder

I managed to not notice that my blog had gone down after the EC2 outage earlier this year. So when I popped back on one day to find it wasn’t there any more I was a little concerned.

Popped over to PuTTY, opened up my EC2 connection to be presented with a login screen. So I tried the old usual login: “root”

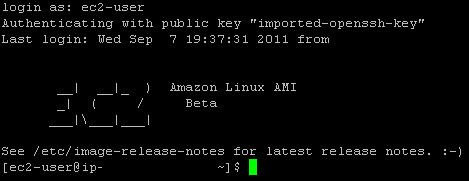
EC2 Login

Ok, let’s  try that then:

EC2 Welcome

BRILLIANT!!

Uh..

Now what?

Crap. I can’t remember.

I faffed around for ages with “ls”, checking out what’s in “/opt/” and “/etc/” and getting a bit lost. How do I restart the damned web server?! Which web server did I install? Why do I not remember how to use linux?! ARGH!!

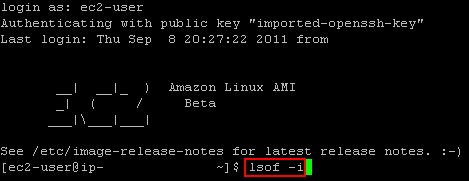
Oh, hey. Look – I just tapped “PgUp” and saw this:

EC2 PgUp

Hello. That’s a command to see what ports are open, as far as I remember. That’s the first command from 2bitcoder‘s EC2 WordPress tutorial.

Pressing the down key resulted in listing every command I’d ever entered:

login as: ec2-user
Authenticating with public key "imported-openssh-key"
Last login: Thu Sep  8 20:27:22 2011 from blah--blah-blah-blah.blah.blah.com

       __|  __|_  )  Amazon Linux AMI
       _|  (     /     Beta
      ___|\___|___|

See /etc/image-release-notes for latest release notes. :-)
[ec2-user@ip-12-345-67-890 ~]$ apt-get install lighttpd
[ec2-user@ip-12-345-67-890 ~]$ ipkg install lighttpd
[ec2-user@ip-12-345-67-890 ~]$ yum install lighttpd
[ec2-user@ip-12-345-67-890 ~]$ sudo yum -y install lighttpd
[ec2-user@ip-12-345-67-890 ~]$ ls
[ec2-user@ip-12-345-67-890 ~]$ ls /
[ec2-user@ip-12-345-67-890 ~]$ ls /opt/
[ec2-user@ip-12-345-67-890 ~]$ ls /etc/
[ec2-user@ip-12-345-67-890 ~]$ ls /etc/httpd/
[ec2-user@ip-12-345-67-890 ~]$ ls /etc/httpd/run/
[ec2-user@ip-12-345-67-890 ~]$ sudo ls /etc/httpd/run/
[ec2-user@ip-12-345-67-890 ~]$ service httpd start
[ec2-user@ip-12-345-67-890 ~]$ httpd start
[ec2-user@ip-12-345-67-890 ~]$ sudo /etc/init.d/httpd start

I just had to hit “enter” a couple of times to replay some ancient commands to restart Apache and mysql and the site was back up and running! Phew!

So – if you’re using EC2 for hosting something and you can’t remember the very basic linux commands you fired off to get it working in the first place, fear not! PgUp is your friend!

TeamCity and MSBuild Quirks #2

If your build works just peachy on your own PC but bombs out on your TeamCity server with the error “Default parameter specifiers are not permitted”, head over to your build step and update the Tools Version to 4.0

Build step tools version

This way your CI build will be targetting C# 4, the version that introduced optional parameters. And yes, I realise that the correct solution here is to not have optional parameters in your codebase; the codebase is new to me and I haven’t refactored them all out yet!


TeamCity and MSBuild Quirks #1

I’m using a postbuild event to fire off resgen and AL to create DLLs from resource files (for nice multilingual content). This event looks a bit like:

"$(WindowsSDKDir)bin\resgen.exe" "$(SolutionDir)\Langfr.resx"
"$(WindowsSDKDir)bin\AL" /t:lib /culture:fr /embed:"$(SolutionDir)Langfr.resources" /out:"$(SolutionDir)bin\Language.fr.dll"

As such, when I build this locally from either VS2010 or MSBuild hitting the csproj file, all is fine. The resx file is picked up by resgen and creates a resources file, which is in turn picked up by AL and embedded into a dll. It actually appears in the build log/command line as something similar to:

PostBuildEvent:
  "C:\Program Files (x86)\Microsoft SDKs\Windows\v7.0A\bin\resgen.exe" "..\Lang\fr.resx"
  "C:\Program Files (x86)\Microsoft SDKs\Windows\v7.0A\bin\AL" /t:lib /culture:fr /embed:"..\Lang\fr.resources" /out:"..\bin\Language.fr.dll"

However, when I committed this into my branch and saw TeamCity pick it up, even though the build appeared to pass the build log shows the truth:

[PostBuildEvent] Exec
[Exec] "bin\resgen.exe" "..\Lang\fr.resx" "bin\AL" /t:lib /culture:fr /embed:"..\Lang\fr.resources" /out:"..\bin\Language.fr.dll"

Eh? Where’s the path to the  Windows SDK? Maybe it’s not installed on the Build Server. Fine, I’ll pop off and install it. And restart. And try again. Still the same result. What’s up with that? I whacked in a <Message> tag to output the value of $(WindowsSDKDir)… and it shows the correct path!

I still don’t understand why the value of $(WindowsSDKDir) is correctly set, but when used in a post build event it appears to be empty. If anyone can help with that, please let me know.

So, to my hack: I have yet to discover the correct way to fix this so have instead edited the MSBuild build step on the CI server to override the empty value with a specific one (i.e., the location of the windows SDK on the build server):

TeamCity Build Step Parameter

(A little tip: for some reason I needed to remove the trailing quote from the path parameter else it resulted in “C:\blahblah\”bin\resgen.exe” instead of “C:\blahblah\bin\resgen.exe”)

TeamCity doesn’t approve of this and instead suggests you use a TeamCity Build Parameter instead of an MSBuild parameter; unfortunately I couldn’t get this to work so am sticking with the command line parameter, as above. If anyone can inform me how to do this correctly, I’d appreciate it.

Check out the big brain on Brett!

Wow. Ok, so I managed to completely forget that I’d registered this WP account. No idea when I did it either. Weird.

And I’ve managed to register a matching domain name too, and completely forget about it. I am just not on the ball these days!

It’s just as well too, since my other blog seems to have been taken down in a blaze of lightning (thanks for nothing EC2).

Posts coming up – in no particular order – prepare your bookmarking finger!

  • Grading a developer
  • Lessons learned: MSBuild for n00bs (i.e., me)
  • Lessons learned: Continuous Integration using TeamCity, a VirtualBox VM, NUnit, Selenium, a private NuGet repo, SVN, git and oodles and oodles of patience. For n00bs.
  • Content templating using Nustache (mustache for .Net), a.k.a. “How to work effectively with an external design company: a case study”
Ok, so that’s a lot to commit to. I better get started!