Learning By Doing: Java, Maven, Seyren, Hipchat, Github

If you use a graphing system, waiting all day long to see something spike can be painful. And boring.

Spike

Ouch! Seeing those spikes can be annoying, but missing them can be even more annoying. Who can be bothered to stare at graphs all day and night?

Seyren

That’s why recently I had the opportunity to try out Seyren. I’ve been meaning to try it out for a while; it’s a Java-based solution to monitor a graphite endpoint and react to various configured thresholds by alerting external services.

Seyren

Creating a check

These external services are extensible and currently there is support for systems such as plain old email, Flowdock, Hubot, Irc, PagerDuty, Slack, and – the subject of my interest – Hipchat.

Unfortunately, Seyren only supports Hipchat API v1 (which is deprecated) and as such I couldn't use it. Also it’s written in Java and I’ve never written anything in Java. However, I did do a degree in C++ and that's pretty close, right?…
Right?..

This is the short story of how I contributed to a Java-based open source project, adding support for Hipchat V2 and generally saving the day! (possible exaggerations may exist in this post.)

First up, how I managed to set up a minimal Java development environment on Windows.

Java

Installing Java on Windows

You have two main options for getting the Java Development Kit running on your system:

One:

  1. Head over to the JDK download page on oracle.com
  2. Download and install the Java Development Kit for your OS

Two:

  1. If you haven't already got the amazing Windows package manager chocolately, go and get it!
  2. choco install jdk8

For either one, you may still need to add the Java root dir to your PATH (not the bin subdir) as JAVA_HOME, like this:
JAVA_HOME environment variable

Maven

What is it?

Maven is a build automation tool, used a lot in Java projects. The build configuration is in an xml file – usually named "pom.xml" for Project Object Model – which defines the dependencies and project configuration.

Maven has the concept of plugins, goals, and phases to extend and link stages into build lifecycles. The Build lifecycle is a list of named phases that can be used to give order to goal execution.

One of Maven's standard lifecycles is the default lifecycle, which includes the following phases:

  1. validate
  2. generate-sources
  3. process-sources
  4. generate-resources
  5. process-resources
  6. compile
  7. process-test-sources
  8. process-test-resources
  9. test-compile
  10. test
  11. package
  12. install
  13. deploy

So running mvn test will result in the execution of phases 1 through 10; mvn install will execute phases 1 though 12. You get the idea.

Installing Maven on Windows

Again, a couple of options;

One:

  1. Head over to https://maven.apache.org/
  2. Download the zip
  3. Place the contents in a seriously high level directory such as C:\mvn (Maven doesn't like spaces in pathnames)
  4. Append the bin subdir to your PATH

Two:

  1. choco install maven

Heh.

Either route needs you to open a fresh command line in order to get the updated PATH values maven configures.

Right, now on to the main event!

Seyren

What is it?

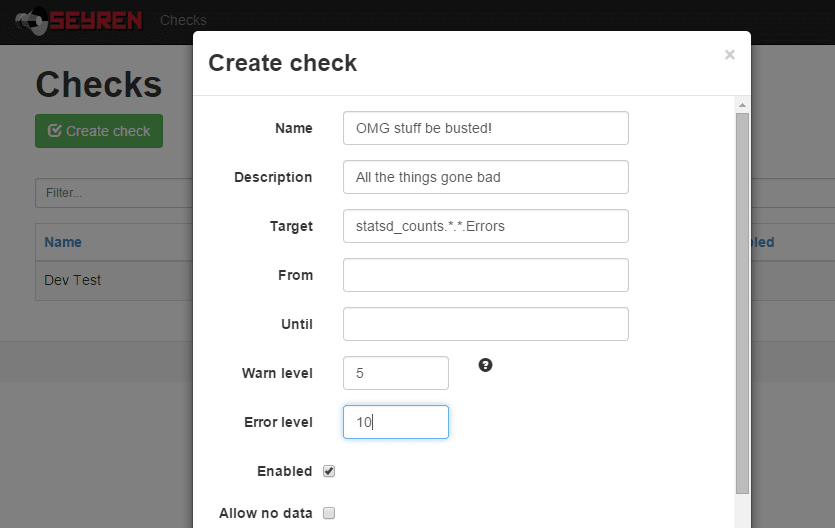
Seyren "is an alerting dashboard for Graphite. It supports the following notification channels: Email, Flowdock, HipChat, HTTP, Hubot, IRCcat, PagerDuty, Pushover, SLF4J, Slack, SNMP, Twilio"

You configure it to point at a graphite instance, tell it what metrics to monitor, what thresholds to watch out for, how to notify you of these events, and it will ping graphite every few seconds; should any of those thresholds be met, it will notify you.

Simple as that. Its power is in that simplicity.

Getting the code

Head over to the github repo at https://github.com/scobal/seyren and clone the repo locally.

If you just want to run it, then you can just download the latest release as a Java jar file.

Running Seyren locally

Seyren has a dependency on mongodb where it saves the checks (points at which a configured threshold has changed state)

So, let's set that up.

  • choco install mongodb

Easy. If everything has worked so far, you can open a terminal in the repo directory and run the following maven command to check it builds and the tests pass:

  • mvn clean verify

If all went well, you will need to set up an environment variable or two, such as your graphite instance's url and in my case my hipchat API key. Again, these are just environment variables, like JAVA_HOME.

Once that's done you can run Seyren temporarily within maven for a quick play.

Happy with it? You can use maven to create a jar file using

  • mvn package

    or if you want to skip running the tests again

  • mvn package -DskipTests

That will generate you a bunch of jar files in various target subdirectories; the one we're interested in is in seyren-web – the others are dependencies for it.

You can now start this puppy up within a tomcat instance using (substitute the name of your "war-exec.jar" file in here):

  • java -jar /seyren/seyren-web/target/seyren-web-1.4.0-SNAPSHOT-war-exec.jar

Checkpoint 1

You should now have Java, Maven, MongoDB, and Seyren running happily. Now here's how I managed to implement Hipchat v2 support and get the PR accepted!

Java IDEs

Seriously? Eclipse? I've looked at it before, and couldn't stand it. I even downloaded and installed it, but gave up. Since I'm not building a Java project from scratch, all I needed was a half decent text editor.

As such, I fired up my current favourite editor – SublimeText. I like the simplicity of this editor, and you can easily get it yourself with choco install sublimetext2, naturally.

Having a pretty good understanding of the Hipchat v2 API, I was able to guess and googlebing the necessary Java syntax for updating the existing HipchatNotificationService, as can be seen in this pull request: https://github.com/scobal/seyren/pull/294/files

Being able to easily switch back to command line and run mvn clean verify to get the build feedback and the test results was pretty painless. I got it running by pointing it at the company Hipchat account and checked everything worked as expected, then proceeded to submit a pull request, expecting to receive all manner of awards for my contribution and epic skillz.

Contributing

messy comits

Unfortunately I made a few messy commits in my initial pull request and someone had their own PR merged in the meantime (i.e., whilst I spent several days trying to work out how to generate a "jar" file..), but it didn't do anything of value and was even incorrect. Instead of doing the right thing and merging with it, fixing it, reverting their stuff, and submitting a full PR, I was lazy; I submitted a messy list of commits with a message along the lines of "I know it doesn't merge, but that's your fault not mine".

I was tired, I apologise.

I received a request to rebase and squash the commits, then resubmit the PR. I've never done that; I can
git clone
like a pro, but after something like
git mergetool --tool=kdiff3
(my current fave), I'm out of my depth. I had to learn quickly!

In short; rebase appears to rewind your commits, take another branch, and replay the commits one by one over that branch. If any of the commits result in a merge conflict you can fix it before deciding to git rebase --continue. Pretty nice.

Squashing commits is pretty obvious; takes a set of individual commits and merges them into one commit. There are several ways of doing this that I've read about, but the one I find easiest is to "soft reset" your local branch using
git reset HEAD~3 --soft

In this example I will effectively uncommit the latest 3 commits, but the key is the --soft option – your changes are not undone (as with --hard), merely uncommited.

You can now commit all of the changes from those 3 commits into one, and give it a nice, clear, commit message.

That's what I did, and that's how my first Java OSS contribution was accepted!

References

Node.js 101: Wrap up

Year of 101s, Part 1 – Node January

Summary – What was it all about?

I set out to spend January learning some node development fundementals.

Part #1 – Intro

I started with a basic intro to using node – a Hello World – which covered what node.js is, how to create the most basic of all programs, and mentioned some of the development environments.

Part #2 – Serving web content

Second was creating a very simple node web server, which covered using nodemon to develop your node app, the concept of exports, basic request routing, and serving various content types.

Part #3 – A basic API

Next was a simple API implementation, where I proxy calls to the Asos API, return a remapped subset of the data returned, reworked the routing creating basic search functionality and a detail page, and touched on being able to pass in command line arguements.

Part #4 – Basic deployment and hosting with Appharbor, Azure, and Heroku

Possibly the most interesting and fun post for me to work on involved deploying the node code on to three cloud hosting solutions where I discovered the oddities each provider has, various solutions to the problems this raises, as well as some debugging cleverness (nice work, Heroku!). The simplicity of a git-remote-push-deploy process is incredible, and really makes quick application development and hosting even more enjoyable!

Part #5 – Packages

Another interesting one was getting to play with node packages, the node package manager (npm), the express web framework, jade templating engine, and stylus css pre-processor, and deploying node apps with packages to cloud hosting.

Part #6 – Web-based development

The final part covered the fantastic Cloud9IDE, including a (very) basic intro to github, and how Cloud9 can still be used in developing and deploying directly to Azure, Appharbor, or Heroku.

What did I get out of it?

I really got into githubbing and OSSing, and really had to try hard to not over stretch myself as I had starting forking repos to try and make a few tweaks to things whilst working on the node month.

It has been extremely inspiring and has opened up so many other random tangents for me to explore in other projects at some other time. Very motivating stuff.

I’ve now got a month of half decent blog posts – I had only intended to do a total of 4 posts but including this one I’ve done 7, since I kept adding more information as it turned up and needed to split a few posts into two.

Also I’ve learned a bit about blogging; trying to do posts well in advance allowed me to build up the details once I’d discovered more whilst working on subsequent posts. For example, how Appharbor and Azure initially track master – but can be configured to track different branches. Also, debugging with Heroku only came up whilst working with packages in Heroku.

Link list

Node tutorials and references

Setting up a node development environment on Windows
Node Beginner – a great article, and I’ve also bought the associated eBooks.
nodejs.org – the official node site, the only place to go for reference

Understanding Javascript better

Execution in The Kingdom of Nouns
Object Orientation and Inheritance in Javascript

Appharbor

Appharbor and git

Heroku

Heroku toolbelt download and reference
node on Heroku

Azure

Checkout what Azure can do!

February – coming up, Samsung Smart TV App Development!

Yeah, seriously. How random is that?.. 🙂

Node.js 101: Part #6 – Web-Based Development

Web-Based Development

Following on from my recent post about doing something this year, I’m committing to doing 12 months of “101”s; posts and projects themed at begining something new (or reasonably new) to me

January is all about node, and I started with a basic intro, then cracked open a basic web server with content-type manipulation and basic routing, created a basic API, before getting stuck into some great deployment and hosting solutions and then an intro to using node packages including cloud deployment

In my previous posts I’ve been developing code locally, committing to a local git repo and pushing to a remote git repo. This is fine for the particular situation, but what about when I’m not at my own pc and feel the need to make some changes? Maybe I’m at my dad’s place using his netbook with no dev tools installed?

Cloud9IDE

Cloud9 is an incredible web-based development environment that is so feature-rich you’d usually expect to fork out wads of cash for the opportunity to use it: LIVE interactive collaborative development in the same shared IDE (see multiple people editing a file at once), code completion, syntax highlighting, an integrated console for those useful commands like ssh, git, npm.

It’s frikkin open source too, so you could install it on your own servers and have your own private IDE for your own code, based in a web browser. How amazing is that?

It’s built on Node.js in the back-end and javascript and HTML5 at the front. I’ve been playing around on there for the past year, and it’s been improving all the time – it’s just the best thing around. Go and start using it now. There are still some bugs, but if you find something you can always try to fix it and send a pull request!

c9-demo-1

So. That’s great for my web-based development, so how about if I need to collaborate on this project with people who I’m not sharing my C9 environment with?

GitHub

If you’re not already using github but are already using git (what the hell are you playing at?!), go and sign up for this exceptionally “powerful collaboration, review, and code management for open source and private development projects.”

You configure github as your git remote, push your code to it, and other users can pull, fork, edit, and send pull requests, so that you’re still effectively in charge of your own code repository whilst others can contribute to it or co-develop with you.

github-demo-1

Great. So how do I deploy my code if I’m using this sort of remote, web-based development environment?

Azure/AppHarbor/Heroku

Deploying to an existing Azure/Appharbor/Azure site from Cloud9IDE is the same as from your local dev pc; set up a remote and push to it! C9 has a built in terminal should the bare command line at the bottom of the screen not do it for you.

As for creating a new hosting environment, C9 also includes the ability to create them from within itself for both Azure and Heroku! I’ve actually never managed to get this working, but am quite happy to create the empty project on Heroku/Azure/Appharbor and use git from within C9 to deploy.

c9-azure-setup-1

Coming up

Next post will be the last for this first month of my Year of 101s: January Wrap-Up – Node.js 101; a summary of what I’ve learned in January whilst working with Node, as well as a roundup of the useful links I’ve used to get all of the information.

What’s in February’s 101?.. wait and see..!

Node.js 101: Part #5 – Packages

Following on from my recent post about doing something this year, I’m committing to doing 12 months of “101”s; posts and projects themed at begining something new (or reasonably new) to me

January is all about node, and I started with a basic intro, then cracked open a basic web server with content-type manipulation and basic routing, created a basic API, before getting stuck into some great deployment and hosting solutions

Node Packages

Up until now I’ve been working with node using the basic code I’ve written myself. What about if you want to create an application that utilises websockets? Or how about a Sinatra-inspired web framework to shortcut the routing and request handling I’ve been writing? Maybe you want to have a really easy to build website without having to write HTML with a nice look without writing any CSS? Like coffeescript? mocha? You gaddit.

Thanks to the node package manager you can easily import pre-built packages into your project to do alllll of these things and loads more. This command line tool (which used to be separate but is now a part of the node install itself) can install the packages in a ruby gem-esque/.Net nuget fashion, pulling down all the dependencies automatically.

Example usage:
[code]npm install express -g[/code]

The packages (compiled C++ binaries, just like node itself) are pulled either into your working directory (local node_modules folder) or as a global package (with the “-g” parameter). You then reference the packages in your code using “requires”.

Or you can install everything your project needs at once by creating a package.json e.g.:
[code]{
"name": "basic-node-package",
"version": "0.0.1",
"dependencies": {
"express": "*",
"jade": "*",
"stylus": "*",
"nib": "*"
}
}[/code]

And then call [code]npm install[/code]

A great intro to using these four packages can be found on the clock website

I’ve decided to write a wrapper for my basic node API using express, jade, stylus, and nib. All I’m doing is call the api and displaying the results on a basic page. The HTML is being written in jade and the css in stylus & nib. Routing is being handled by express.

app.js
[js]var express = require(‘express’)
, stylus = require(‘stylus’)
, nib = require(‘nib’)
, proxy = require(‘./proxy’)

var app = express()
function compile(str, path) {
return stylus(str)
.set(‘filename’, path)
.use(nib())
}
app.set(‘views’, __dirname + ‘/views’)
app.set(‘view engine’, ‘jade’)
app.use(express.logger(‘dev’))
app.use(stylus.middleware(
{ src: __dirname + ‘/public’
, compile: compile
}
))
app.use(express.static(__dirname + ‘/public’))

var host = ‘rposbo-basic-node-api.azurewebsites.net’;

app.get(‘/products/:search/:key’, function (req,response) {
console.log("Request handler ‘products’ was called");

var requestPath = ‘/products/’ + req.params.search + ‘?key=’ + req.params.key;

proxy.getRemoteData(host, requestPath, function(json){
var data = JSON.parse(json);

response.render(‘products’,
{
title: ‘Products for’ + data.category,
products: data.products,
key: req.params.key
}
);
})
});

app.get(‘/product/:id/:key’, function (req,response) {
console.log("Request handler ‘product’ was called");

var requestPath = ‘/product/’ + req.params.id + ‘?key=’ + req.params.key;

proxy.getRemoteData(host, requestPath, function(json){
var data = JSON.parse(json);

response.render(‘product’,
{
title: data.title,
product: data
}
);
})
});

app.get(‘/’, function (req,response) {
console.log("Request handler ‘index’ was called");
response.end("Go");
});

app.listen(process.env.PORT);
[/js]

So that file sets up the express, jade, and stylus references and wires up the routes for /products/ and /product/ which then make a call using my old proxy.js to the API; I can probably do all of this with a basic inline http get, but I’m just reusing it for the time being.

Notice how the route “/products/:search/:key” which would actually be something like “/products/jeans/myAp1k3Y” is referenced using req.params.search and req.params.key.

Then all I’m doing is making the API call, parsing the returned JSON and passing that parsed object to the view.

The views are written in jade and have a main shared one:
layout.jade
[code]!!!5
html
head
title #{title}
link(rel=’stylesheet’, href=’/stylesheets/style.css’)
body
header
h1 basic-node-packages
.container
.main-content
block content
.sidebar
block sidebar
footer
p Running on node with Express, Jade and Stylus[/code]

Then the route-specific ones:

products.jade:
[code]extend layout
block content
p
each product in products
li
a(href=’/product/’ + product.id + ‘/’ + key)
img(src=product.image)
p
=product.title[/code]

and

product.jade:
[code]extend layout
block content
p
img(src=product.image)
li= product.title
li= product.price[/code]

The stylesheet is written in stylus & nib:

style.styl
[css]/*
* Import nib
*/
@import ‘nib’

/*
* Grab a custom font from Google
*/
@import url(‘http://fonts.googleapis.com/css?family=Quicksand’)

/*
* Nib provides a CSS reset
*/
global-reset()

/*
* Store the main color and
* background color as variables
*/
main-color = #fa5b4d
background-color = #faf9f0

body
font-family ‘Georgia’
background-color background-color
color #444

header
font-family ‘Quicksand’
padding 50px 10px
color #fff
font-size 25px
text-align center

/*
* Note the use of the `main-color`
* variable and the `darken` function
*/
background-color main-color
border-bottom 1px solid darken(main-color, 30%)
text-shadow 0px -1px 0px darken(main-color, 30%)

.container
margin 50px auto
overflow hidden

.main-content
float left

p
margin-bottom 20px

li
width:290
float:left

p
line-height 1.8

footer
margin 50px auto
border-top 1px dotted #ccc
padding-top 5px
font-size 13px[/css]

And this is compiled into browser-agnostic css upon compilation of the app.

The other files used:

proxy.js:
[js]var http = require(‘http’);

function getRemoteData(host, requestPath, callback){

var options = {
host: host,
port: 80,
path: requestPath
};

var buffer = ”;
var request = http.get(options, function(result){
result.setEncoding(‘utf8’);

result.on(‘data’, function(chunk){
buffer += chunk;
});

result.on(‘end’, function(){
callback(buffer);
});
});

request.on(‘error’, function(e){console.log(‘error from proxy call: ‘ + e.message)});
request.end();
};
exports.getRemoteData = getRemoteData;[/js]

package.json
[js]{
"name": "basic-node-package",
"version": "0.0.1",
"dependencies": {
"express": "*",
"jade": "*",
"stylus": "*",
"nib": "*"
}
}[/js]

web.config
[xml]<configuration>
<system.web>
<compilation batch="false" />
</system.web>
<system.webServer>
<handlers>
<add name="iisnode" path="app.js" verb="*" modules="iisnode" />
</handlers>
<iisnode loggingEnabled="false" />

<rewrite>
<rules>
<rule name="myapp">
<match url="/*" />
<action type="Rewrite" url="app.js" />
</rule>
</rules>
</rewrite>
</system.webServer>
</configuration>[/xml]

All of these files are, as usual, on Github

Deployment with Packages

Something worth bearing in mind is that deploying something which includes packages and the result of packages (e.g. minified js or css from styl) requires all of these artifacts to be added into your git repo before deployment to certain hosts such as Appharbor and Azure; Heroku will actually run an npm install as part of the deployment step, I believe, and also compile the .styl into .css, unlike Azure/Appharbor.

The files above give a very basic web interface to the /products/ and /product/ routes:
asos-jade-products-1

asos-jade-product-1

Coming up

Web-based node development and deployment!

Your New Year Resolution 2013 – JOIN ME!

I’m bored. Let’s do something. You and me. Let’s make something fun and educational. Something you’re proud of and enjoyed being a part of.

What on Earth am I talking about?!

For example:

Code52

Downmarker

I really liked the Code52 idea, but that succumbed to everyone involved being human and not able to actually commit to a new coding project every single week for a whole year. Very very ambitious.

What amazing things came out of code52?

  • some really wonderful pieces of open source software (Markpad, one of the first, got me into Markdown which resulted in my sublimemarkpress sublimetext plugin)
  • explained concepts such as OSS and git (or github) in a very easy to understand and welcoming way; if this didn’t get you to fork a repo and learn git, nothing will
  • got people enthusiastic about collaborating on interesting and small projects; big projects are hard to commit time to and hard to join later on

I applaud their efforts and the fact that they couldn’t commit to literally 52 projects in one year in no way detracts from their achievements. Bravo, code52, bravo.

7DFPS

What about the 7 Day FPS challenge? Create a first person shooter in 7 days!

7DFPS - Sub Rosa

Sub Rosa is a fantastic (if extremely blocky) multiplayer game, with a pretty complex city to wander around and an actual 3 team “plot” (get item – from team 1 – into briefcase – held by team 2. Team 3 must stop them. Or something)

The Plan

Why don’t we start something like that? Something a bit educational and for future reference; the sort of thing you can point your new junior developer to when they have a few spare minutes to help build their skillz up, but nothing too taxing for the contributors

Potential projects

Year of GoF

How about a project for example/reference implementations of the Gang of Four Design Pattern in various languages; one a month for all of 2013 (and almost all of 2014, if you like).

For example, January could be Strategy Month, February is Observer Month. Contributers submit example implementations in a language of their choice, and the we try to document the best in each language. The examples should all be hosted on github/codeplex

Kinect 2013

Got a Kinect for Windows? What stuff can we make with it, one a month?

RaspberryPi’13

RaspberryPi’s – what are they good for? Let’s find out. 12 projects over 2013.

Anyone fancy it? Any suggestions?

Scripting the setup of a developer PC, Part 3 of 4 – Installing.. uh.. everything.. with Chocolatey.

This is part three of a four part series on attempting to automate installation and setup of a development PC with a few scripts and some funky tools. If you haven’t already, why not read the introductory post about ninite or even the second part about the command line version of WebPI? Disclaimer: this series was inspired by a blog from Maarten Balliauw.

Installing.. uh.. everything..: Chocolatey

Chocolatey is sort of “apt-get for windows” using powershell; it doesn’t quite achieve that yet, but the idea is the same; imagine nuget + apt-get. It works exactly like nuget but is meant to install applications instead of development components. The next release will support webpi from within chocolatey, but more on that in a moment.

There’s not much to look at yet, but that’s the point; you just type what you want and it’ll find and install it and any dependencies. I want to install virtualclonedrive, some sysinternals goodies, msysgit, fiddler, and tortoisesvn.

Before you start, make sure you’ve relaxed Powershell’s execution policy to allow remote scripts:
[powershell]Set-ExecutionPolicy Unrestricted[/powershell]

Ok, now we can get on with it. I can now execute a new powershell script to install choc and those apps:

[powershell]# Chocolatey
iex ((new-object net.webclient).DownloadString(‘http://bit.ly/psChocInstall’))

# install applications
cinst virtualclonedrive
cinst sysinternals
cinst msysgit
cinst fiddler
cinst tortoisesvn[/powershell]

This script will download (DownloadString) and execute (iex) the chocolatey install script from the bit.ly URL, which is just a powershell script living in github:
https://raw.github.com/chocolatey/chocolatey/master/chocolateyInstall/InstallChocolatey.ps1

This powershell script currently resolves the location of the chocolatey nuget package:
http://chocolatey.org/packages/chocolatey/DownloadPackage

Then, since a nupkg is basically a zip file, the chocolatey script unzips it to your temp dir and fires off chocolateyInstall.ps1; this registers all of the powershell modules that make up chocolatey. The chocolatey client is essentially a collection of clever powershell scripts that wrap nuget!

Once chocolatey is installed, the above script will fire off “cinst” – an alias for “chocolatey install” – to install each listed application.

What’s even more awesome is that the latest – not yet on the “master” branch – version of Chocolatey can install using webpi. To get this beta version, use the extremely terse and useful command from Mr Chocolatey himself, Rob Reynolds (@ferventcoder):

Adding in the install of this beta version allows me to use choc for a few more webpi components:

[powershell]# Chocolatey
iex ((new-object net.webclient).DownloadString(‘http://bit.ly/psChocInstall’))

# install applications
cinst virtualclonedrive
cinst sysinternals
cinst msysgit
cinst fiddler
cinst tortoisesvn

# getting the latest build for webpi support: git clone git://github.com/chocolatey/chocolatey.git | cd chocolatey | build | cd _{tab}| cinst chocolatey -source %cd%
# I’ve already done this and the resulting nugetpkg is also saved in the same network directory:
cinst chocolatey –source “Z:\Installation\SetupDevPC\”

# Now I’ve got choc I may as well use it to install a bunch of other stuff from WebPI;
# things that didn’t always work when I put them in the looong list of comma delimited installs
# IIS
cinst IIS7 -source webpi
cinst ASPNET -source webpi
cinst BasicAuthentication -source webpi
cinst DefaultDocument -source webpi
cinst DigestAuthentication -source webpi
cinst DirectoryBrowse -source webpi
cinst HTTPErrors -source webpi
cinst HTTPLogging -source webpi
cinst HTTPRedirection -source webpi
cinst IIS7_ExtensionLessURLs -source webpi
cinst IISManagementConsole -source webpi
cinst IPSecurity -source webpi
cinst ISAPIExtensions -source webpi
cinst ISAPIFilters -source webpi
cinst LoggingTools -source webpi
cinst MetabaseAndIIS6Compatibility -source webpi
cinst NETExtensibility -source webpi
cinst RequestFiltering -source webpi
cinst RequestMonitor -source webpi
cinst StaticContent -source webpi
cinst StaticContentCompression -source webpi
cinst Tracing -source webpi
cinst WindowsAuthentication -source webpi[/powershell]

Best bit about this? When you run the first command you’ll download and install the latest version of the specified executable. When this succeeds you’ll get:

[code] has finished successfully! The chocolatey gods have answered your request![/code]

Nice.

You’ll hopefully see your Powershell window update like this a few times:
choc_install (click to embiggen)

But depending on your OS version (I’m using Windows Server 2008 R2) you might see a few alerts about the unsigned drivers you’re installing:
choc_alert

That doesn’t seem to be avoidable, so just click to install and continue.

You might also find that your own attempts to install the beta version of chocolatey fail with errors like these:
choc_install_choc_fail1
or
choc_install_choc_fail2 (click to embiggen)

This is due to how you reference the directory in which your beta choc nuget package lives. If you reference it from a root dir (e.g. “Z:\”) then it’ll fail. Put it in a subdirectory and you’re golden:
choc_install_choc_success2
or using “%cd%” as the source dir (assuming you’re already in that dir):
choc_install_choc_success1

So, with my new powershell script and the beta chocolatey nupkg, along with the existing script for ninite, webpi and their components, my PC Setup directory now looks like this:

281211_autoinstall_choc_dir_contents

The last part of this series focuses on installing other things that either can’t be done or just didn’t work using one of the previous options, a list of “interesting things encountered”, and a conclusion to the whole project; see you back in:

Scripting the setup of a developer PC, Part 4 of 4 – Installing Custom Stuff, Interesting Things Encountered, and Conclusion.

Update: The chocolatey “beta” I mentioned is actually now in the mainline.