Year of 101s: February – Samsung Smart TV

Part #1 – Intro

I’m committing to doing 12 months of “101”s; posts and projects themed at beginning something new (or reasonably new) to me. January was all about node development awesomeness

February is going to be all about developing applications for the Samsung Smart TV.

So what’s a Smart TV?

smart-tv-1

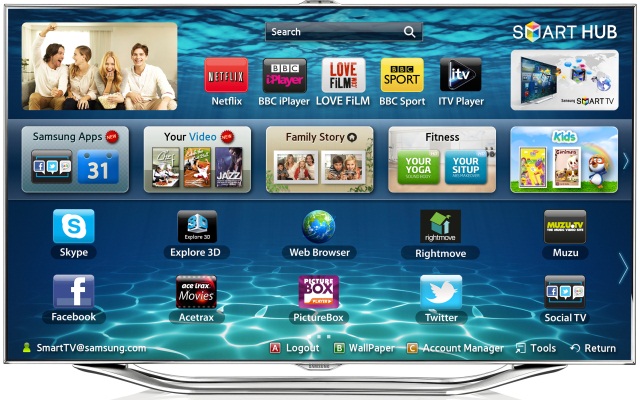
“Smart TV” is a term used to describe a reasonably new series of internet connected televisions introduced over the past 3 or 4 years which have the facility to install applications; these can range from media streaming (e.g., free stuff from iPlayer, ITV Player, Demand 5, youtube and premium content from the likes of BlinkBox, LoveFilm, NetFlix, Curzon OD) to video chat and VOIP (e.g., Skype), and games, facebook, twitter, TED.

There are hundreds of such applications to choose from: even a pretend log fire. Srsly.

They will also stream media from your local network (DLNA or UPNP) or from USB attached devices, and some can use a USB HDD to make it a PVR.

Samsung?

Yeah, just because I have one. They started making clever TVs back in 2007 so have it working pretty well now. I also have a Samsung phone which makes streaming content to the TV (over DLNA) really easy. It’s great to take a few photos or videos on my phone and then promptly have them appear as a slideshow on the TV.

Apps

The apps that run on the Samsung TV are basically HTML pages; the app hub itself is an html page. They can be made interactive by using either javascript or flash (yes! FLASH! Who knew that was still useful for something?!).

They can be downloaded directly from the TV’s “Smart Hub” but can also be browsed online – the array and extent of what’s been made is fascinating; this is stuff you can install on your frikkin television! This is not like the TV I grew up with..
80s-tv-set-1

The apps can be developed using an SDK downloadable from Samsung, which I’ll go into detail about in the next post.

Interactivity

So wait, how can you create an interactive app using Javascript, but browsing a local html file? Everyone knows that you can’t make a cross domain ajax request, so how on earth can you get dynamic data into the page?

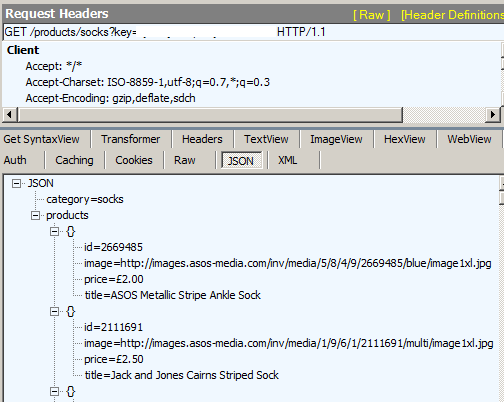
Well, here’s the interesting thing. If you run Fiddler you’ll see that running a cross domain ajax request from a local html file actually does the request just fine and the data is returned; it’s your browser’s security configuration that says “hell no, budday.”

local html making remote ajax call:

<html>
<script src="https://ajax.googleapis.com/ajax/libs/jquery/1.9.0/jquery.min.js"></script>
<script>
$(document).ready(function(){
	$.ajax({
	  url: "http://rposbo-basic-node-api.apphb.com/products/socks?key={snipped API key}",
	  success: function(data) {
	    $('#category').html('<h1>' + data.category + '</h1>');
	  }
	})
});
</script>
<body>
<div id="category" />
</body>
</html>

Chrome says no
remote-ajax-chrome-block

Fiddler says yes!
remote-ajax-fiddler-allows

App Engine

The Samsung Smart TV (at time of writing) runs a specific browser called App Engine 6.0 – from the blurb in the development documentation:

When an application is displayed and behaves on the screen, its image and text generation should be controlled and managed. For Samsung TVs with Samsung Smart TV installed, it is App Engine that performs such work. An application’s behaviors and displays are made by App Engine. While Internet Explorer and Firefox are PC-based browsers, App Engine is Samsung TV-based browser.

Supported web standards
* HTML4.01, XHTML1.0, XML1.0 Markup language specifications
* HTTP1.0/1.1
* CSS1, CSS2, CSS TV Profile 1.0
* DOM1, DOM2
* JavaScript 1.6

So, the interesting part is that the cross domain ajax request security feature isn’t enabled in App Engine, which means you can execute ajax calls from the local html page to your external service and use the returned data quite happily!

Next up – App development

I’ll cover the IDE and creating a basic app.

Scripting the setup of a developer PC, Part 3 of 4 – Installing.. uh.. everything.. with Chocolatey.

This is part three of a four part series on attempting to automate installation and setup of a development PC with a few scripts and some funky tools. If you haven’t already, why not read the introductory post about ninite or even the second part about the command line version of WebPI? Disclaimer: this series was inspired by a blog from Maarten Balliauw.

Installing.. uh.. everything..: Chocolatey

Chocolatey is sort of “apt-get for windows” using powershell; it doesn’t quite achieve that yet, but the idea is the same; imagine nuget + apt-get. It works exactly like nuget but is meant to install applications instead of development components. The next release will support webpi from within chocolatey, but more on that in a moment.

There’s not much to look at yet, but that’s the point; you just type what you want and it’ll find and install it and any dependencies. I want to install virtualclonedrive, some sysinternals goodies, msysgit, fiddler, and tortoisesvn.

Before you start, make sure you’ve relaxed Powershell’s execution policy to allow remote scripts:

Set-ExecutionPolicy Unrestricted

Ok, now we can get on with it. I can now execute a new powershell script to install choc and those apps:

# Chocolatey
iex ((new-object net.webclient).DownloadString('http://bit.ly/psChocInstall'))

# install applications
cinst virtualclonedrive
cinst sysinternals
cinst msysgit
cinst fiddler
cinst tortoisesvn

This script will download (DownloadString) and execute (iex) the chocolatey install script from the bit.ly URL, which is just a powershell script living in github:
https://raw.github.com/chocolatey/chocolatey/master/chocolateyInstall/InstallChocolatey.ps1

This powershell script currently resolves the location of the chocolatey nuget package:
http://chocolatey.org/packages/chocolatey/DownloadPackage

Then, since a nupkg is basically a zip file, the chocolatey script unzips it to your temp dir and fires off chocolateyInstall.ps1; this registers all of the powershell modules that make up chocolatey. The chocolatey client is essentially a collection of clever powershell scripts that wrap nuget!

Once chocolatey is installed, the above script will fire off “cinst” – an alias for “chocolatey install” – to install each listed application.

What’s even more awesome is that the latest – not yet on the “master” branch – version of Chocolatey can install using webpi. To get this beta version, use the extremely terse and useful command from Mr Chocolatey himself, Rob Reynolds (@ferventcoder):

Adding in the install of this beta version allows me to use choc for a few more webpi components:

# Chocolatey
iex ((new-object net.webclient).DownloadString('http://bit.ly/psChocInstall'))

# install applications
cinst virtualclonedrive
cinst sysinternals
cinst msysgit
cinst fiddler
cinst tortoisesvn

# getting the latest build for webpi support: git clone git://github.com/chocolatey/chocolatey.git | cd chocolatey | build | cd _{tab}| cinst chocolatey -source %cd%
# I’ve already done this and the resulting nugetpkg is also saved in the same network directory: 
cinst chocolatey –source "Z:\Installation\SetupDevPC\"

# Now I’ve got choc I may as well use it to install a bunch of other stuff from WebPI;
# things that didn’t always work when I put them in the looong list of comma delimited installs
# IIS
cinst IIS7 -source webpi
cinst ASPNET -source webpi
cinst BasicAuthentication -source webpi
cinst DefaultDocument -source webpi
cinst DigestAuthentication -source webpi
cinst DirectoryBrowse -source webpi
cinst HTTPErrors -source webpi
cinst HTTPLogging -source webpi
cinst HTTPRedirection -source webpi
cinst IIS7_ExtensionLessURLs -source webpi
cinst IISManagementConsole -source webpi
cinst IPSecurity -source webpi
cinst ISAPIExtensions -source webpi
cinst ISAPIFilters -source webpi
cinst LoggingTools -source webpi
cinst MetabaseAndIIS6Compatibility -source webpi
cinst NETExtensibility -source webpi
cinst RequestFiltering -source webpi
cinst RequestMonitor -source webpi
cinst StaticContent -source webpi
cinst StaticContentCompression -source webpi
cinst Tracing -source webpi
cinst WindowsAuthentication -source webpi

Best bit about this? When you run the first command you’ll download and install the latest version of the specified executable. When this succeeds you’ll get:

 <thing> has finished successfully! The chocolatey gods have answered your request!

Nice.

You’ll hopefully see your Powershell window update like this a few times:
choc_install (click to embiggen)

But depending on your OS version (I’m using Windows Server 2008 R2) you might see a few alerts about the unsigned drivers you’re installing:
choc_alert

That doesn’t seem to be avoidable, so just click to install and continue.

You might also find that your own attempts to install the beta version of chocolatey fail with errors like these:
choc_install_choc_fail1
or
choc_install_choc_fail2 (click to embiggen)

This is due to how you reference the directory in which your beta choc nuget package lives. If you reference it from a root dir (e.g. “Z:\”) then it’ll fail. Put it in a subdirectory and you’re golden:
choc_install_choc_success2
or using “%cd%” as the source dir (assuming you’re already in that dir):
choc_install_choc_success1

So, with my new powershell script and the beta chocolatey nupkg, along with the existing script for ninite, webpi and their components, my PC Setup directory now looks like this:

281211_autoinstall_choc_dir_contents

The last part of this series focuses on installing other things that either can’t be done or just didn’t work using one of the previous options, a list of “interesting things encountered”, and a conclusion to the whole project; see you back in:

Scripting the setup of a developer PC, Part 4 of 4 – Installing Custom Stuff, Interesting Things Encountered, and Conclusion.

Update: The chocolatey “beta” I mentioned is actually now in the mainline.

Scripting the setup of a developer PC, Part 1 of 4 – Installing Applications & Utilities with Ninite

Setting up a development PC can be a bit of a pain, unless you’re smart and create an image following the setup of a brand new vanilla install. But who’s organised enough to do that?! I’ll get onto that option in another post, but this one is more an excuse to play with interesting stuff.

I thought I’d have a play with coding up a set of scripts to do as much of this setup as possible instead; there are a few tools out there to do this sort of thing, and I’ve gone with ninite, webpi, and chocolatey.


I’ll start with the intended ideal option for each tool, and then go into how this doesn’t work perfectly and why, and what the other options are. Part 1 of this series of 4 is for the easiest tool of all:


Installing Applications & Utilities: ninite

This site allows you to create a single exe installer which contains your own selection of a large number of applications/frameworks/utilities:

232111_autoinstall_ninite_web

For an ASP.Net developer PC I’ve gone with Chrome, Safari, Opera, Firefox, Skype, VLC, Flash, Air, Java, Silverlight, Launchy, 7-Zip, WinSCP, PuTTY, Notepad++, WinMerge, Paint.NET, PDFCreator, Reader, DropBox, and Everything Search for my installer. This installer can be called from the command line but the basic version still opens a graphical interface; however no interaction is required. The Pro version comes with a command line installer, but I’ll not be using that.

Ninite Pro is absolutely awesome: you can remotely manage installed software and software patches within your network with a silent install process.

232111_autoinstall_ninite_pro


So far my install script set looks like this; pretty bare:

[batch]@echo off
REM Ninite stuff
cmd /C Z:\Installation\SetupDevPC\Ninite_DevPC_Utils.exe[/batch]

And the installation directory is merely one script and one exe:

281211_autoinstall_ninite_dir_contents

That was dead simple! Lovely! Coming up next – something a bit messier:

Scripting the setup of a developer PC, Part 2 of 4 – Installing Frameworks and Components with WebPI.